• Skip to primary navigation
  • Skip to main content
  • Skip to primary sidebar
  • Skip to footer

The Nourishing Gourmet

Nourishing. Satisfying. Gourmet.

  • THM Coaching
  • About
    • Privacy
    • Contact
  • Recipes
  • Cookbooks
    • Everyday Nourishing Food
    • Salad Cookbook
    • Soup Cookbook

Desserts

Easy Mint Chocolate Fudge (Dairy and Gluten free)

December 12, 2014 by April Swiger 23 Comments

Mint Chocolate Fudge (dairy and gluten free)

By April Swiger, Contributing Writer

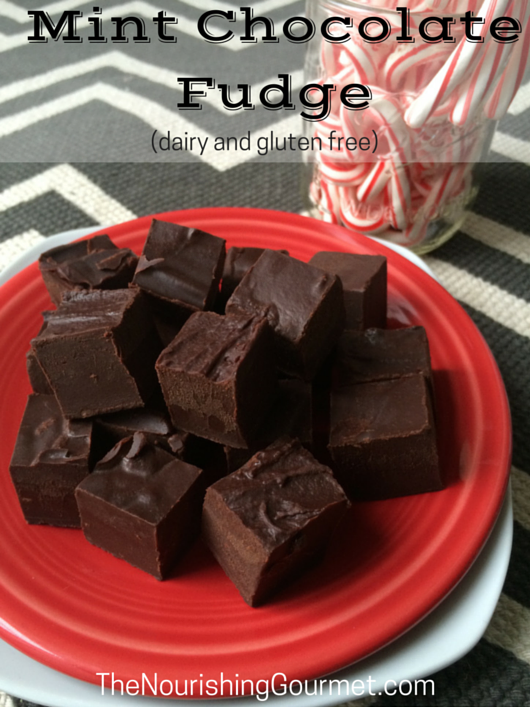
Velvety smooth fudge, rich in chocolate, mingled with refreshing peppermint is a must-try this season. This mint chocolate fudge is the perfect way to satisfy a craving, or finish off a hearty meal this holiday season. Even better it’s surprisingly quick to make, and can be boxed up easily to give as a lovely gift.

I am a huge fan of fudge. It’s always my go-to treat during summer vacations at the beach, and my top pick off the Christmas dessert table. The first time I made fudge at home I used Kimi’s recipe for the easiest, healthiest, most scrumptious fudge ever (also see this version using maple syrup). It definitely lived up to its name, and I have made it many times since then to satisfy those pesky little chocolate cravings. I love that her recipe, and the one I created as well, is free from refined sugar, dairy, gluten, and all other kinds of yucky ingredients the more typical fudge recipes have. This version starts with chocolate chips instead of cocoa powder for a more stable fudge for gift giving.

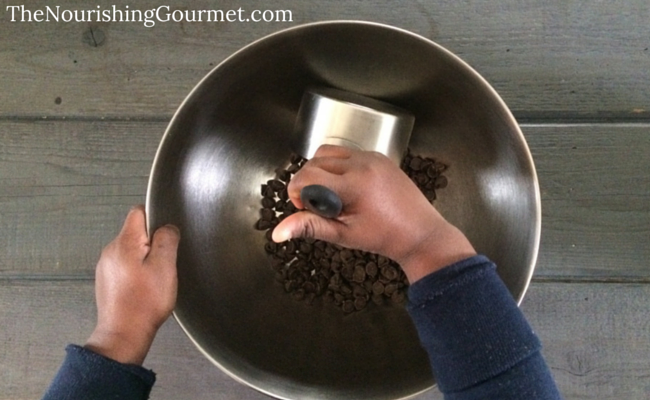
My 3 year old son is a major chocolate lover. He saw me pull out my bag of chips and immediately wanted to help with whatever I was doing. I purposefully made this recipe as simple as possible because, well, life can be a bit crazy with a toddler in tow…especially during the holiday season! He had so much fun helping me dump all the ingredients into a big bowl (not as much as he enjoyed trying to finished product though). I received a hearty “yum yum yummy in my tum tum tummy!” after his first bite 🙂

Mint Chocolate Fudge (dairy and gluten free)

There are some fantastic chocolate chips on the market that are completely allergy free, and would be a great option for this recipe. I have used the Enjoy Life Brand of chocolate chips, which are very allergy friendly, a number of times and find the flavor and texture top notch!

You can use either the (Affiliate links)  Semi-Sweet chocolate chips, or the dark chocolate chips in this recipe. Truly though, any chocolate of your choice should work, and the amount of honey you add to sweeten the recipe can be adjusted to your liking as well. I used Frontier’s Natural Mint Extract for flavoring my fudge, and it was delicious!

Homemade gifts are some of my favorite to give. Even the most frugal and simple recipe can be made extra special with its presentation. This fudge wrapped in parchment paper, tied up in colorful bakers twine, and a special box makes for a very thoughtful gift.

Other healthy, and homemade, gifts you may enjoy:

  • Homemade and healthy food gift list 
  • Silky Maple Chocolate Fudge
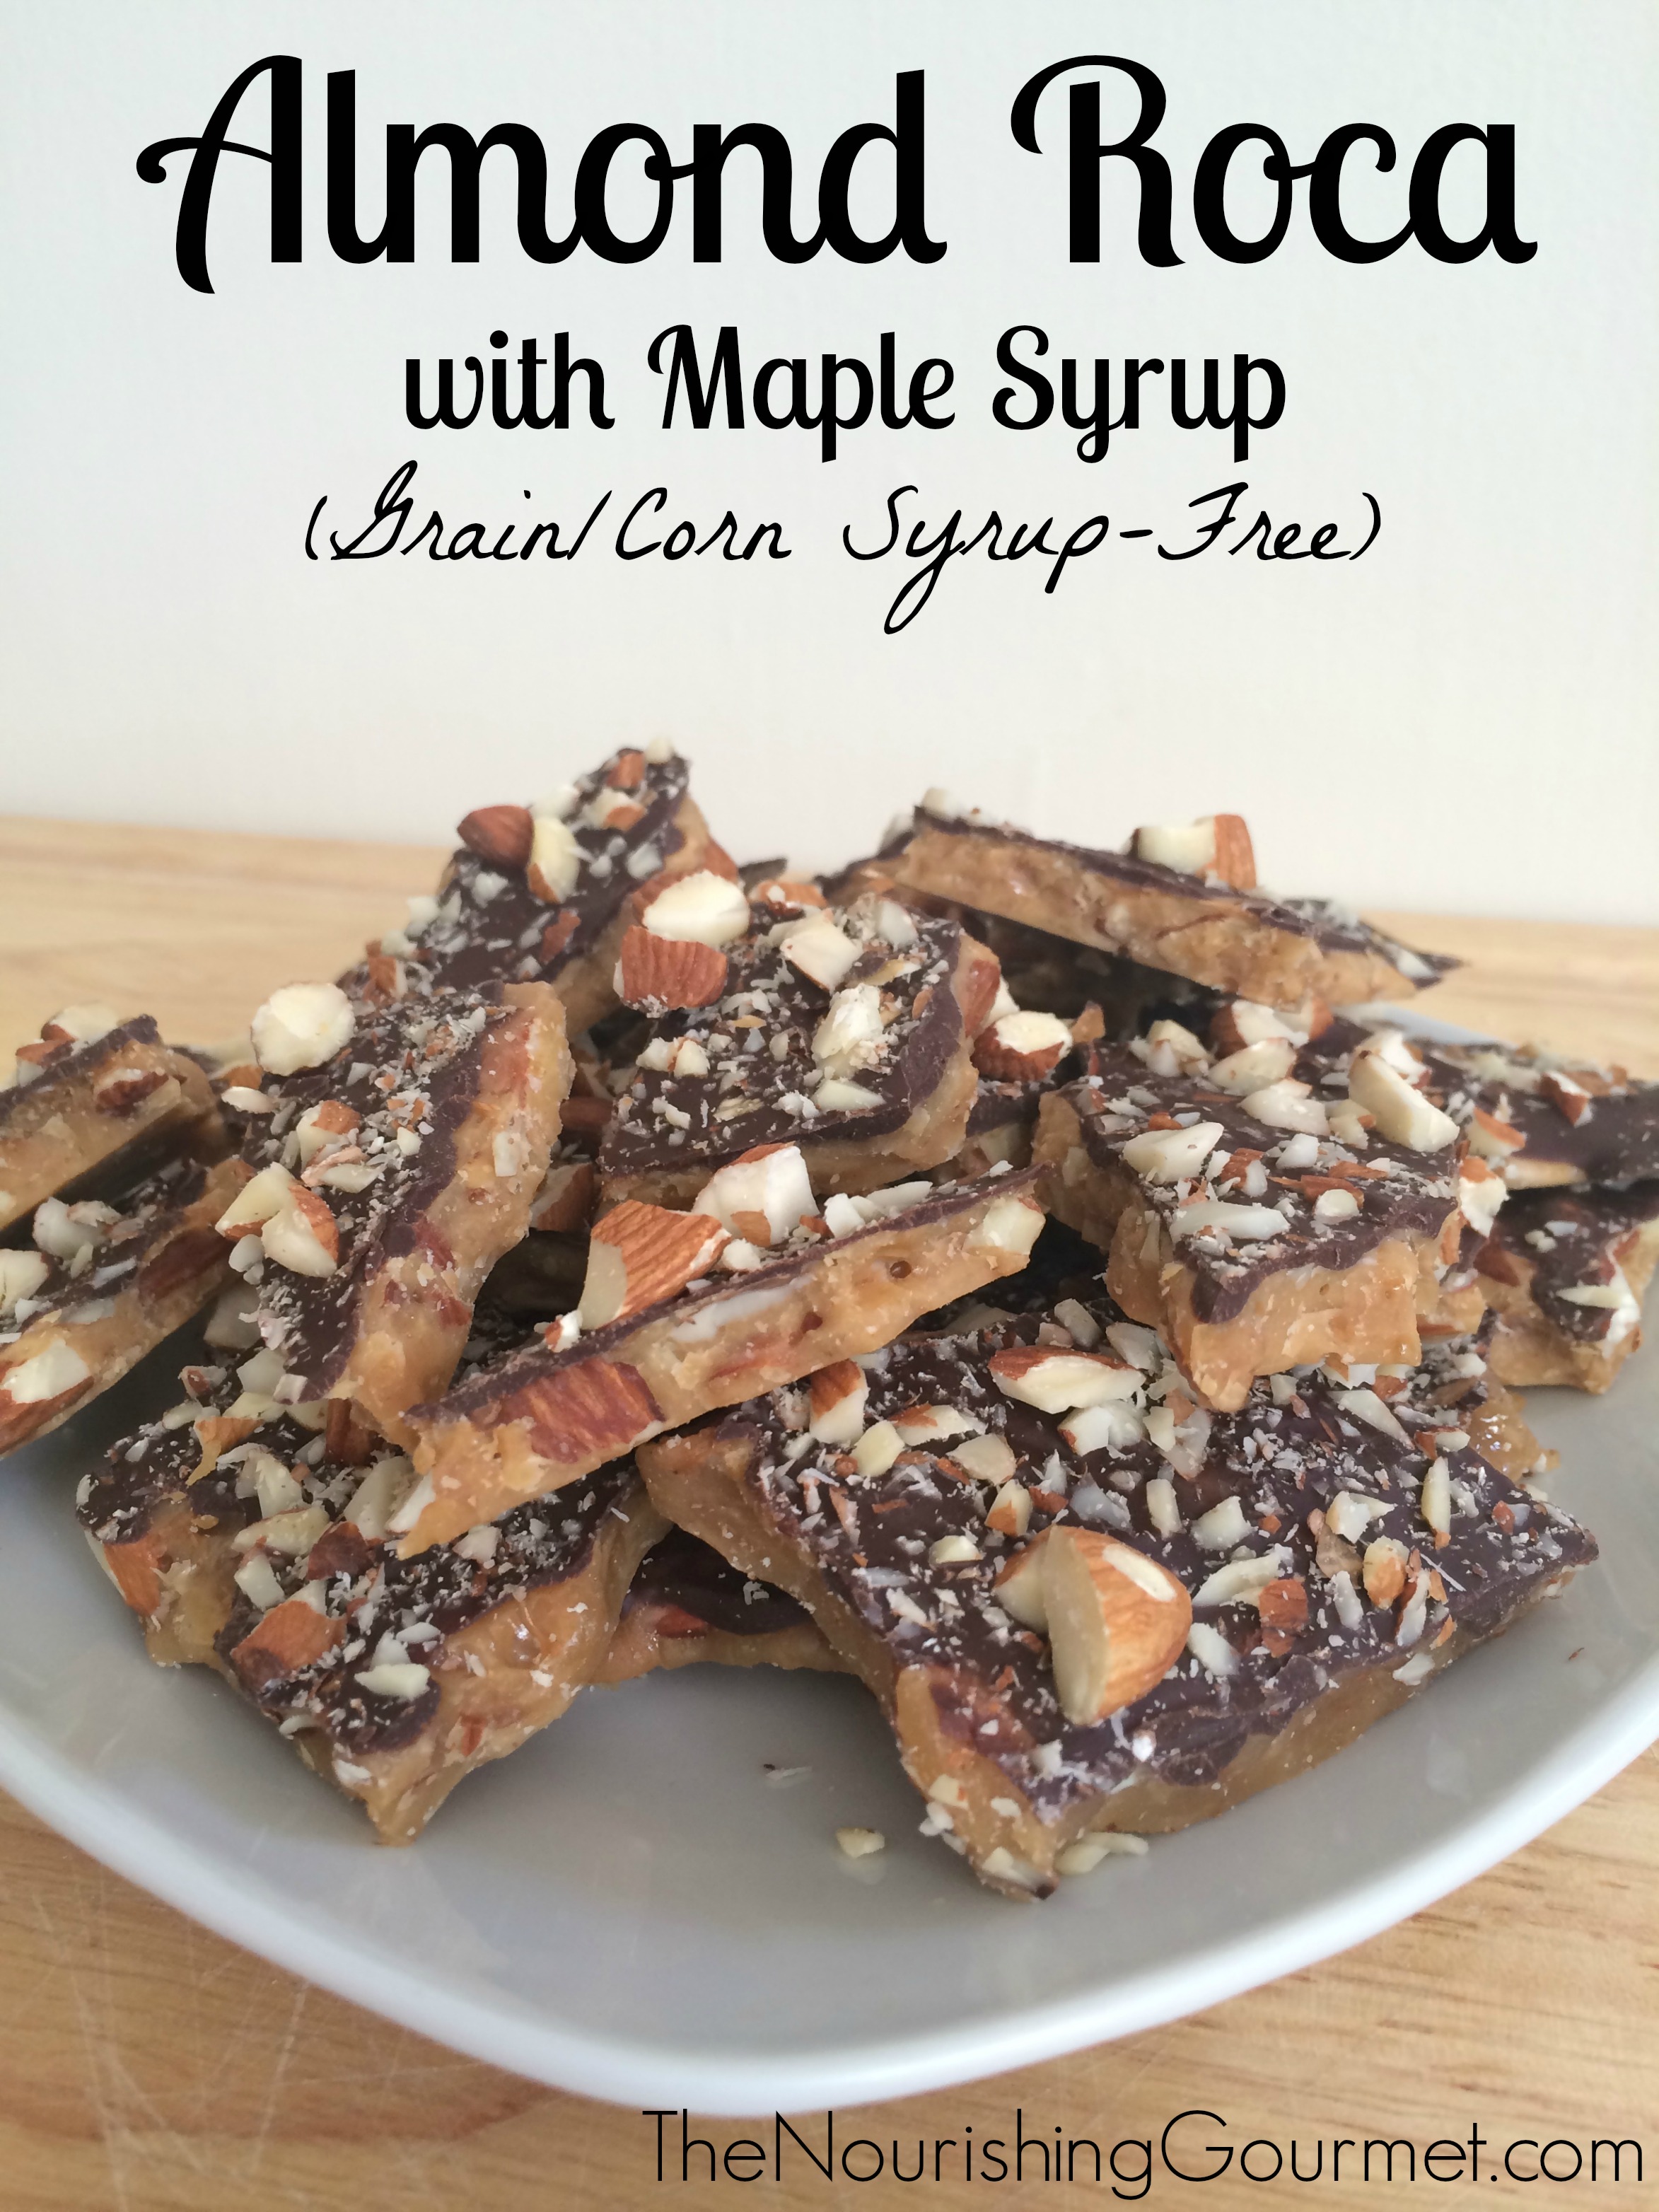
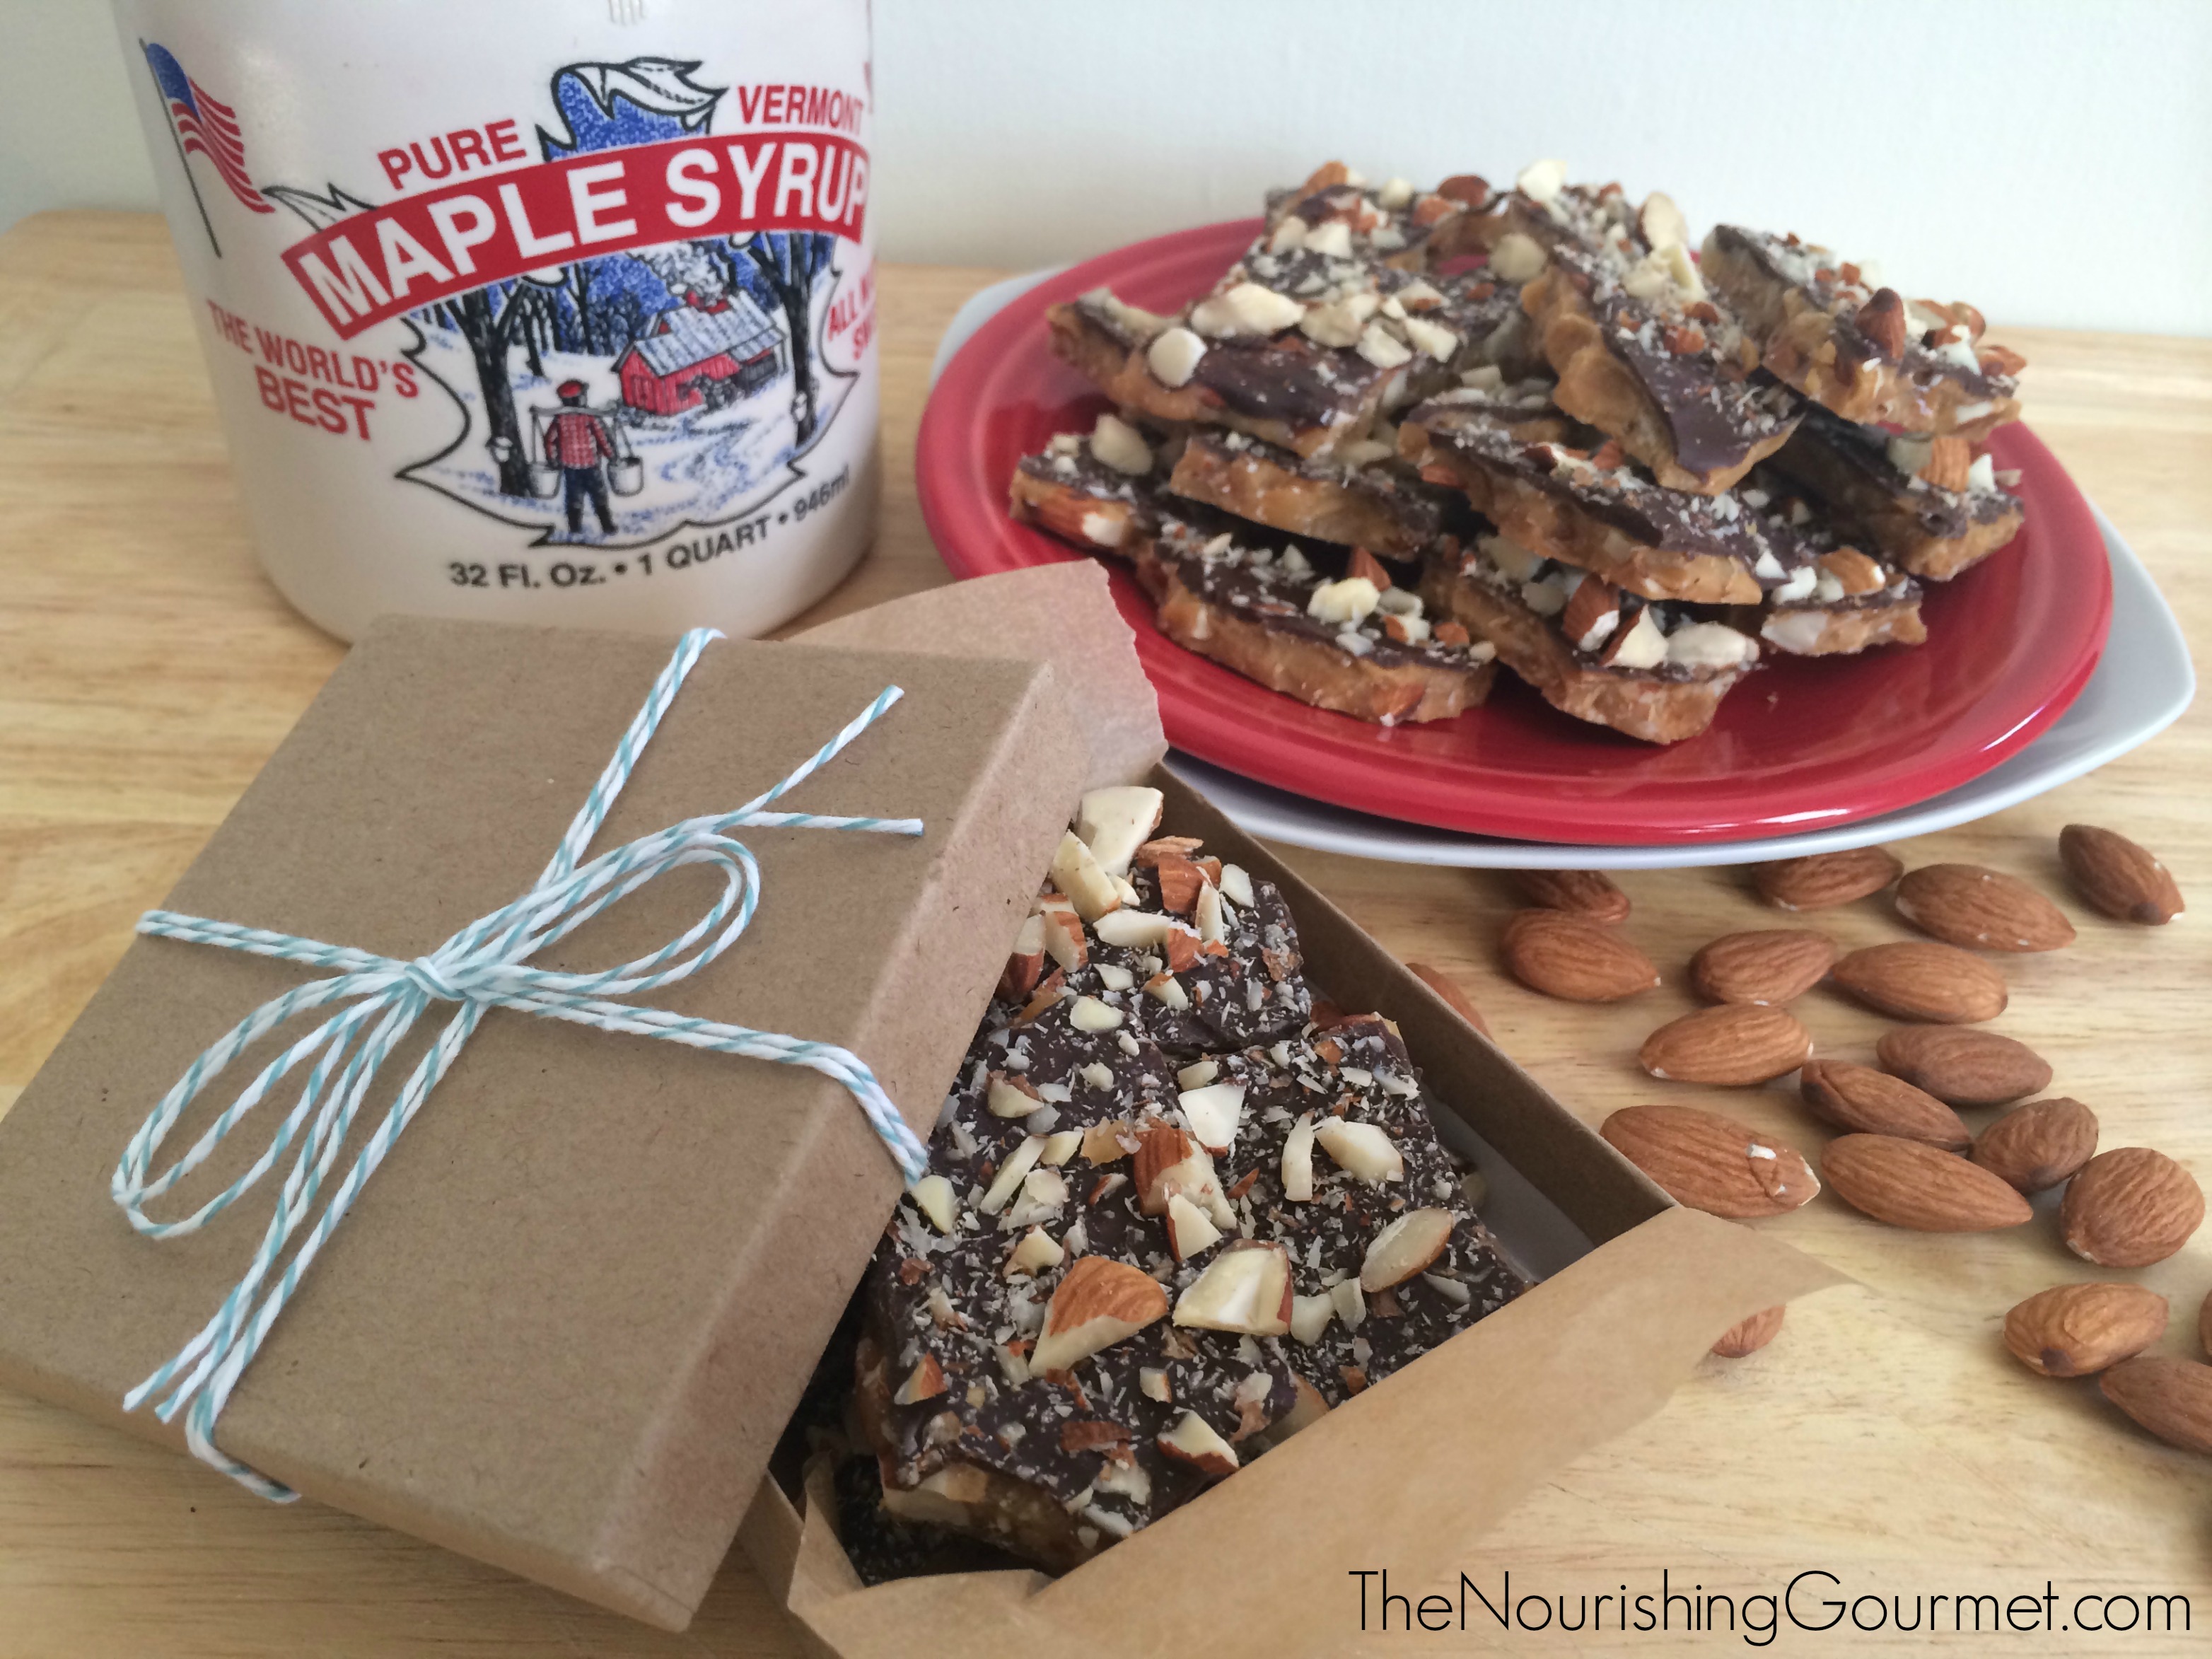
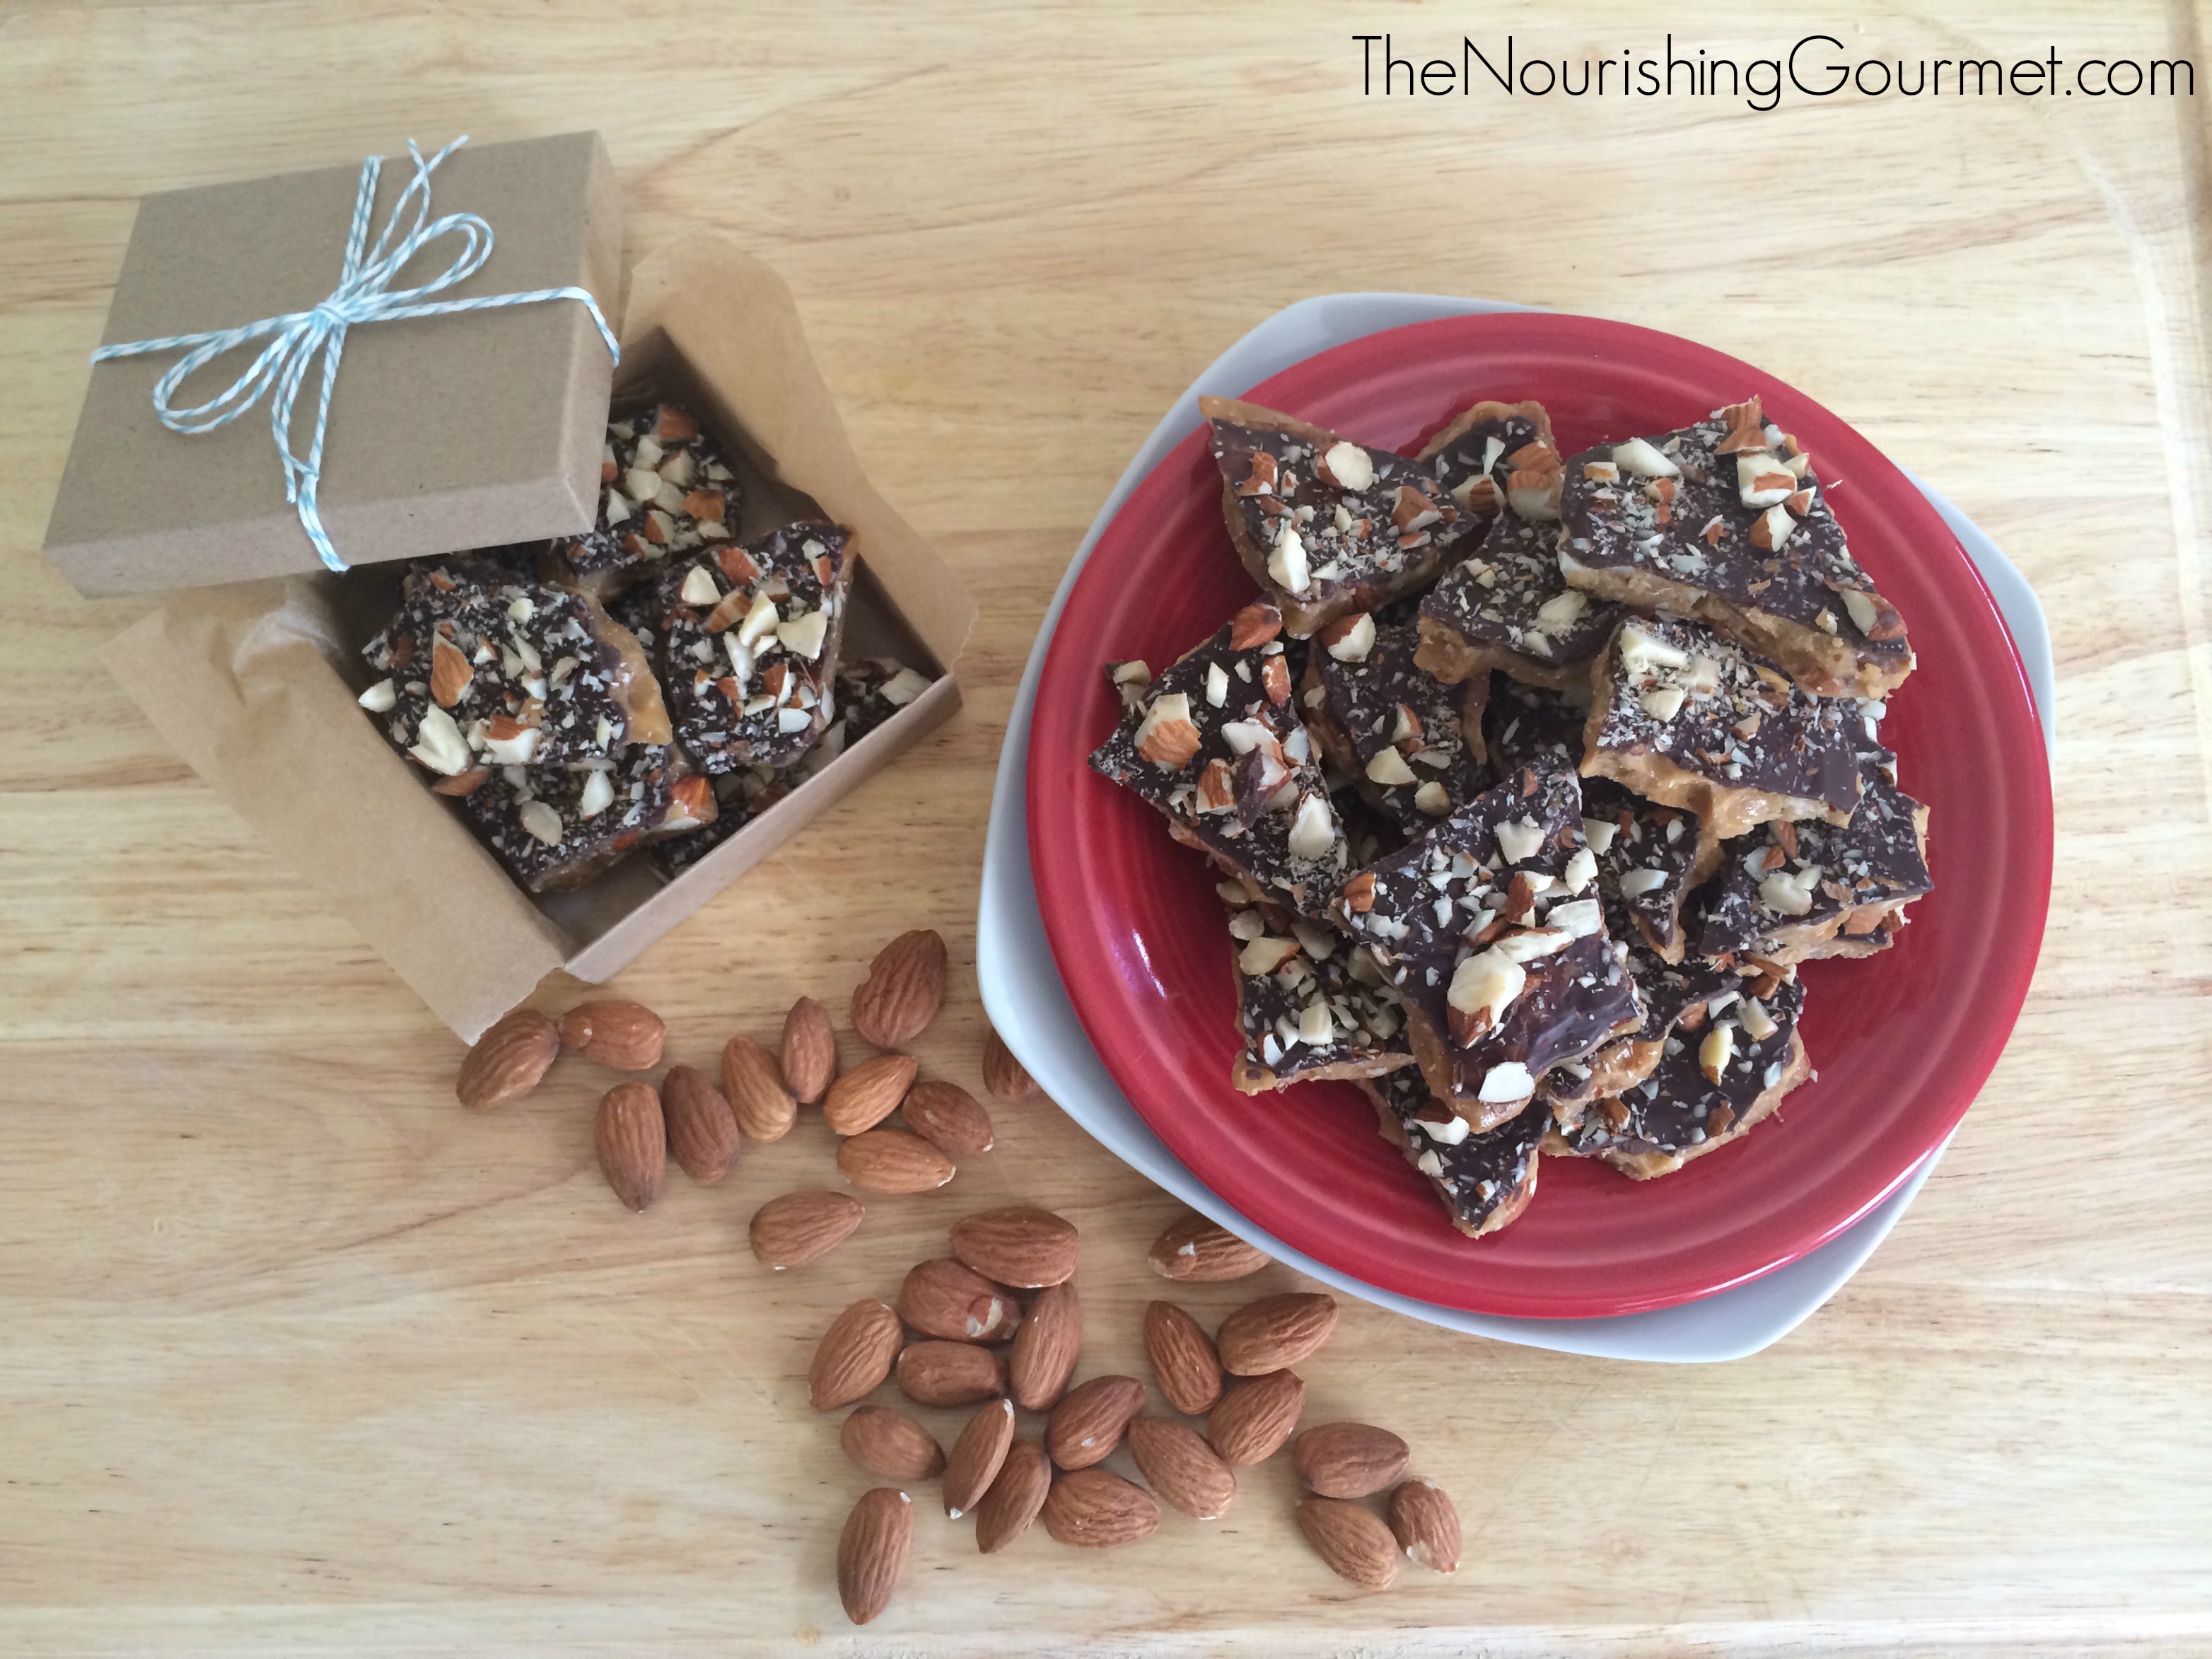
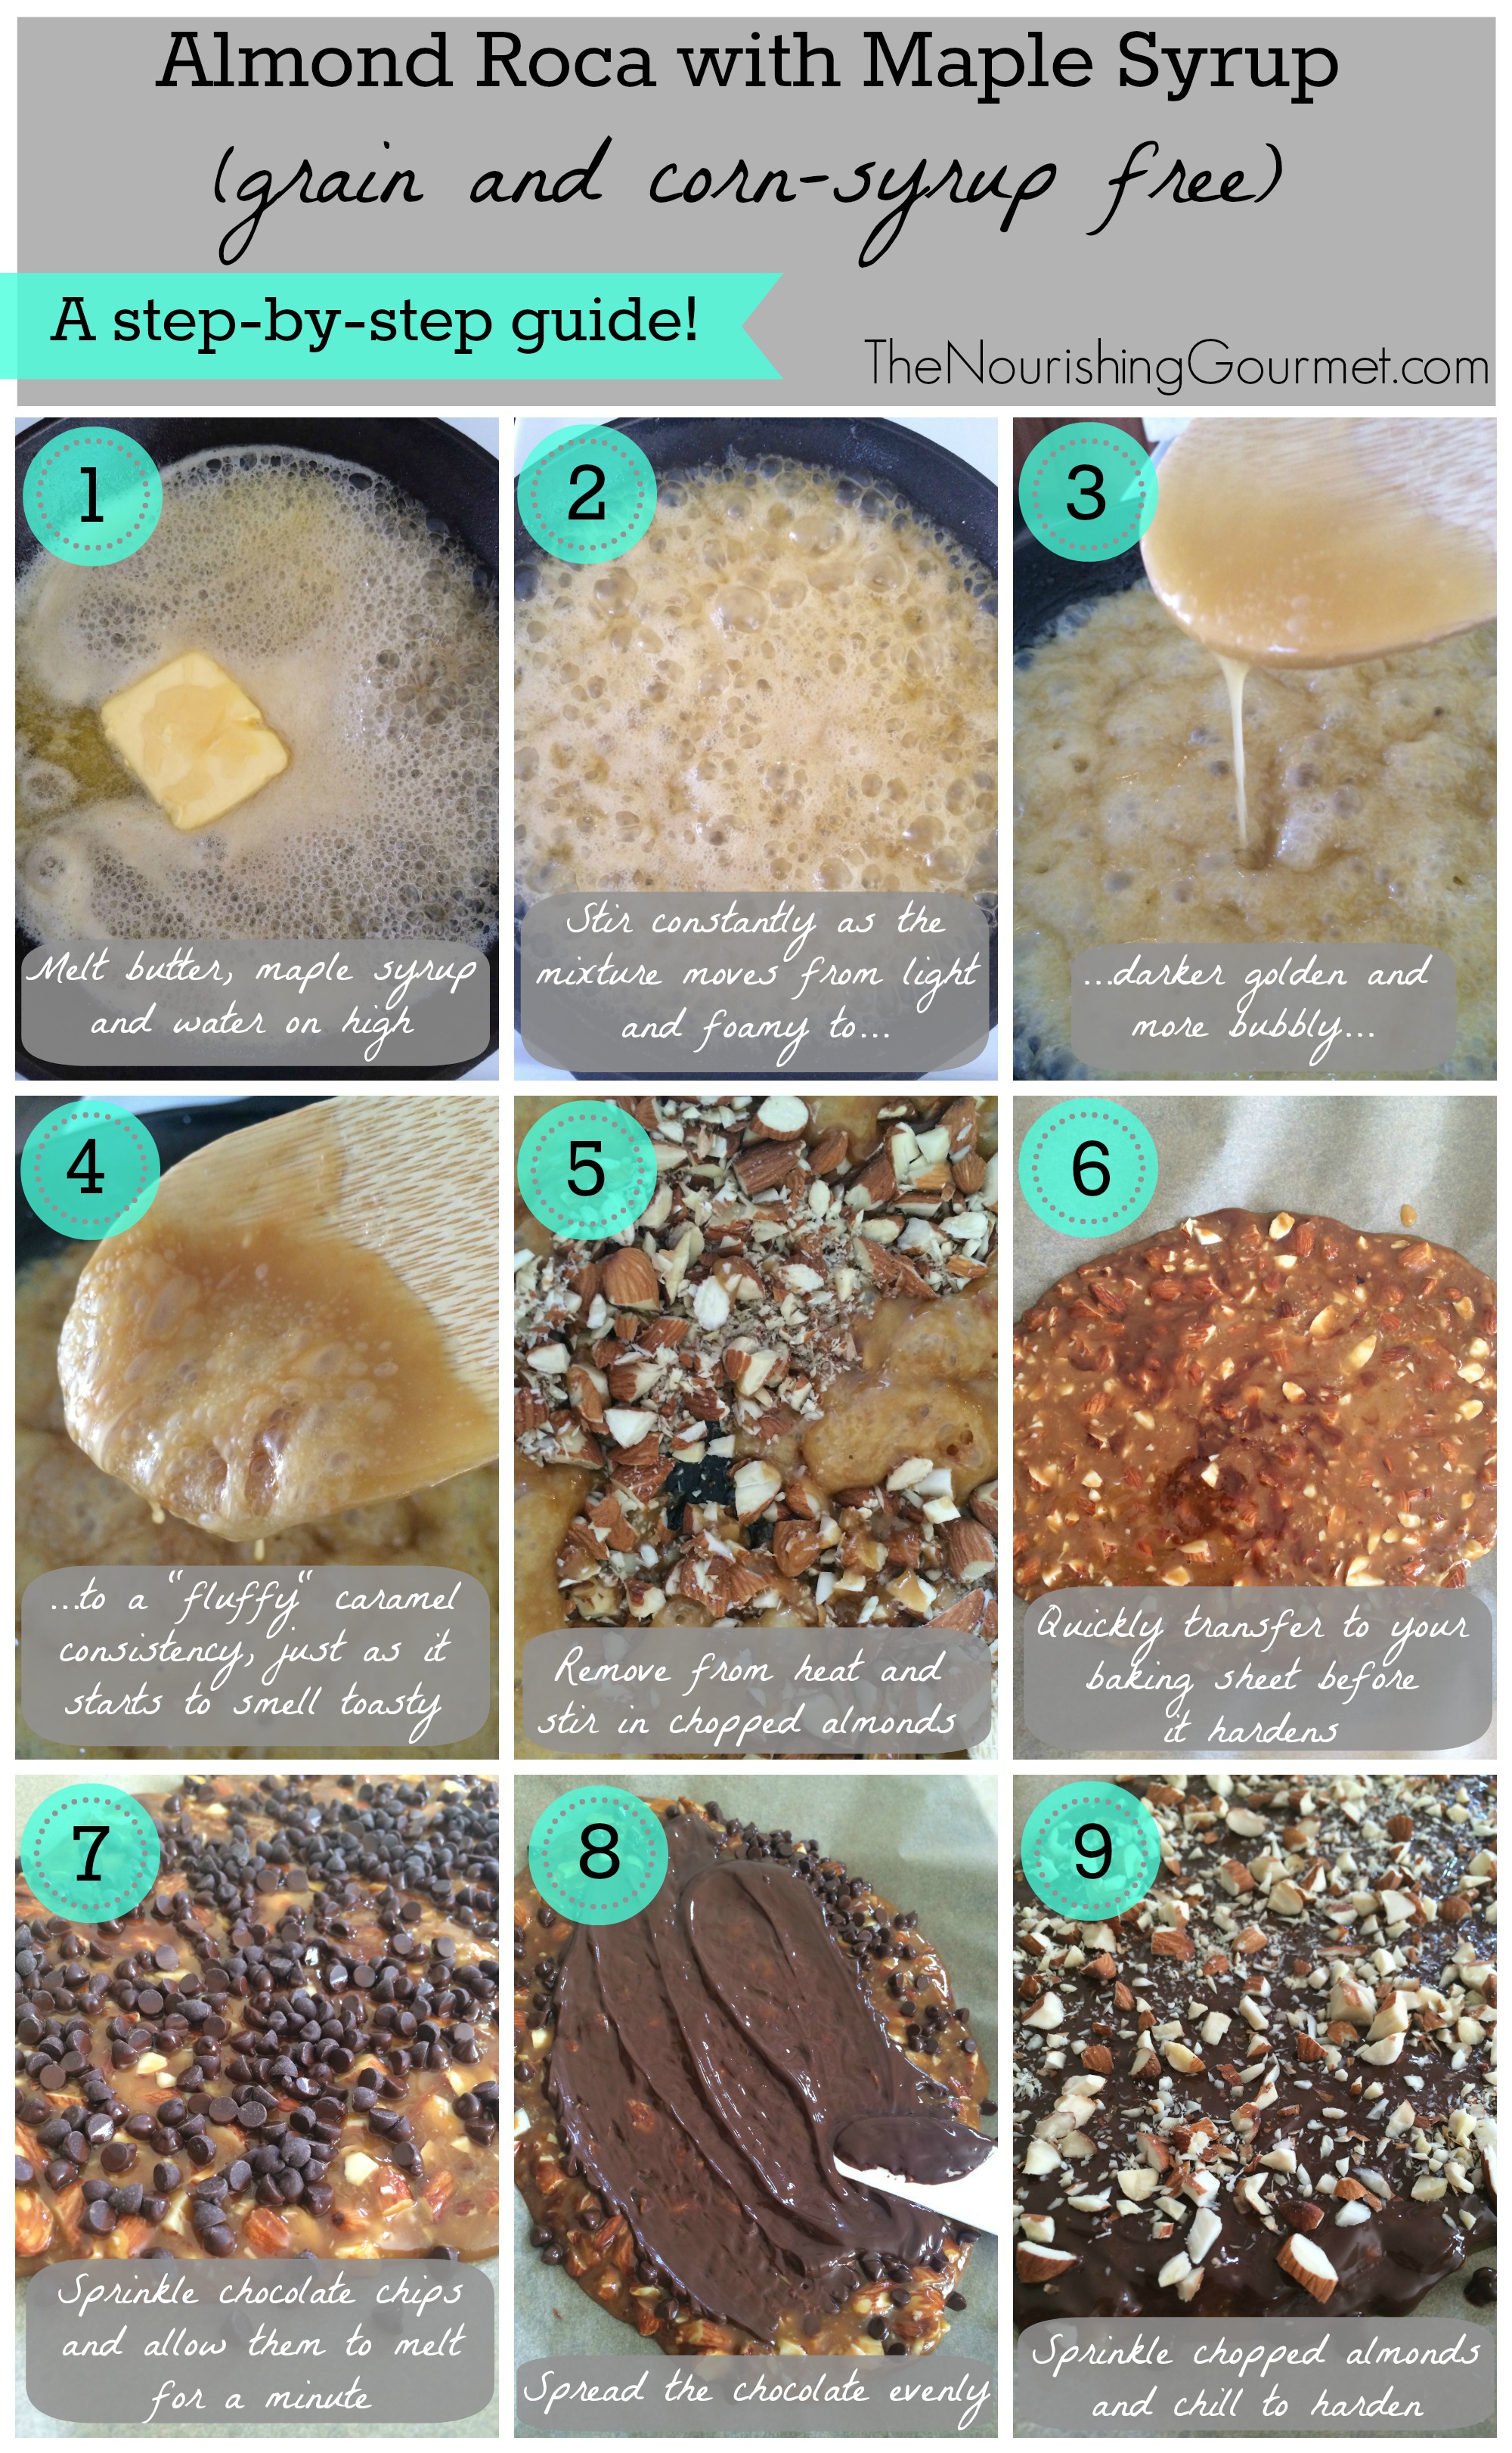
  • Almond Roca (maple syrup sweetened – this is a family favorite!)
  • Chile Spiked Dark Chocolate Bark with Pepitas and mangos (another favorite of mine)
  • Scrumptious Candied Citrus Peel

Mint Chocolate Fudge (dairy and gluten free)
 
Author:
April Swiger
Recipe type: Dessert
Print
 
This velvety mint chocolate fudge is simple to make, includes nourishing ingredients, and is a lovely gift to give this season!
Ingredients
  • 2½ cups chocolate (I used semi-sweet)
  • ½ cup full-fat coconut milk
  • 2 teapoons peppermint extract
  • 1 Tablespoon honey
  • 1 Tablespoon coconut oil
  • pinch of salt
Instructions
  1. Put all the ingredients into a large bowl, and create a double boiler by placing it over a pot of lightly simmering water.
  2. Allow the chocolate to melt slowly. Stir continuously until all of the ingredients are smooth and incorporated.
  3. Pour the chocolate mixture into a parchment paper lined dish. If desired, top with crushed candy cane pieces. Refrigerate until hardened, and cut into small square pieces to serve.
3.2.2807


Filed Under: Dairy Free, Desserts, For the Kids, Gluten Free, Grain Free, Vegan, Vegetarian Tagged With: Chocolate, Dairy Free, Desserts, Gluten Free

Blueberry Lemon Clafoutis with Einkorn Flour (refined sugar free)

June 17, 2014 by April Swiger 6 Comments

Blueberry Lemon Clafoutis with Einkorn Flour (refined sugar free)

By April Swiger, Contributing Writer

Plump blueberries burst in your mouth as the creamy custard-like batter hints of fresh lemon zest and the subtle zing of ginger. This adapted version of the traditional French dessert is absolutely brimming over with summertime flavor! The classic version is made with cherries, covered with a batter of eggs, milk, flour, and sugar, and served as a dessert sprinkled with powdered sugar. I love the idea of substituting nourishing ingredients and serving this rustic looking treat as a breakfast or brunch option as well.

This recipe is free from refined sugar, and uses beautiful raw honey to lightly sweeten the batter. I love the flavor that orange blossom honey brings, but any honey will do. For those who don’t need to avoid dairy and gluten, this recipe contains both, along with eggs. The great news is that dietary substitutions can easily be made and I find the recipe is very flexible!

It’s also one of the most simple recipes I’ve made. A layer of fruit, mix up the batter, pour it on top, and bake. Easy as pie clafoutis 🙂

Kimi has posted a number of clafoutis recipes including a dairy and gluten free version made with cherries, as well as an apple version that is grain free. Both look delicious and would be worth your time to try!

Blueberry Lemon Clafoutis with Einkorn Flour (refined sugar free)

Why I chose to use einkorn flour

I recently began experimenting with einkorn flour and I’m loving it. Einkorn flour is an ancient grain and the first variety of wheat. It has never been hybridized and actually contains less gluten than more modern varieties of wheat, making it easier to digest for some (information from Jovial Foods).

For me, when I eat food made with modern varieties of wheat I notice some bloating and uncomfortableness afterwards. This has caused me to bake less (bummer!), and not consume many wheat products. Einkorn has been a game changer for me as it has proved to be much easier on my belly. Along with that, its lovely white color and fluffy texture make it a beautiful ingredient to work with.

Blueberry Lemon Clafoutis with Einkorn Flour (refined sugar free)

I buy einkorn flour at my local natural food store, or you can purchase it from Jovial Foods or Amazon. (affiliatelink) Jovial’s einkorn wheat is grown in the beautiful hills of Tuscany, and I love supporting this small family operation. Here is some nutrition information about einkorn flour from the Jovial Foods website.

* High in Thiamin, essential dietary and trace minerals

* Good source of protein, iron, dietary fiber and a number of B Vitamins.

* Contains a significant amount of the powerful antioxidant Lutein

* Higher Oxygen Radical Absorbance Capacity (ORAC) than durum and bread wheat

* Higher content of proteins, tocols and carotenoids than other species of wheat.

* Lower percentage of nutrient loss during processing

I have a feeling this recipe is going to become a staple in my home. With the changing seasons you can substitute a variety of fruits as the base, keeping it exciting year round. Pastured eggs make this dessert extra hearty and full of the nutrients our bodies need, making it a great option for breakfast or brunch as well. It’s best eaten plain at a lukewarm temperature, or topped with some homemade whipped cream or vanilla ice cream. Yum!

Blueberry Lemon Clafoutis with Einkorn Flour (refined sugar free)3

Clafoutis would pair well with:

  • Coconut Whipped Cream, Stevia-Sweetened and Paleo Friendly
  • Maple Whipped Cream
  • Vanilla Coconut Milk Ice Cream, Dairy-Free

Other fruit based desserts you may enjoy:

  • Persian Watermelon Rose Salad (also may protect against sunburn!)
  • Strawberry Creamsicle Popsicles
  • Caramelized Peach Cornmeal Skillet Cake

Blueberry Lemon Clafoutis with Einkorn Flour (refined sugar free)
 
Author:
April Swiger
Recipe type: Dessert or breakfast/Brunch
Print
 
This dessert is beautifully simple, using nourishing ingredients, and can be adapted in various ways. It's a cinch to put together, even on a busy weeknight!
Ingredients
  • Butter for greasing the pie dish
  • 1½ cups of fresh blueberries
  • Zest of 1 lemon and a splash of lemon juice
  • 1 tsp fresh ginger, grated (optional)
  • ⅓ cup raw honey (Any will do, but I used orange blossom wildflower)
  • 3 eggs
  • ½ cup whole milk
  • ½ cup heavy cream
  • 2 tsp vanilla
  • ½ tsp salt
  • ½ cup einkorn flour (regular wheat flour, soaked or sprouted, should work fine too)
Instructions
  1. Preheat your oven to 350 F and grease an 8 or 9 inch pie pan, liberally, with butter.
  2. In a large bowl, toss the blueberries with grated lemon zest, fresh ginger, and a few squirts of lemon juice. Evenly spread this mixture on the bottom of your pie pan.
  3. In that same large mixing bowl, combine the rest of the ingredients. Whisk it well, or use a hand blender to remove all the little flour lumps. Pour the batter over your blueberries and bake for 40-45 minutes, or until it’s set and a knife comes out clean.
  4. Top with powdered sugar if desired (this is the traditional method of serving, but if you’re avoiding refined sugar like I am, homemade whipped cream sweetened with honey or maple syrup, or a homemade vanilla ice cream would be a perfect addition!).
Notes
Kimi Notes: To make this into a "soaked" version, substitute buttermilk or kefir for the milk and cream, and combine with the flour. Cover and leave overnight in a warm place for 12-24 hours. After that point, you can combine the rest of the batter ingredients with the soaked flour.
3.2.2700


Filed Under: Baked Goods, Breakfast and Brunch, Desserts Tagged With: Breakfast and Brunch, Desserts, Eggs, Einkorn flour, Honey, Lemon

Almond Roca with Maple Syrup (Grain/Corn Syrup-Free)

December 6, 2013 by April Swiger 55 Comments

Almond Roca with Maple Syrup (Grain and Corn Syrup Free)

By April Swiger, Contributing Writer

Crunchy, buttery, stick-to-your-teeth chocolaty goodness! Almond Roca (also known as Almond Toffee) is my favorite treat this time of year. The mixture of creamy butter, and pure maple syrup, heated and cooled to crisp toffee is absolutely to die for! Topped with chocolate, and chopped almonds, this dainty sweet is perfect to share with those you love. Better yet, you don’t even need a candy thermometer to make it!

I feel spoiled living in New England, surrounded by some of the best maple syrup in the whole world. Small “sugar shacks” dot the curvy rural backroads I often drive on through picturesque Connecticut towns. I was recently gifted two jugs of this “liquid gold” from local farms in our region and they have been burning a hole in my cabinet! With my calendar full, and gift list long, I knew it was time to experiment with a naturally sweetened version of my annual favorite.

Almond Roca With Maple Syrup (Grain and Corn Syrup Free)3

According to Sally Fallon in Nourishing Traditions (page 536), maple syrup is “The concentrated sap of huge deciduous trees, maple syrup is rich in trace minerals, brought up from below ground by the tree’s deep roots. It imparts a wonderful flavor to cream-based desserts and may be used in baked goods, such as muffins and pancakes.”

Maple syrup contains antioxidant minerals like manganese and zinc, which are great for the immune system, and makes for a wonderfully natural alternative to refined sugar and corn syrup. However, it’s extremely important that 100% pure maple syrup is used. Most syrups bought at the grocery store are cut with corn-syrup, high fructose corn syrup, and fake maple flavoring. Buying 100% pure maple syrup from a reputable farmer is the best way to ensure its purity and health benefits.

Almond Roca with Maple Syrup (grain and corn syrup free)4

Almond roca can be tricky to make, so be sure to give your full attention to the time spent at the stove. I don’t have a candy thermometer, but have learned how to make this sweet treat by sight and smell. It’s quite easy if you know what to look for. I’ve included a helpful step-by-step guide for you below so you can learn the stages of “melt” and create the most perfect almond roca!

UPDATE: See the note at the end of the recipe for information about using a candy thermometer and some troubleshooting tips!

A few thoughts about my ingredients:

  • I used raw almonds in this recipe and chose not to soak and dehydrate them this time (although I have in the past for a different recipe!). If you would prefer to soak and dehydrate them, they should still work perfectly for almond roca! Kimi has previously written about phytic acid in nuts and seeds, as well as instructions for soaking them that are very helpful.
  • I chose to use a brand of chocolate chips that are gluten, dairy, nut and soy free (affiliate link). Most store bought brands of chocolate contain soy lecithin, an artificial emulsifier that is most likely genetically modified. You could also use dark chocolate for a less sweet roca, or a homemade chocolate chip alternative. It’s up to you!
  • Note from Kimi: This recipe uses beautiful butter, and it reminded me to tell you all that you can now get one of my favorite brands, Kerrygold, through my affiliate Amazon! Get a single one here, or a box of twenty. So helpful for those who can’t get it locally.

Almond Roca with Maple Syrup (Grain and Corn Syrup-Free)

Almond Roca with Pure Maple Syrup (Grain/Corn Syrup-Free)
 
Author:
April Swiger
Recipe type: Dessert/Candy
Print
 
The buttery crunch of pure maple syrup toffee, topped with chocolate and almonds, is the perfect gift for family and friends! This recipe will fill a small 9x13 baking sheet. Double the recipe for a party, or halve it to share with a friend. It freezes very well! Recipe adapted from Tasty Kitchen. As always, be careful when working with the hot candy mixture, as it could cause bad burns if spilled.
Ingredients
  • 2 sticks of butter (16 Tbls)
  • 1 cup pure maple syrup
  • 2 Tbls water
  • 1 cup almonds, coarsely chopped
  • ½ cup (heaping!) chocolate chips (I use a dairy/nut/soy free brand. You could also use dark chocolate for less sugar content)
  • ⅓ cup finely chopped almonds for sprinkling
Instructions
  1. Prepare a small baking sheet (9x13) with parchment paper. Be sure to use one that has edges so the toffee doesn't drip out.
  2. In a saucepan, or cast-iron skillet, melt the butter, maple syrup, and water together on high, stirring constantly.
  3. These ingredients will move from a light golden color with a foamy consistency to darker with more bubbles, and eventually thicker and caramel-like.
  4. When the color begins to darken, and smells slightly toasty (be careful not to burn it!), remove the pan from the heat and quickly stir in the 1 cup of coarsely chopped almonds.
  5. Immediately spread the mixture onto the parchment paper evenly before it hardens. It will darken in color at this point.
  6. Sprinkle the chocolate chips on top. After a minute or two the chips will have melted into the hot toffee.
  7. Use a knife to spread the chocolate over the top.
  8. Sprinkle finely chopped almonds onto the chocolate.
  9. Refrigerate until hardened, or freeze for 20 minutes if you're impatient like me 🙂
  10. Break the roca into small pieces and enjoy!
Notes
UPDATE: Some readers have requested instructions for using a candy thermometer. I have not personally used one, so I don't know from experience what temperature would work best (I rarely make candy, so I never invested in one). However, I have read that the 290-300 F range would result in a nice hard brittle. Kimi shared a helpful link for candy making stages in the comments. If you're using a thermometer, I would recommend looking at that tutorial! She also shared that she has used the timing method by dropping pieces of the candy into ice cold water to check its hardness. This recipe can be tricky as there are a lot of variables that could contribute to a too soft, or overdone brittle (both of which I have experienced). If you're not using a thermometer, it's hard to say how long the brittle should be on the heat, but for this batch I made it was around 7-10 minutes. I found that my gas stovetop heats up much hotter and quicker than my old electric stovetop. I also used a cast iron skillet, which may heat differently than a stainless steel saucepan. I hesitate to put a timeframe on this recipe, because I know the variables will be different for everyone. For some better pictures of the candy making stages you can also check out the original recipe that I adapted this from. That may be very helpful for some, as it was how I originally learned to make Almond Roca!
3.2.2124

Other sweet treats you may enjoy:

  • Cracker Toffee 
  • Chile-Spiked Dark Chocolate Bark with Pepitas and Mango (dairy-free)
  • Gluten and Dairy Free Pancakes (for any extra maple syrup you may have around!)

Filed Under: Desserts, Gluten Free, Vegetarian Tagged With: Chocolate, Desserts, Grain Free

Old Fashioned Boiled Custard

September 20, 2013 by Dina-Marie Oswald 17 Comments

old fashioned boiled custard nourishing gourmet

Like most old-fashioned desserts, this vanilla spiked, creamy dessert is simple, uses the basics, and is delicious! Brought to you from Dina-Marie from Cultured Palate.

I recently visited my mother who still lives in the middle Georgia town of Macon, where I grew up. What a special time we had together. Besides just spending time talking, we visited several restaurants that are still in business from my younger days. One restaurant was a special favorite and Boiled Custard was the favored dessert served. In fact, it was my all-time favorite dessert! Seriously, I ordered it every time we went to that particular restaurant. And, would you believe, the menu was much the same and they still have Boiled Custard!

I have made a lot of healthy changes to my diet since the days of childhood. One of those changes is the greatly decreased amount of processed sugar in my diet, in fact, none while on the GAPS diet! So, when faced with the question of ordering Boiled Custard, I chose to say, ” no”. First , I did not want to splurge with the sugar. Second, I was afraid the taste of the Boiled Custard would not measure up to the delicious childhood memory!

But, as I thought about the Boiled Custard, I wanted some! There had to be a healthy alternative without sacrificing the taste. So, my experimenting began and the following recipe for Old Fashioned Custard is the result. A result that I hope you will enjoy.

Old Fashioned Boiled Custard can be sweetened with honey, Rapadura, Sucanat or processed sugar. If you are not familiar with Rapadura, it is a whole food varying in color from batch to batch. The molasses is not separated out of Rapadura, it is not heated to high temperatures and therefore retains its vitamins and minerals. However, Rapadura is expensive. So, in an effort to balance health and budget, I chose Sucanat. Sucanat is heated to higher temperatures, the molasses is separated but then re-blended to make a consistent product. Sucanat also adds a delicious hint of molasses. If your budget does not allow for Rapadura, Sucanat may be an alternative for those special treat times!

Old Fashioned Boiled Custard can be cooked either in a double boiler or a heavy boiler. I used my Le Creuset enameled cast iron pot which I had purchased at an outlet store. Check out How to Save Money When Buying Le Creuset for ideas on purchasing at discount prices. Le Creuset allows for even heating and there was no problem with the custard sticking during cooking.

Now, on to the recipe…

Old Fashioned Boiled Custard
 
Author:
Dina-Marie @ The Nourishing Gourmet
Recipe type: Dessert
Print
 
Ingredients
  • 1 qt. plus ¼ cup whole milk
  • 4 egg yolks
  • 1 c. Sucanat, Rapadura, raw sugar or ¾ c. honey
  • ¼ c. unbleached flour or sprouted flour
  • 2 tsp vanilla
Instructions
  1. In a double boiler or heavy boiler, heat 1 qt of the milk to scalding - just before boiling.
  2. Cream egg yolks and Sucanat, Rapadura, honey or raw sugar thoroughly. Stir in the flour then add the remaining milk. Cook stirring constantly until the custard thickens and coats the spoon.
  3. Remove the custard from heat and stir in the vanilla.
  4. Pour the custard through a sieve or wire mesh strainer into a large bowl. Whip vigorously for a few minutes.
  5. Chill and Enjoy!
3.2.2124


Hi, I am Dina-Marie, the mother of 10 children, 7 of whom are still at home. I live in West Texas with my husband who also happens to be my best friend. We decided to make a lifestyle change in 2008 and left the corporate world of southern Alabama and moved to West Texas. We now have 27 acres of grapes, 2 family milk cows, chickens and raise our own beef. Working the vineyard together as a family is hard work but very rewarding.

Moving to West Texas to begin a vineyard has brought many changes including a return to health through the GAPS diet, learning about “real” food and becoming a chapter leader for the Weston A. Price Foundation.

Cooking REAL food for a large family has been challenging and fun. I love trying new recipes and sharing them with others. I have a passion to spread the healing potential of real traditional food, as well as, to encourage others with a nutrient dense diet and simple family living.

I would love to have you follow our adventure in real food and vineyard life at my blog, Cultured Palate.

Filed Under: Desserts, Nutrient Dense Foods Tagged With: Dessert, Desserts

Next Page »

Primary Sidebar

ConvertKit Form

Get Every Recipe

And the insider's view from our kitchen

Success! Now check your email to confirm your subscription.

There was an error submitting your subscription. Please try again.

We won't send you spam. Unsubscribe at any time. Powered by ConvertKit

Follow Me

  • Facebook
  • Google+
  • Instagram
  • Pinterest
  • RSS

Search

Please Read:

The information you find here at The Nourishing Gourmet is meant to help you become a better cook! This site is primarily for sharing family friendly recipes. It's not meant to give medical advice or to make any health claims on the prevention or curing of diseases.This site is only for informational and educational purposes. Please discuss with your own, qualified health care provider before adding in supplements or making any changes in your diet. Also, any links to sponsors or affiliates (including Amazon) may give me a percentage of the sale or a pay per click. Thank you for supporting this site.

Categories

  • $10 Main (42)
  • $5 Dishes (43)
  • 52 ways to save money on a healthy diet (53)
  • AIP (23)
  • Baked Goods (83)
  • Beverages (72)
  • Breakfast and Brunch (61)
  • Condiments (8)
  • Dairy Free (492)
  • Desserts (184)
  • Dietary Needs (6)
  • Egg Free (11)
  • Egg Free (86)
  • For the Kids (66)
  • For the Love of Food and Books (18)
  • Gluten Free (484)
  • Grain Free (95)
  • Health (75)
  • Kitchen Tools (4)
  • Main Dishes (126)
  • Nourishing Frugal Recipes (167)
  • Nourishing Frugal Tips (70)
  • Nourishing Practices (56)
  • Nutrient Dense Foods (70)
  • Q and A (15)
  • Salads (39)
  • Sides (101)
  • Snacks (124)
  • Soups (50)
  • The Healthy $1 Menu (21)
  • The Low Energy Guide to Healthy Cooking (18)
  • THM (2)
  • Trim Healthy Mama (2)
  • Uncategorized (846)
  • Vegan (241)
  • Vegetarian (361)

Recent Posts

  • 2 Ingredient Peppermint Bark
  • Herbal Hibiscus Lemonade (Keto, THM)
  • Creamy Curry Red Lentil Soup
  • One-Pot Gluten-Free Mac and Cheese
  • Healthy Pumpkin Spice Granola
  • Crispy Pumpkin Spice Granola (oil-free)
  • Why I Use THM Principles Now
  • Vietnamese Beef Noodle Salad
  • Coconut Flour Pancakes
  • Instant Pot Mexican Shredded Chicken

Recent Comments

  • Dorene St G on Cracker Toffee (Easy Peasy Christmas Candy)
  • Nadia Kriston on Finding a Toaster Oven Without Nonstick
  • KimiHarris on How to make heavenly coconut milk whipped cream (with an isi dispenser)
  • KimiHarris on Autumn Beef Stew (Tomato Free)
  • KimiHarris on How to make heavenly coconut milk whipped cream (with an isi dispenser)

Fresh: Nourishing Salads for All Seasons

Get Every Recipe

And the insider's view from our kitchen

Success! Now check your email to confirm your subscription.

There was an error submitting your subscription. Please try again.

We won't send you spam. Unsubscribe at any time. Powered by ConvertKit

Footer

Privacy

Copyright © 2023 · Foodie Pro & The Genesis Framework