
Fluffy whipped cream with rich vanilla tones and stevia sweetened is the perfect topping for holiday pies, or creamy DIY lattes and fall drinks (such as my Paleo Pumpkin Spice Latte). I gave some topped on a hot beverage to my not-into-healthy-or-allergy-friendly-food dad, and he thought it was normal whipped cream! I got a kick out of that.
I shared a while back my Coconut Whipped Cream and my Chocolate Coconut Whipped Cream, and I promised you that I’d update you as I continue to experiment with it. I have always given stevia as an option when making this whipped cream, but over time I have found that it worked best with a few adjustments to the original recipe.
I have had so much fun using it! For those of you who don’t know, I was taken off of even my beloved natural sweeteners for a time period, just to help my sugar levels even out. I don’t like to use a ton of stevia (since it can be very concentrated and refined), but having my whipped cream to enjoy with fresh fruits ( or even to top my coffee with!) has been incredibly helpful in not feeling deprived. I haven’t been making it every week, but when I do, I really feel pampered.
Also, for those of you doing Trim Healthy Mama, this stevia sweetened version will work great for satisfying meals/days.
Besides changing the sweetener out for stevia, the significant change I made was taking out the added coconut oil. I found without the liquid from the maple syrup, it actually was getting too firm inside the canister, making it hard to come out. (That can happen no matter what, just let it sit out at room temperature for about 15 minutes, if needed.). The trade off is that the whipped cream isn’t quite as firm, but without adding it, it comes out more reliably, so that’s the trade-off.
So for this version, you actually only need three ingredients. Canned whole fat coconut milk, stevia of choice, and vanilla. Nice!
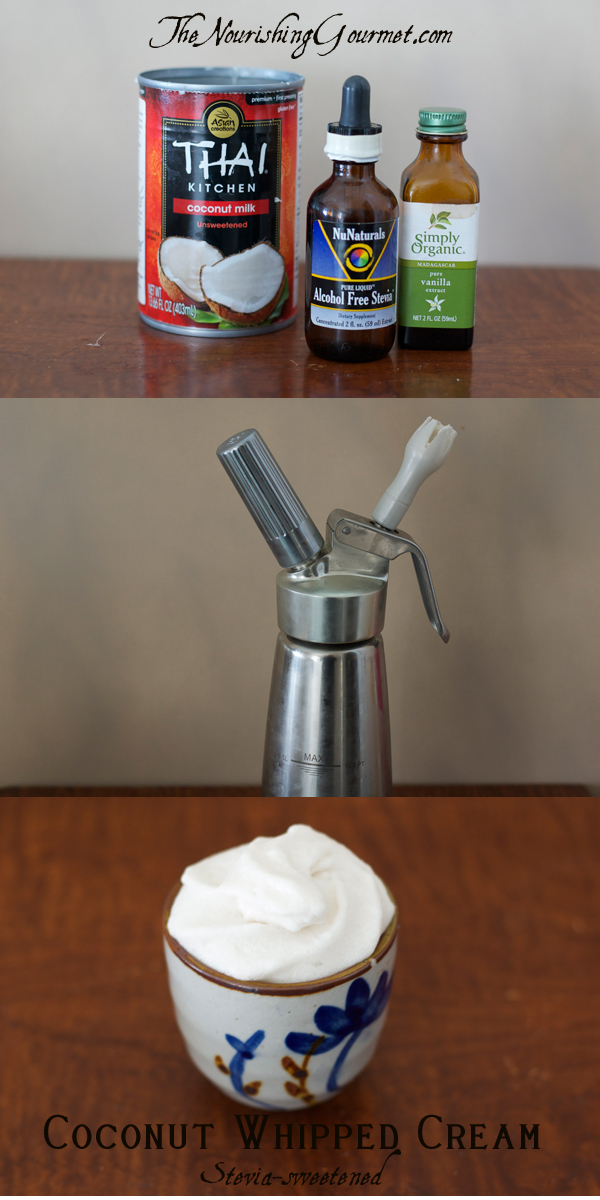
I used Thai Kitchen’s coconut milk (Amazon affiliate links) this time, because I got it on a great sale. Last I heard, the products are BPA-free in the sense that none is detected in the actual milk, though there is some in the lining of the can. Native Forests doesn’t have any in the lining. Coconut milk can vary even from can to can, which can make a recipe like this tricky, but so far I’ve had barely any issues! (UPDATE: I have now tried this exact recipe twice with Native Forest coconut milk and I liked it even more with their coconut milk!)
I own this ISI dispenser, and here is a more frugal everyday option as well too. It’s been a real treat to have for everyday use, but I am really looking forward to having it for the holidays too!
As you can see in the pictures, I used NuNaturals stevia, but there are many whole leaf formulas as well.
- 1 14 ounce can of unsweetened full fat coconut milk (such As Thai Kitchen or Native Forests)
- 1 teaspoon high quality vanilla (gluten-free, if needed)
- 10-25 drops of liquid stevia
- Thoroughly whisk the ingredients together in a medium bowl.
- Pour into ISI canister. Refrigerate for 15-30 minutes. Follow instructions for adding the charger and shake about 10-15 times.
- Enjoy!
Latest posts by KimiHarris (see all)
- 2 Ingredient Peppermint Bark - December 21, 2022
- Herbal Hibiscus Lemonade (Keto, THM) - March 16, 2022
- Creamy Curry Red Lentil Soup - December 8, 2021
I have several cans of coconut milk in my pantry and love it in smoothies, but have never tried this! How perfect for those healthy desserts I’ve been making a lot of lately. 🙂 Thanks!
Oh, is so very fun to use with desserts! I LOVE having reliable whipped cream again!
After struggling to make whipped coconut cream the “traditional” way this weekend, I just put the ISI on my Christmas wish list! Thanks for sharing your latest modifications. I was wondering about it recently.
I love mine! I got it as a gift too. 🙂
Any word on trying gelatin as an emulsifier/stabilizer? Seems like I remember that being in your last whipped cream posts.
I still need to put on my big girl panties and try it out! I am afraid that it will be a flop, but you never know until you try!
LOL. Having experienced some flops myself this weekend, I sympathize.
This looks like a lovely gadget. Whip cream makes everything seem more festive. Do you know how many days the cream is good for in the container?
I believe it’s 7-10 days! It lasts longer this way. 🙂
Hi Kim,
I love your blog!! I had a question about Stevia. I’ve never bought it before as a lot of people I know told me they hated it and I know there is a lot of trial and error with figuring which brands have the dreaded ‘after taste’ and which don’t. I was thinking of getting some of the NuNaturals one you used in this recipe but then I came across some reviews which say they have changed suppliers and so is no longer any good. Can you recommend another ‘good’ brand I can try, it doesn’t have to be liquid.
Thank you!
Siddiqa
That is such a cool gadget! I never knew you could make your own whipped cream and put it in a can! I think I’ll have to add it to my list as well.
Just one question for clarification… do you only whisk the ingredients together or do they need to whipped to a foam before adding to the canister?
So here it is! I follow your Instagram much more closely than your blog because I love the real life photos you post (especially of your darling girls). I’ll have to put that stainless steel whip cream maker on my Christmas list. My kids would be so ecstatic to have whip cream that they can actually eat (they are dairy free)!
Hi! What do I do to make this recipe successful without an ISI dispenser? Thanks
Karina – If you go to this recipe
http://www.thenourishinggourmet.com/2013/05/how-to-make-heavenly-coconut-milk-whipped-cream-with-an-isi-dispenser.html
you can make the exact same mixture and just refrigerate it for a while before whipping up (it won’t be totally thick like regular whipped cream, but works fairly well). Otherwise, you can refrigerate two cans of whole fat coconut milk, skim of the creamy parts, and then whipped that with a little sweeter and vanilla. 🙂
Hi! What do I do to make this recipe successful without an ISI dispenser? Thanks
This worked great! So exciting!!!! :o)
Thank you!!
Do you use a 1/2 pint or 1 pint ISI canister for this recipe? thanks
Mavis,
1 pint. 🙂