• Skip to primary navigation
  • Skip to main content
  • Skip to primary sidebar
  • Skip to footer

The Nourishing Gourmet

Nourishing. Satisfying. Gourmet.

  • THM Coaching
  • About
    • Privacy
    • Contact
  • Recipes
  • Cookbooks
    • Everyday Nourishing Food
    • Salad Cookbook
    • Soup Cookbook

AIP

Why I’m Spatchcocking My Turkey This Year

November 26, 2019 by KimiHarris 6 Comments

This method has many advantages, including a super fast cooking time, and moist, delicious meat.

Turkey is the centerpiece of most Thanksgiving tables, yet it’s also the hardest to cook correctly. If you undercook it, food poisoning is a possibility, but if you overcook it, the breasts can be dry and unappetizing. 

My solution for the past five years or so has been trying out different forms of brining. My go to is this dry brine – I love not having to deal with a lot of liquid (as well as not having to find a large enough container for said turkey and brine). A dry brine still gives you the flavorful benefits of a brine as well as a juicy turkey. 

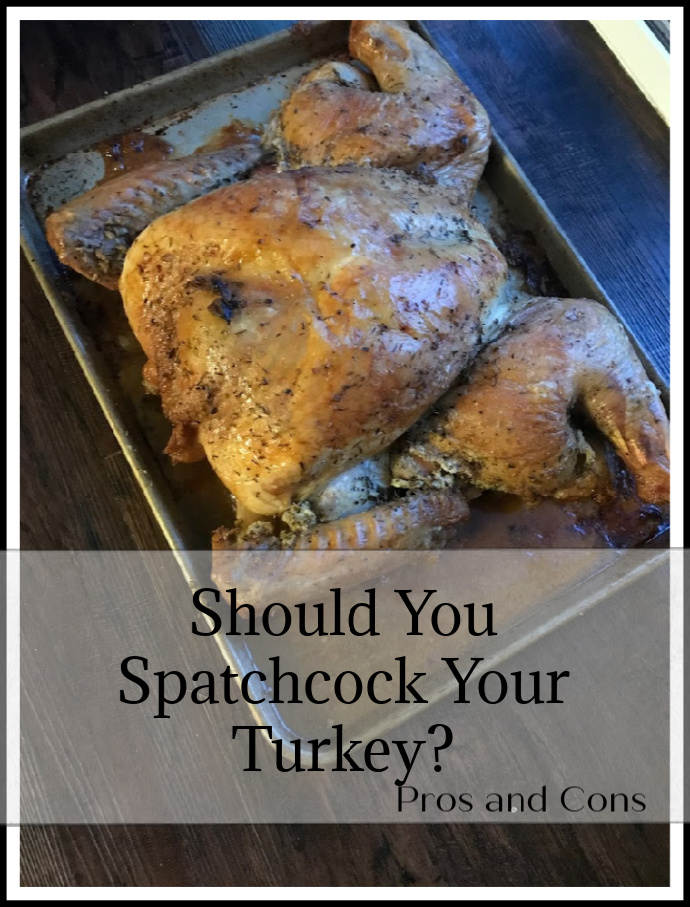
However, I think spatchcocking makes my recipe even better. Spatchcocking is when you remove the spine of the turkey, and roast the turkey flat. This has significant benefits, the biggest that it cooks very fast. I cooked a 16 pound turkey in a little less than an hour and a half. Wow! But it also gets the turkey’s skin delicious, crisp and brown, and even better –roasts the turkey evenly – so the legs and breasts get done at the same time. 

While you won’t be able to stuff your turkey this way (an option that many experts say not to do anyway), the benefits far outweigh that fact. 

But before I send you all scurrying to try this out yourself, I do want to honestly share our experience testing this method out. 

  1. It’s not at all hard to spatchcock a chicken with a sharp knife or kitchen shears. I had a harder time with a turkey. My husband, with his stronger hands, ended up helping me out with this part. I prefer kitchen shears, but do expect to have to use some oomph on this part. 
  2. When I pressed down on the turkey to flatten it after the backbone was removed, a large squirt of turkey juice sprayed across the kitchen floor. Oops. 
  3. Most recipes I found used a very hot oven for this method. This ended up causing a lot of smoking. For Thanksgiving, I plan on turning the oven down a bit after the first 20 minutes, and also adding water to the bottom of the pan to hopefully prevent that from reoccurring. 
  4. Our turkey was hefty at 16 pounds, so it just barely fit on our sheet pan once flattened. I would say it needs to be 16 pounds or less, so this method won’t likely work for larger birds unless you split the turkey in half and roast on two pans. 

Despite those disadvantages, our “test” turkey turned out so well cooked and delicious we all decided this was a method we simply had to do again. Paired with the salt brine? Amazing. 

I don’t want to give my own directions yet, as I still want to experiment with this method, but here are a couple of recipes showing how to spatchcock: Example one, two, and three.

And here is my dry brine recipe! 

Filed Under: AIP, Dairy Free, Egg Free, Gluten Free, Grain Free, Main Dishes, Nutrient Dense Foods

Roasted Frozen Broccoli

September 11, 2019 by KimiHarris 13 Comments

This is not only a simple recipe, but it's delicious and kid-friendly too. Yes! Even frozen vegetables can taste good!

We have a problem. If we don’t like how I prepare vegetables, they are pushed around on our plates and barely touched. This is no good, as I believe that vegetables are not only important for our health, but they can also be a delicious part of our daily diet as well. 

So when we made our big move to South Dakota, I faced a new problem. Back in Portland, Oregon, I had a large array of options for vegetables. Here? Not so much. Don’t get me wrong, there are still plenty of stores and some good options, but I found that I was eating less vegetables, they were costing a little more, and I wasn’t getting as good of a variety into our diets. Because of the climate here, we simply don’t have as many local options for produce. 

I needed to change my game plan, and that meant being willing to try more frozen vegetables. I have, admittedly, long eschewed frozen vegetables, and we mainly used them as a stop-gap. But I realized that there were many great frozen vegetables options here and I needed to figure out how to make them a little more delicious. I’m proud to say that we now eat them on a regular basis and all of us love them. Why? 

Can You Roast Frozen Vegetables?

Well, it turns out that you can roast them just like you do fresh vegetables! Why does roasting make fresh and frozen vegetables so much better? For a number of reasons: It helps crisp vegetables while they cook and if you leave them in long enough they will start to caramelize and give you a savory depth of flavor. 

Steamed frozen vegetables can sometimes have a mushy texture once cooked, or be very bland in flavor. I did find that the recipe I used for my cooking like a Roman day, using a spiced wine sauce with frozen broccoli, was really delightful. So you can absolutely have good steamed frozen vegetables. 

However, roasting them is a more fail-safe way for delicious vegetables that takes very little hands-on time. 

It’s also very versatile. We’ve done frozen Brussels sprouts, a carrots, broccoli and cauliflower mix, and both cauliflower and broccoli. The only thing we haven’t really been fans of is the frozen carrots. They were far better when roasted than steamed, but we found we preferred the other vegetables. 

Basic Method for Roasting Frozen Vegetables

Basic Method: Roasting vegetables is very easy. The basis concept is to toss frozen vegetables (don’t defrost) with oil, salt and pepper and roast in a hot oven until they are browned and crispy. I often don’t even set a timer. 

Additions: You can also toss them with dried herbs, fresh garlic before they go in the oven, or toss with a splash of balsamic vinegar and fresh herbs right after they come out of the oven. Or, roast with chopped bacon. This is the type of recipe where knowing the basic method is helpful, and then you can have fun trying a variety of vegetables and herbs and spices. 

But to get you started, here is a basic recipe for Roasted Frozen Broccoli

Roasted Frozen Broccoli

1 package of frozen broccoli (16 oz) 

2-3 tablespoons of oil or melted fat of your choice 

Salt and pepper 

  1. Preheat oven to 425F. I use parchment paper because I use sheet pans that are aluminum, but you can an unlined sheet pan as well. 
  2. Toss broccoli with oil/fat and salt and pepper. Place in oven and cook until browned to desired doneness. (between 15-35 minutes). 

Variation: My favorite variation is adding some sliced fresh onions to the broccoli before it cooks and then tossing with chopped fresh basil and a splash of balsamic vinegar once it’s out of the oven. Fabulous! 

Filed Under: $5 Dishes, 52 ways to save money on a healthy diet, AIP, Dairy Free, Egg Free, For the Kids, Gluten Free, Grain Free, Health, Sides, The Low Energy Guide to Healthy Cooking, Uncategorized, Vegan, Vegetarian

Pomegranate Italian Cream Soda (Dairy Free)

April 12, 2018 by KimiHarris 4 Comments

This healthy but sophisticated drink is delicious as well as beautiful. Antioxidant rich and only three ingredients! -- The Nourishing Gourmet

This sophisticated Italian Soda is sweetened and flavored with rich pomegranate juice for a refreshing and antioxidant-rich drink. You only need two ingredients (or three for the cream version), with no sugar syrup needed. It’s a lovely and beautiful drink! I especially like it with a drizzle of coconut milk (my husband uses cream or half and half).

Pomegranate works particularly well for this type of drink because it has such a pronounced flavor. Other juices could easily become watered down too much, and so you would have to use a juice concentrate instead. The other possible method is the one I used for this Paleo Raspberry Cream Soda where I started with whole raspberries.

Make sure you buy 100% pomegranate juice, otherwise the flavor won’t be pronounced enough. I used Pom Juice, but you can also use something like this brand.

Another juice I’m eager to try as an Italian Soda is tart cherry juice. It’s also especially antioxidant-rich and with a robust flavor.

If you wanted to try a juice concentrate, you can find anything from blueberry concentrate, black cherry juice concentrate, and even elderberry concentrate. For juice concentrates you will only need a small portion per cup.

This is the Coconut Milk I like to use. It is guar gum free, and it is easy to stir into a drink.

This drink is paired nicely with quinoa pizzas, pasta dishes, and salads.

This healthy but sophisticated drink is delicious as well as beautiful. Antioxidant rich and only three ingredients! -- The Nourishing Gourmet

Pomegranate Italian Cream Soda (Dairy Free)

I eyeball the proportions. Fill the glass 3/4s full of sparkling water, and then finish it with the juice.

Per Serving:

  • Ice
  • ¾ cup of sparkling water
  • ¼ cup of pomegranate juice
  • 1-2 teaspoons Aroy-D Coconut Milk (or, if consuming dairy, cream or half and half)

Directions:

Fill a cup with ice, and add sparkling water. Add juice, and stir in the coconut milk. Enjoy.

Some links are affiliate.

Filed Under: AIP, Beverages, Dairy Free, Egg Free, For the Kids, Gluten Free, Grain Free, Vegan, Vegetarian

Lemon Apple or Raspberry Banana Green Monster Smoothie (and 5 Reasons to Drink Green Smoothies)

March 6, 2018 by KimiHarris 7 Comments

Why Green Smoothies are so healing, and how to enjoy them on a regular basis.

These healing smoothies are stuffed full of greens, and antioxidant-rich berries and lemons. They are especially for those bringing healing foods into their diet. I love them! Full fat coconut milk makes it creamy and delicious, but it also helps aid in the absorption of nutrition (Read: Fat and the absorption of vitamins). I personally love the flavor of lemon in the Lemon Apple smoothie, and it helps balance any bitterness from the greens. Plus, read about all of the health benefits of lemons here. Healing smoothies like these have been an important part of my diet since I got sick months ago, and I definitely felt the lack when I tried cutting them out.

I find that green smoothie drinking is somewhat frowned upon in the real food, slow food, Nourishing Traditions crowd. It’s true that smoothies weren’t available to our ancestors, but I have no problem using a blender if it will help me heal and energize me!

Here are five reasons that you might want to consider including them into your routine. Just remember that we are all unique, and you should add in what works best for you.

Green smoothies up your vegetable intake

I have long known that I feel significantly better when eating a lot of vegetables. The Wahls protocol has also inspired me to get a lot of produce into my daily diet. But I’m not going to lie – It can be hard to consume the amount that makes me feel best. This is especially true when you are healing or deal with chronic health issues. But it’s also true for those of us with busy lifestyles, work schedules, or kids! Consuming lots of greens in your smoothies is an easy way to enjoy the benefits of a high vegetable diet. 

Help you consume antioxidant rich berries

Blueberries, wild blueberries, and raspberries are easily accessible and offer a lot of antioxidant support. This is so important for fighting inflammation and it’s best to get antioxidants from food not supplements (read more why here PDF). They also add fiber and nutrition and are wonderful foods to keep in your diet on a regular basis. The lemon apple smoothie offers support through the lemon and apple too.

Green smoothies are FAST

I love the slow food movement, and I have a chicken slowly roasting over a bed of vegetables in my oven right now, but I love foods that are fast too. I recognize that I need fast things at least sometimes, and you probably do too.

Green smoothies are easy to digest

As many have experienced with Lyme disease, or mold exposure, and many other gut disturbances, digestion can be easily upset. Some find that they have to only consume well cooked vegetables. In my case, I also find smoothies are especially easy on my stomach. It’s been a huge blessing for me during months when everything I ate felt heavy in my stomach – with the exception of smoothies.

Green smoothies can be enjoyed on the go

And by the go, I don’t just mean taking them in the car. I like that I can be sipping on my smoothie slowly while helping a child with homework, or doing housework. I think we overall do need to slow down and eat slowly. But for someone like me, I’m thankful I can sip my way through my smoothie in my own time.

Tips for these recipes:

  • When you need a lot of extra nutrition, you can make a double portion, put most of it in a eight cup mason jar in the fridge, and enjoy it slowly throughout the day. Most days I fill my Vitamix container to the top with greens.
  • This is a STRONG green drink at the full amount of greens. Play around with what you personally tolerate.
  • Make it sweeter by using some apple juice, cut down on the greens if they are too strong for you, or try more mild greens like baby lettuce.
  • I do use a high powered blender (I recently switched to the Vitamix and love it!). You can also use a regular heavy duty blender, but you will likely have to adjust the recipe a bit (more liquid, less to blend, etc).
  • You can precook certain greens, as desired, and then freeze them in an ice cube tray instead of using raw. (You can read more about this issue here). I personally have decided not to worry about it too much and just rotate my greens.
  • For best taste, or if you are using nonorganic lemons, you can peel the lemon before slicing. Also, do this if you aren’t using a high powered blender.

Ingredients:

    • I love using this coconut milk or coconut cream.
    • Organic vanilla extract
    • For added protein, you can add this gelatin.

Lemon-Apple Green Monster Smoothie

PDF for printing

  • 2-4 cups of greens of choice (I rotate through baby spring mix, “power mixes” of greens, and spinach)
  • 1 large apple, cored, and cut into pieces.
  • 1 slice of lemon (seeded, and peeled, see notes above).
  • 1 cup of liquid + more as needed (I usually mix coconut cream or full fat coconut milk with water for this, or have used coconut water and/or kombucha, which also adds sweetness. Apple juice or part apple juice would make this a lot sweeter, but use in moderation. You can also add a half or whole banana, which does change the taste.)
  • 1 teaspoon of vanilla extract, optional
  • 2 handfuls of ice

Add all of the ingredients to a high powered blender, and blend until frothy and smoothie. Scrape down the sides and add more liquid as needed. Make sure that the texture is smooth!

Enjoy

Raspberry-Banana Green Monster Smoothie

  • 2-4 cups of greens of choice (I rotate through baby spring mix, “power mixes” of greens, and spinach).
  • ½ cup of frozen raspberries
  • ½ – 1 frozen banana (or fresh)
  • 1 cup of liquid + more as needed (I usually mix coconut cream or full fat coconut milk with water for this, or have used coconut water, which also adds sweetness. Apple juice or part apple juice would make this a lot sweeter, but use in moderation.)
  • 1 teaspoon of vanilla extract, optional
  • Small handful of ice

Add all of the ingredients to a high powered blender, and blend until frothy and smoothie. Scrape down the sides and add more liquid as needed. Make sure that the texture is smooth!

Enjoy

Disclosure: Some links are affiliate. 

Filed Under: AIP, Beverages, Dairy Free, Egg Free, Gluten Free, Grain Free, Health, The Low Energy Guide to Healthy Cooking, Vegan, Vegetarian

Next Page »

Primary Sidebar

ConvertKit Form

Get Every Recipe

And the insider's view from our kitchen

Success! Now check your email to confirm your subscription.

There was an error submitting your subscription. Please try again.

We won't send you spam. Unsubscribe at any time. Powered by ConvertKit

Follow Me

  • Facebook
  • Google+
  • Instagram
  • Pinterest
  • RSS

Search

Please Read:

The information you find here at The Nourishing Gourmet is meant to help you become a better cook! This site is primarily for sharing family friendly recipes. It's not meant to give medical advice or to make any health claims on the prevention or curing of diseases.This site is only for informational and educational purposes. Please discuss with your own, qualified health care provider before adding in supplements or making any changes in your diet. Also, any links to sponsors or affiliates (including Amazon) may give me a percentage of the sale or a pay per click. Thank you for supporting this site.

Categories

  • $10 Main (42)
  • $5 Dishes (43)
  • 52 ways to save money on a healthy diet (53)
  • AIP (23)
  • Baked Goods (83)
  • Beverages (72)
  • Breakfast and Brunch (61)
  • Condiments (8)
  • Dairy Free (492)
  • Desserts (184)
  • Dietary Needs (6)
  • Egg Free (11)
  • Egg Free (86)
  • For the Kids (66)
  • For the Love of Food and Books (18)
  • Gluten Free (484)
  • Grain Free (95)
  • Health (75)
  • Kitchen Tools (4)
  • Main Dishes (126)
  • Nourishing Frugal Recipes (167)
  • Nourishing Frugal Tips (70)
  • Nourishing Practices (56)
  • Nutrient Dense Foods (70)
  • Q and A (15)
  • Salads (39)
  • Sides (101)
  • Snacks (124)
  • Soups (50)
  • The Healthy $1 Menu (21)
  • The Low Energy Guide to Healthy Cooking (18)
  • THM (2)
  • Trim Healthy Mama (2)
  • Uncategorized (846)
  • Vegan (241)
  • Vegetarian (361)

Recent Posts

  • 2 Ingredient Peppermint Bark
  • Herbal Hibiscus Lemonade (Keto, THM)
  • Creamy Curry Red Lentil Soup
  • One-Pot Gluten-Free Mac and Cheese
  • Healthy Pumpkin Spice Granola
  • Crispy Pumpkin Spice Granola (oil-free)
  • Why I Use THM Principles Now
  • Vietnamese Beef Noodle Salad
  • Coconut Flour Pancakes
  • Instant Pot Mexican Shredded Chicken

Recent Comments

  • Dorene St G on Cracker Toffee (Easy Peasy Christmas Candy)
  • Nadia Kriston on Finding a Toaster Oven Without Nonstick
  • KimiHarris on How to make heavenly coconut milk whipped cream (with an isi dispenser)
  • KimiHarris on Autumn Beef Stew (Tomato Free)
  • KimiHarris on How to make heavenly coconut milk whipped cream (with an isi dispenser)

Fresh: Nourishing Salads for All Seasons

Get Every Recipe

And the insider's view from our kitchen

Success! Now check your email to confirm your subscription.

There was an error submitting your subscription. Please try again.

We won't send you spam. Unsubscribe at any time. Powered by ConvertKit

Footer

Privacy

Copyright © 2023 · Foodie Pro & The Genesis Framework