
Chicken broth is one of the most wonderful foods out there. It is full of flavor and incredibly nutritious! And it’s also very frugal to make, which is why it was one of the first things I mentioned in my 52 ways to save money on a healthy diet series. We actually save a lot of money when making soup based meals often because broth can be very frugal to make. Today, I want to show you an even more frugal method to making chicken broth!
As the contributing writers and I have been working on The Healthy $1 Menu series, we have struggled to put a price on homemade chicken broth – partly because we make it with slightly different methods, causing a fluctuation in price. One of my contributors choose to list hers as “free” because she follows a method which basically just uses food scraps! Broth is wonderfully adaptable, and this is one super-frugal way to make it.
I think that it is such a great method, that I thought I’d share how I make broth using scraps (you can also read my other method here). I’ve referenced this method before, but I thought it was worth showing step-by-step.
I basically have two freezer baggies, one for bones, and one for vegetable scraps. Whenever we do any type of bone-in-chicken (like these Lemon Garlic Drumsticks), we save the bones by placing them in the freezer bag and putting them in the freezer. When I am peeling carrots, have bits and pieces of leftover celery, onion,mushroom stems, etc, I put them in the second bag and also freeze it. When you have enough to make a pot of soup, you dump everything into the pot, add whatever herbs or other additions you want, and then cover with water, bring to a boil, and after a long simmer, they are done! Here are pictures of that process.
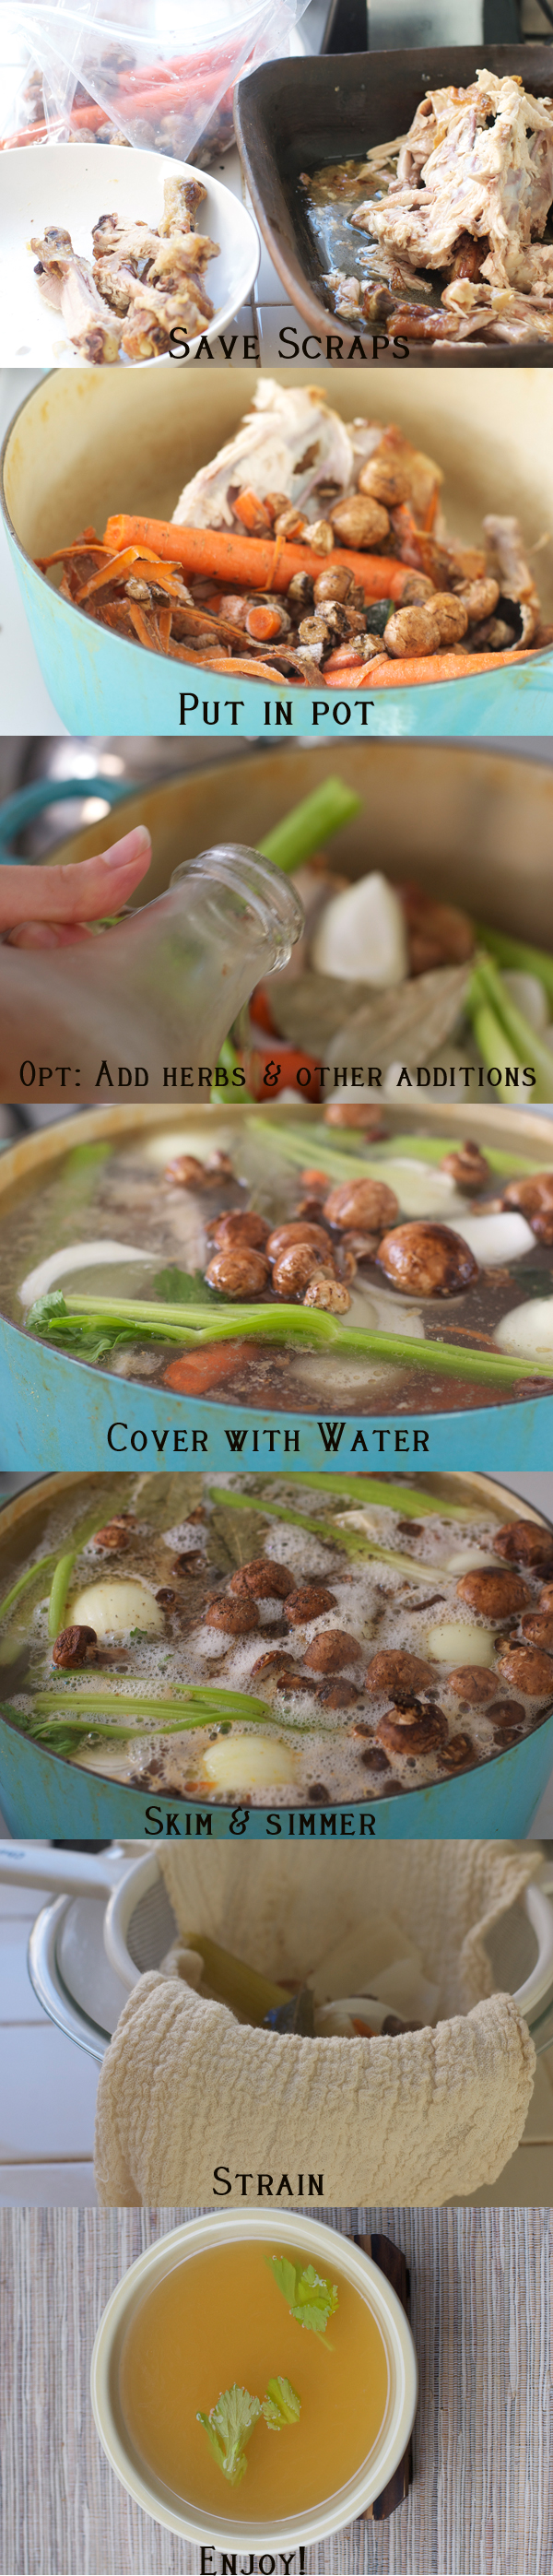
For this specific batch, I had saved carrot peelings, a few limp carrots from the bottom of my five-pound bag, a handful of unused mushrooms, and mushroom stems. I choose to add a few things to round out the flavor – two celery sticks, 1 onion, peppercorns, and two bay leaves, but you would have a great broth without those additions.
A few warnings: I like long simmering times as it really breaks down the nutrients in the chicken bones. When you do a long simmer, if you add onion peels at the beginning of the process, they will make your broth bitter. If you’d like to add them for color and nutrients add in the last hour or two of the cooking process. Make sure to rinse all your vegetable scraps too.
When saving vegetable scraps for the cooking process, make sure you always use good vegetables (no moldy or gone-bad ingredients –ever), and that you leave out strong tasting vegetable scraps, such as chard, and beet tops. They will overwhelm the flavor.
- In the freezer, save in separate freezer baggies any chicken bones or suitable vegetable scraps until you have enough to make a pot of soup. Examples of suitable vegetables: Carrot peelings (washed before peeled), celery leaves or ends, leftover chopped onions, zucchini pieces, mushrooms and mushroom stems.
- Dump in a pot and add (optional) two bay leaves, 2-4 tablespoons of raw apple cider vinegar or kombucha vinegar, 10-15 peppercorns, and any other vegetables you’d like to add to round out the flavor.
- Cover with water and bring to a simmer. Use a spoon to skim off any foam as it rises.
- Turn down heat low enough to just keep at a low simmer, and simmer for 3-24 hours (the longer the better).
- Strain through a fine sieve (for a really well strained broth, also line the fine sieve with cheesecloth) into a heat-safe bowl.
- Salt well (up to 1 tablespoon of unrefined salt per 4 cups), and enjoy in a soup or or even simply well salted and topped with parsley!
Latest posts by KimiHarris (see all)
- 2 Ingredient Peppermint Bark - December 21, 2022
- Herbal Hibiscus Lemonade (Keto, THM) - March 16, 2022
- Creamy Curry Red Lentil Soup - December 8, 2021
I love making chicken broth, but I find that when I used previously-cooked bones, like from another chicken meal, the broth has a strange smell and taste. Do you ever find that? Does it depend how the chicken was cooked in the first place? It doesn’t seem like roasting a chicken and using the carcass or roasting a few drumsticks and using the bones should make such a huge difference in taste. What do you think?
I found that, too, especially if I used a previously roasted chicken’s bones. I now like to use half roasted bones and half raw bones – I find it gives the broth the best flavor. You can also throw in a pork or beef bone for enhanced flavor. I’ll have to be better about using scraps, etc. as I always use fresh veggies for my broth and I could be more frugal. Thanks for the reminder!!
Magda,
I also really love the combo of roasted and fresh! (The other chicken broth I linked to above uses both). However, as long as you have plenty of roasted bones, I’ve also found that just roasted bones can create a flavorful broth as well. 🙂
Oops, Nikolia! It looks like my earlier reply to your question got lost in cyper-space. Basically, you should still be able to make a GREAT tasting broth with leftover roasted bones. The times when that hasn’t been true for me have been for three reasons. 1) I let the bones sit around in my refrigerator too long. Take a sniff, if they still smell chicken-y and fresh, they are good. If they are starting to turn at all, it makes a bad tasting broth. 2) When I have heavily flavored my chicken – like with curry, my broth ends up flavored too. 3) I use too much water. Hope that helps!
Yum! I always add a splash of raw Apple Cider Vinegar to my stock pot, too, because I’ve read that it helps draw more nutrients out of the bones.
Me too!
This simple post just answered a couple basic questions I’ve had that have been keeping me from being more frugal. Thank you!
So glad it was helpful, Lynda!
I’ve done this with my beef soup bones.I have made beef stock concentrate by first roasting all the bones then put them all(I had about 10 lbs of them)into my counter top oven.I add lots of carrots,onions,celery, peppercorns garlic, rosemary and 1-1 1/2 cups of red wine. I cover it all with filtered water and let it simmer for about 24 hrs. When it is cooked down enough it will form a very thick jelly when cooled. As I take the bones out of the stock I scrape all the bone marrow back into the broth. I then package 1/2 cup portions in sandwich bags,freeze them. I then use 1 pk plus 1/2 cup filtered water to make 1 cup of beef stock. It makes a very favorable broth that really adds to the flavor of whatever beef dish you make. My husband really likes the taste of it.
thanks for the excellent webpage
Joan
Joan
Love it, Joan! I also make beef stock and it’s simply delicious as well. 🙂
When growing up, my mom would place the whole onion on the gas burner and singe the onion (after peeling). I now know that it imparted more flavor into the broth as using the onion peelings add nutrition. I also found (on another site) that adding egg shells (of course from pastured chickens) imparts nutrients also. I used to purchase chicken feet from a farmer who raised chickens. This certainly made the broth more gelatinous.
Elizabeth, YES! Onion grilling produces a rich flavor. Nice!
Hi Kimi,
Do you by chance know where you got the cheesecloth that is in the picture? I have one like that and have searched high and low to find more to buy and have not found them anywhere…would love to know your source if you know…
Thank-you,
Karen
Karen,
You know, I am trying to remember the brand name, and it just won’t come to mind! I will try to remember to check where I buy it at, next time I am there.
Just a heads up that limp carrots and celery don’t need to be relegated to the “scrap” pile. They can be restored to crispness by letting them sit in cold water in the refrigerator for a while.
I love this idea!I want my family to have more broth.I’ m trying to transition my family to more healthy eating.I buy organic chicken when its on sale or on clearance(still can be costly) also when I can ,I get a fowl from a farmer.I always put the whole chicken In the pot and my family doesn’t like the meat from the chicken after it has been used for broth.It is embarrassing to say its very hard for me to be creative with the meals and to be frugal that’s why I love the scraps idea,but I was wondering how much broth can you get from bones of one chicken?I like to make soups in bulk because when I feel like life get crazy,instead of getting a unhealthy quick meal ,I can pull out soup from the freezer and feel good about giving my family a very nutritional meal.Thank you so much for the all the tips…already have bones from 2 chickens in the freezer:)
Sorry for the double post,the first one didn’t show up on my end