By April Swiger, Contributing Writer
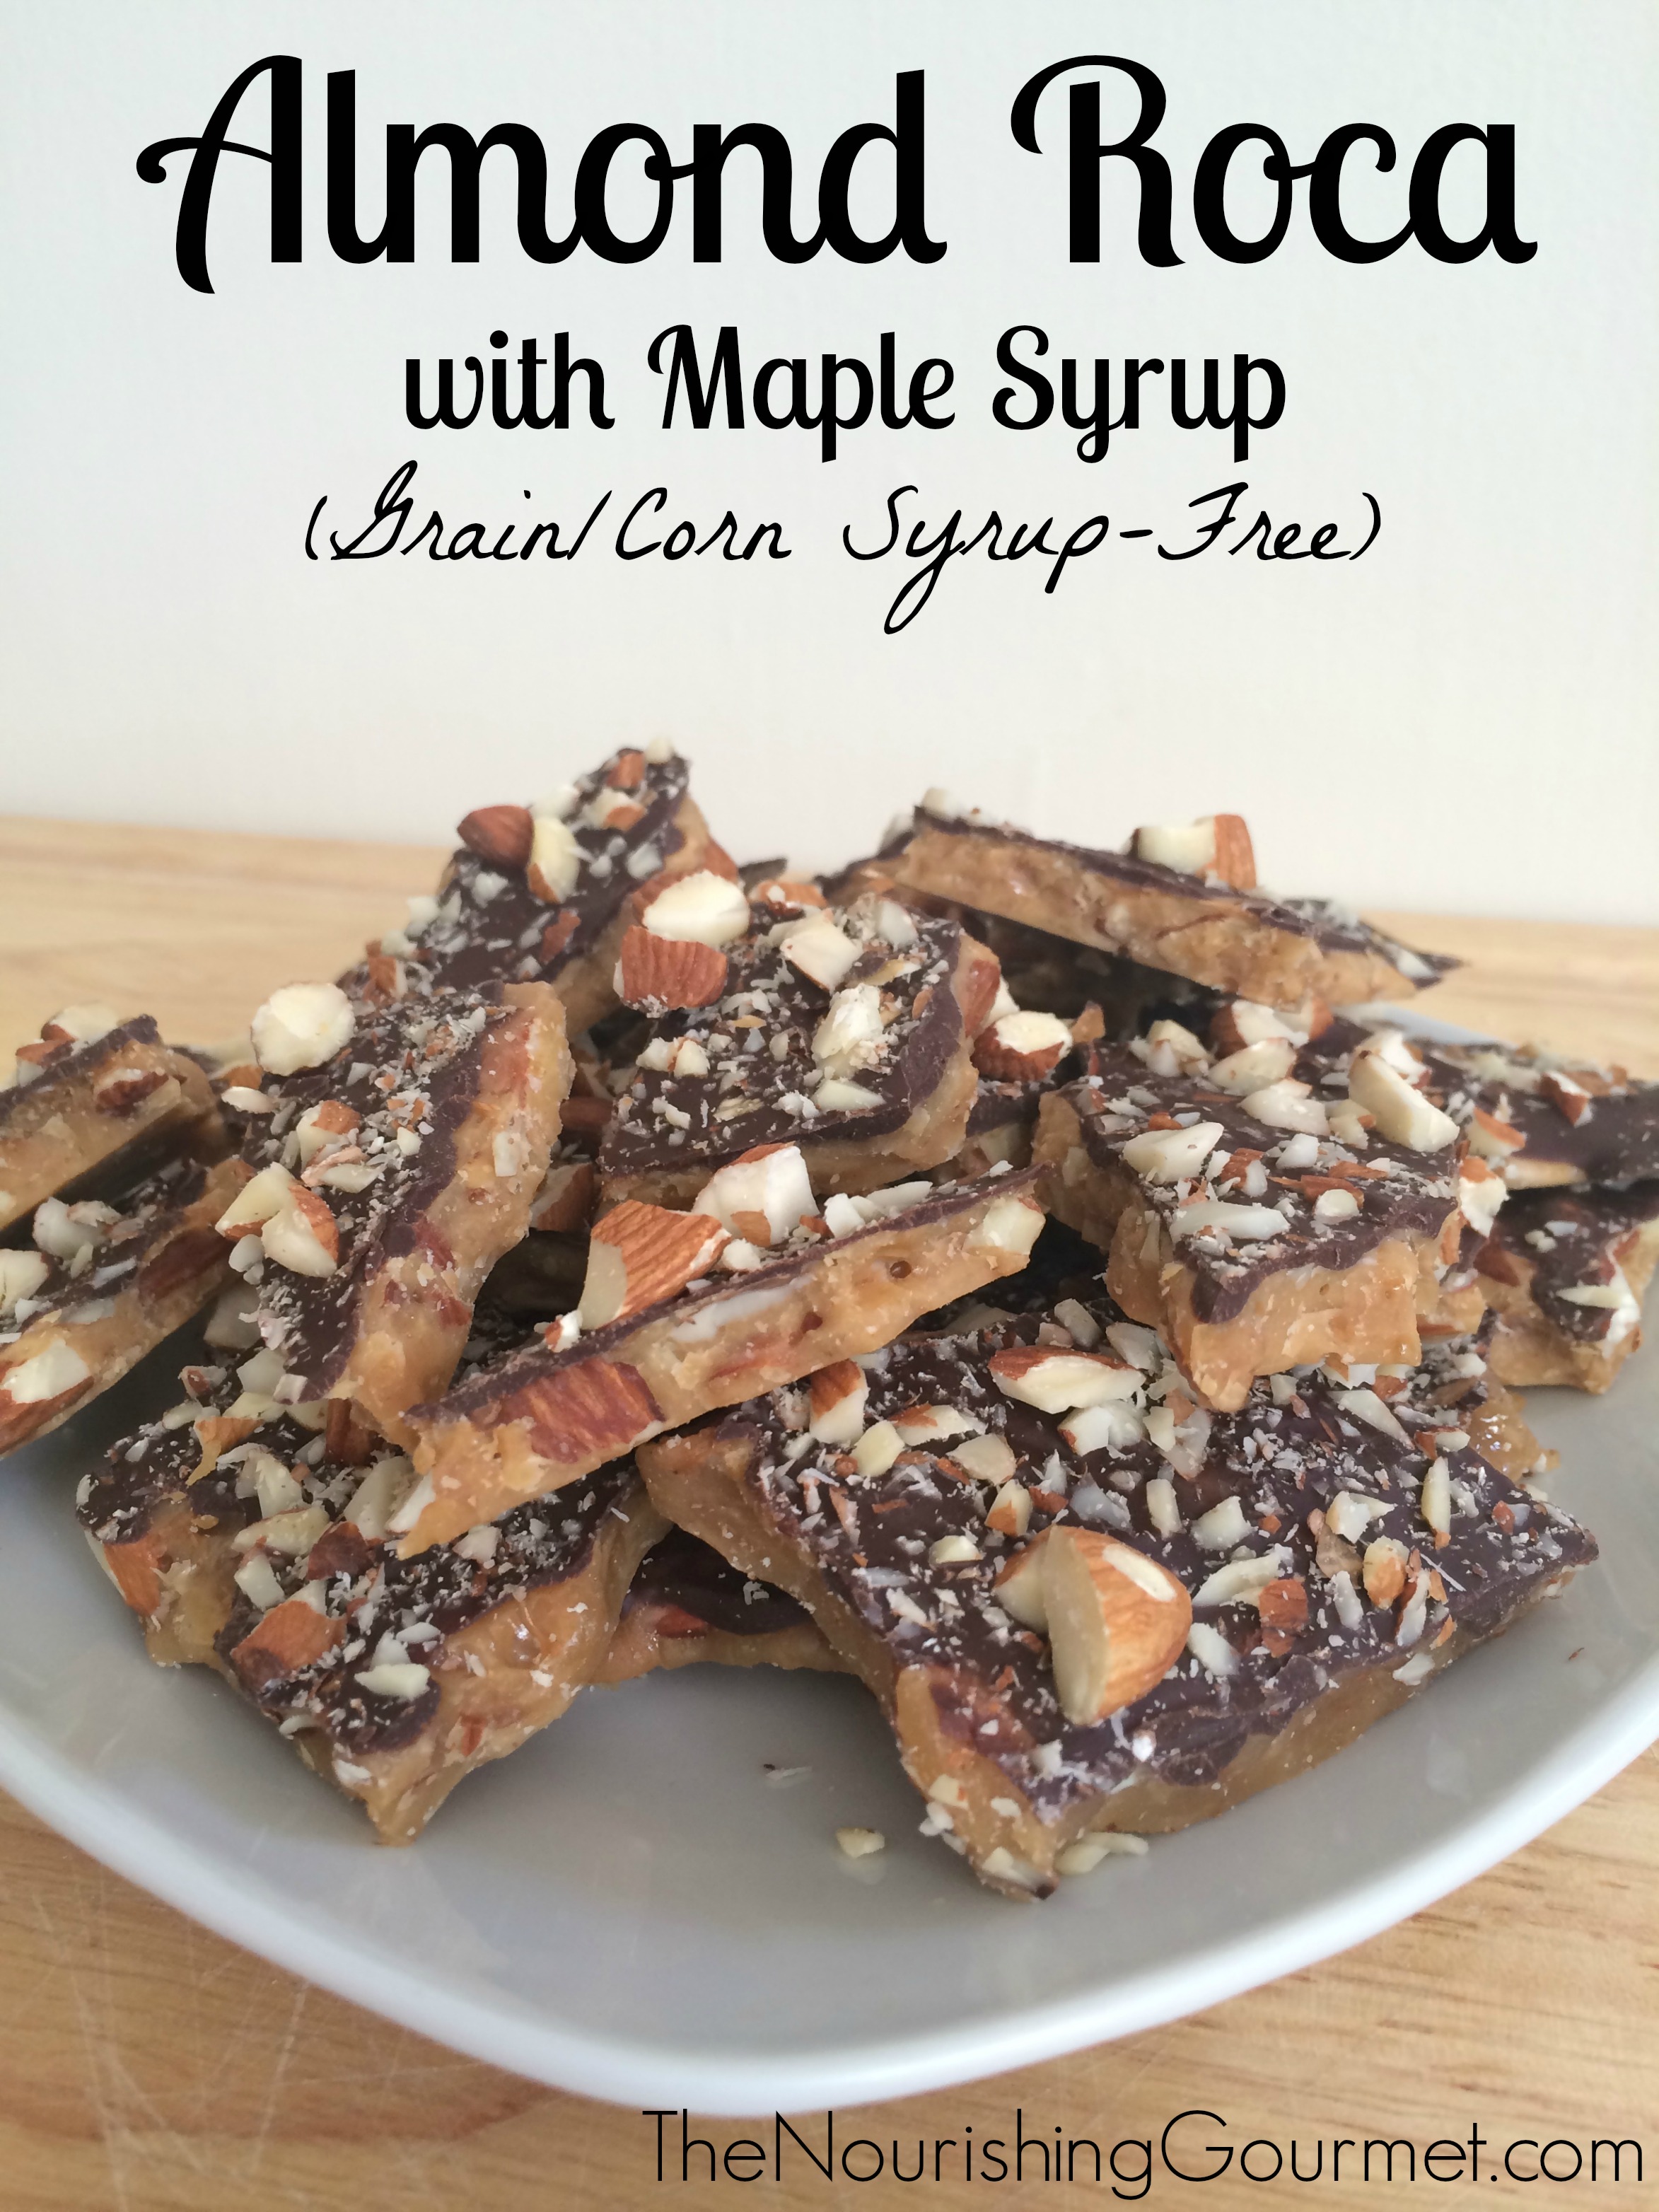
Crunchy, buttery, stick-to-your-teeth chocolaty goodness! Almond Roca (also known as Almond Toffee) is my favorite treat this time of year. The mixture of creamy butter, and pure maple syrup, heated and cooled to crisp toffee is absolutely to die for! Topped with chocolate, and chopped almonds, this dainty sweet is perfect to share with those you love. Better yet, you don’t even need a candy thermometer to make it!
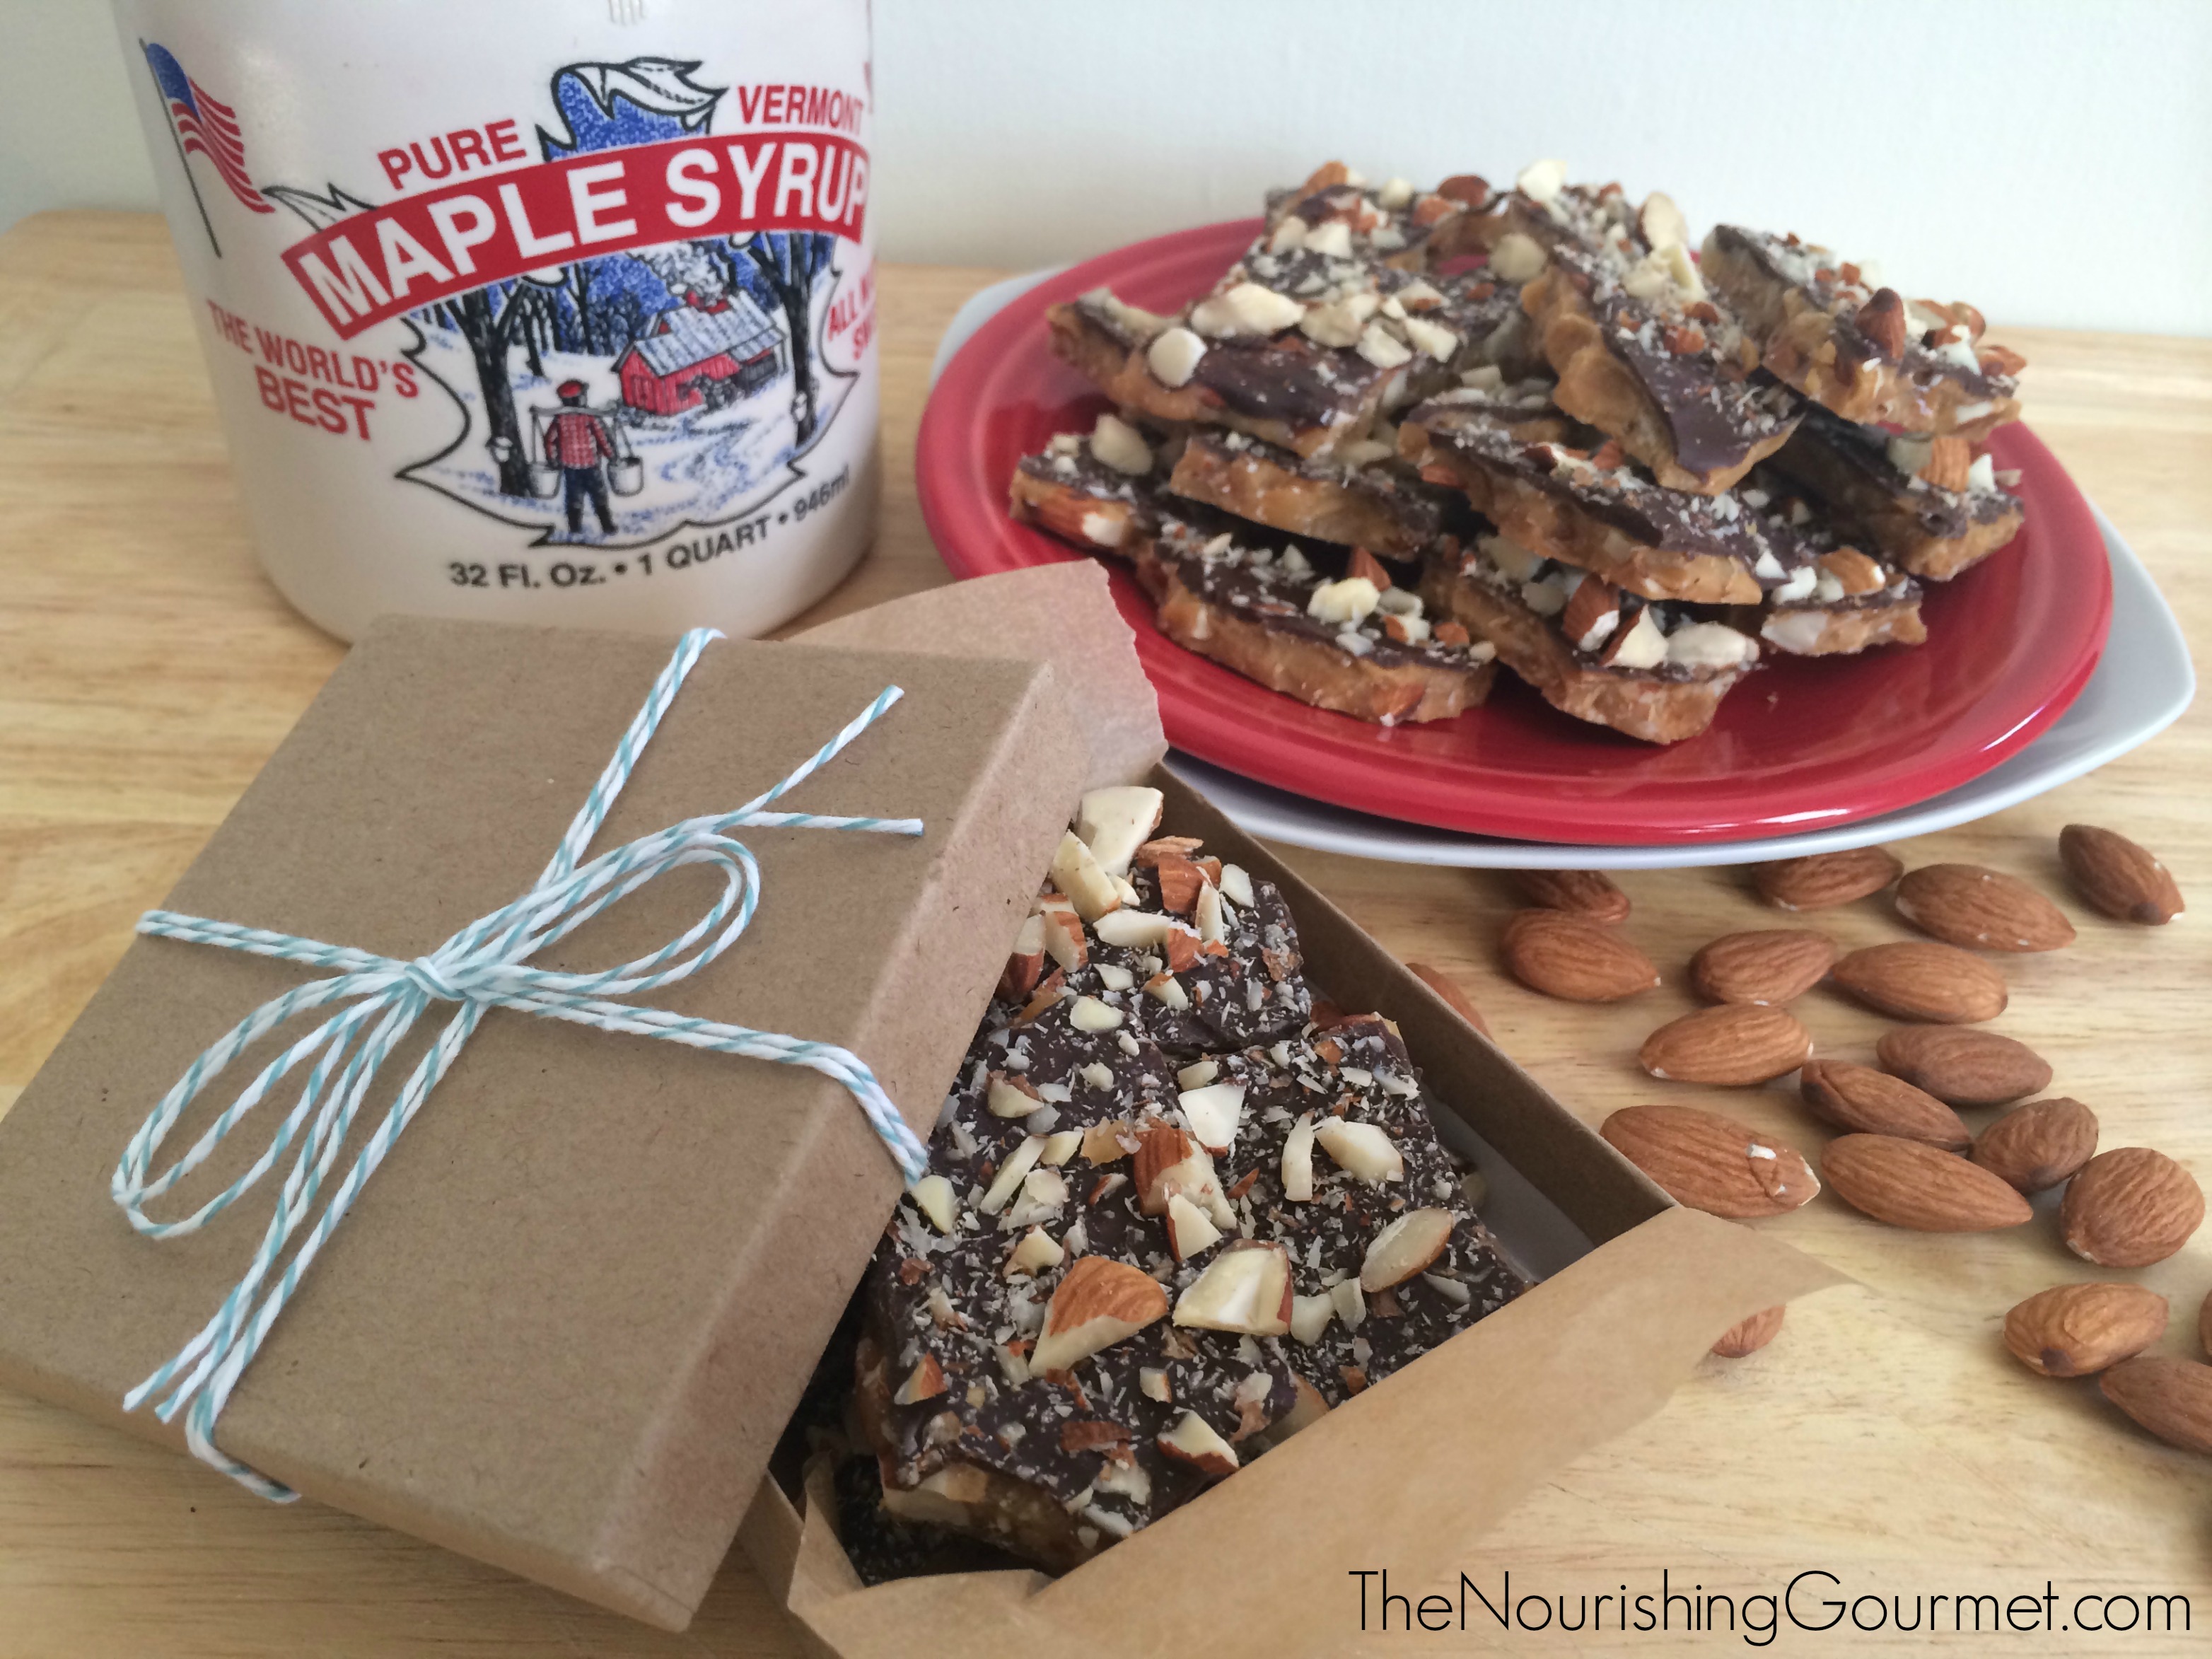
I feel spoiled living in New England, surrounded by some of the best maple syrup in the whole world. Small “sugar shacks” dot the curvy rural backroads I often drive on through picturesque Connecticut towns. I was recently gifted two jugs of this “liquid gold” from local farms in our region and they have been burning a hole in my cabinet! With my calendar full, and gift list long, I knew it was time to experiment with a naturally sweetened version of my annual favorite.
According to Sally Fallon in Nourishing Traditions (page 536), maple syrup is “The concentrated sap of huge deciduous trees, maple syrup is rich in trace minerals, brought up from below ground by the tree’s deep roots. It imparts a wonderful flavor to cream-based desserts and may be used in baked goods, such as muffins and pancakes.”
Maple syrup contains antioxidant minerals like manganese and zinc, which are great for the immune system, and makes for a wonderfully natural alternative to refined sugar and corn syrup. However, it’s extremely important that 100% pure maple syrup is used. Most syrups bought at the grocery store are cut with corn-syrup, high fructose corn syrup, and fake maple flavoring. Buying 100% pure maple syrup from a reputable farmer is the best way to ensure its purity and health benefits.
Almond roca can be tricky to make, so be sure to give your full attention to the time spent at the stove. I don’t have a candy thermometer, but have learned how to make this sweet treat by sight and smell. It’s quite easy if you know what to look for. I’ve included a helpful step-by-step guide for you below so you can learn the stages of “melt” and create the most perfect almond roca!
UPDATE: See the note at the end of the recipe for information about using a candy thermometer and some troubleshooting tips!
A few thoughts about my ingredients:
- I used raw almonds in this recipe and chose not to soak and dehydrate them this time (although I have in the past for a different recipe!). If you would prefer to soak and dehydrate them, they should still work perfectly for almond roca! Kimi has previously written about phytic acid in nuts and seeds, as well as instructions for soaking them that are very helpful.
- I chose to use a brand of chocolate chips that are gluten, dairy, nut and soy free (affiliate link). Most store bought brands of chocolate contain soy lecithin, an artificial emulsifier that is most likely genetically modified. You could also use dark chocolate for a less sweet roca, or a homemade chocolate chip alternative. It’s up to you!
- Note from Kimi: This recipe uses beautiful butter, and it reminded me to tell you all that you can now get one of my favorite brands, Kerrygold, through my affiliate Amazon! Get a single one here, or a box of twenty. So helpful for those who can’t get it locally.
- 2 sticks of butter (16 Tbls)
- 1 cup pure maple syrup
- 2 Tbls water
- 1 cup almonds, coarsely chopped
- ½ cup (heaping!) chocolate chips (I use a dairy/nut/soy free brand. You could also use dark chocolate for less sugar content)
- ⅓ cup finely chopped almonds for sprinkling
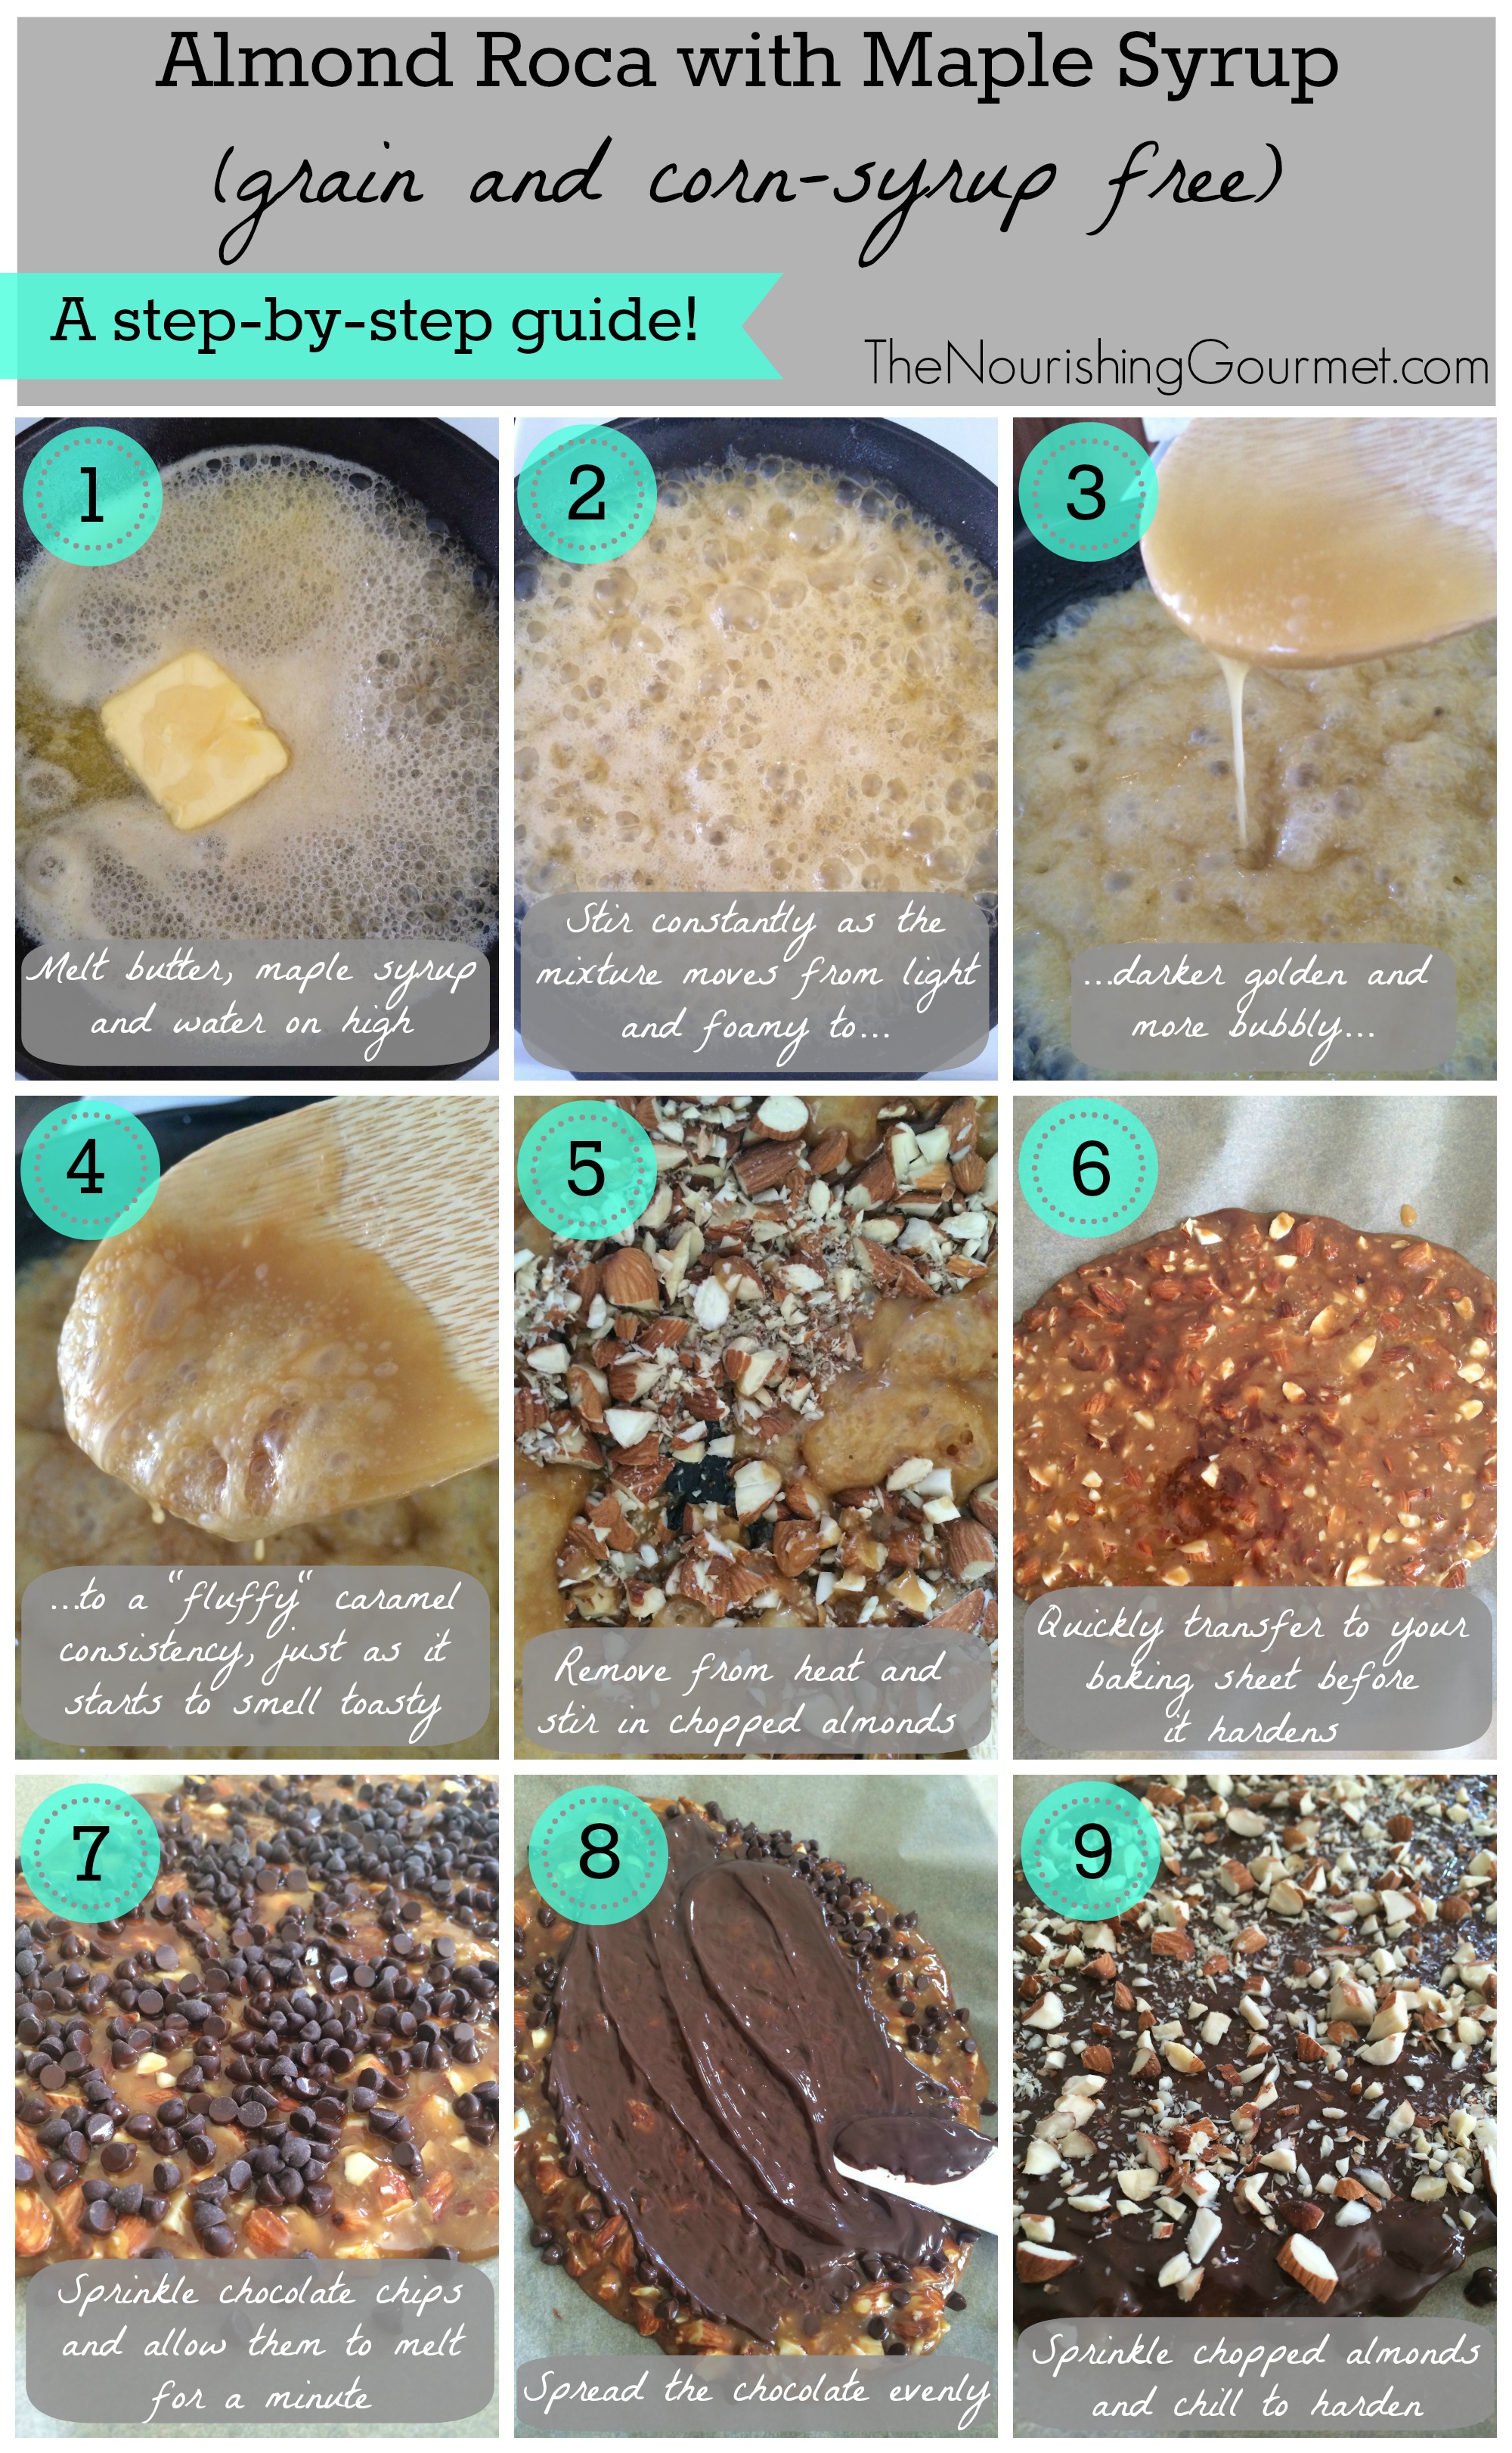
- Prepare a small baking sheet (9x13) with parchment paper. Be sure to use one that has edges so the toffee doesn't drip out.
- In a saucepan, or cast-iron skillet, melt the butter, maple syrup, and water together on high, stirring constantly.
- These ingredients will move from a light golden color with a foamy consistency to darker with more bubbles, and eventually thicker and caramel-like.
- When the color begins to darken, and smells slightly toasty (be careful not to burn it!), remove the pan from the heat and quickly stir in the 1 cup of coarsely chopped almonds.
- Immediately spread the mixture onto the parchment paper evenly before it hardens. It will darken in color at this point.
- Sprinkle the chocolate chips on top. After a minute or two the chips will have melted into the hot toffee.
- Use a knife to spread the chocolate over the top.
- Sprinkle finely chopped almonds onto the chocolate.
- Refrigerate until hardened, or freeze for 20 minutes if you're impatient like me 🙂
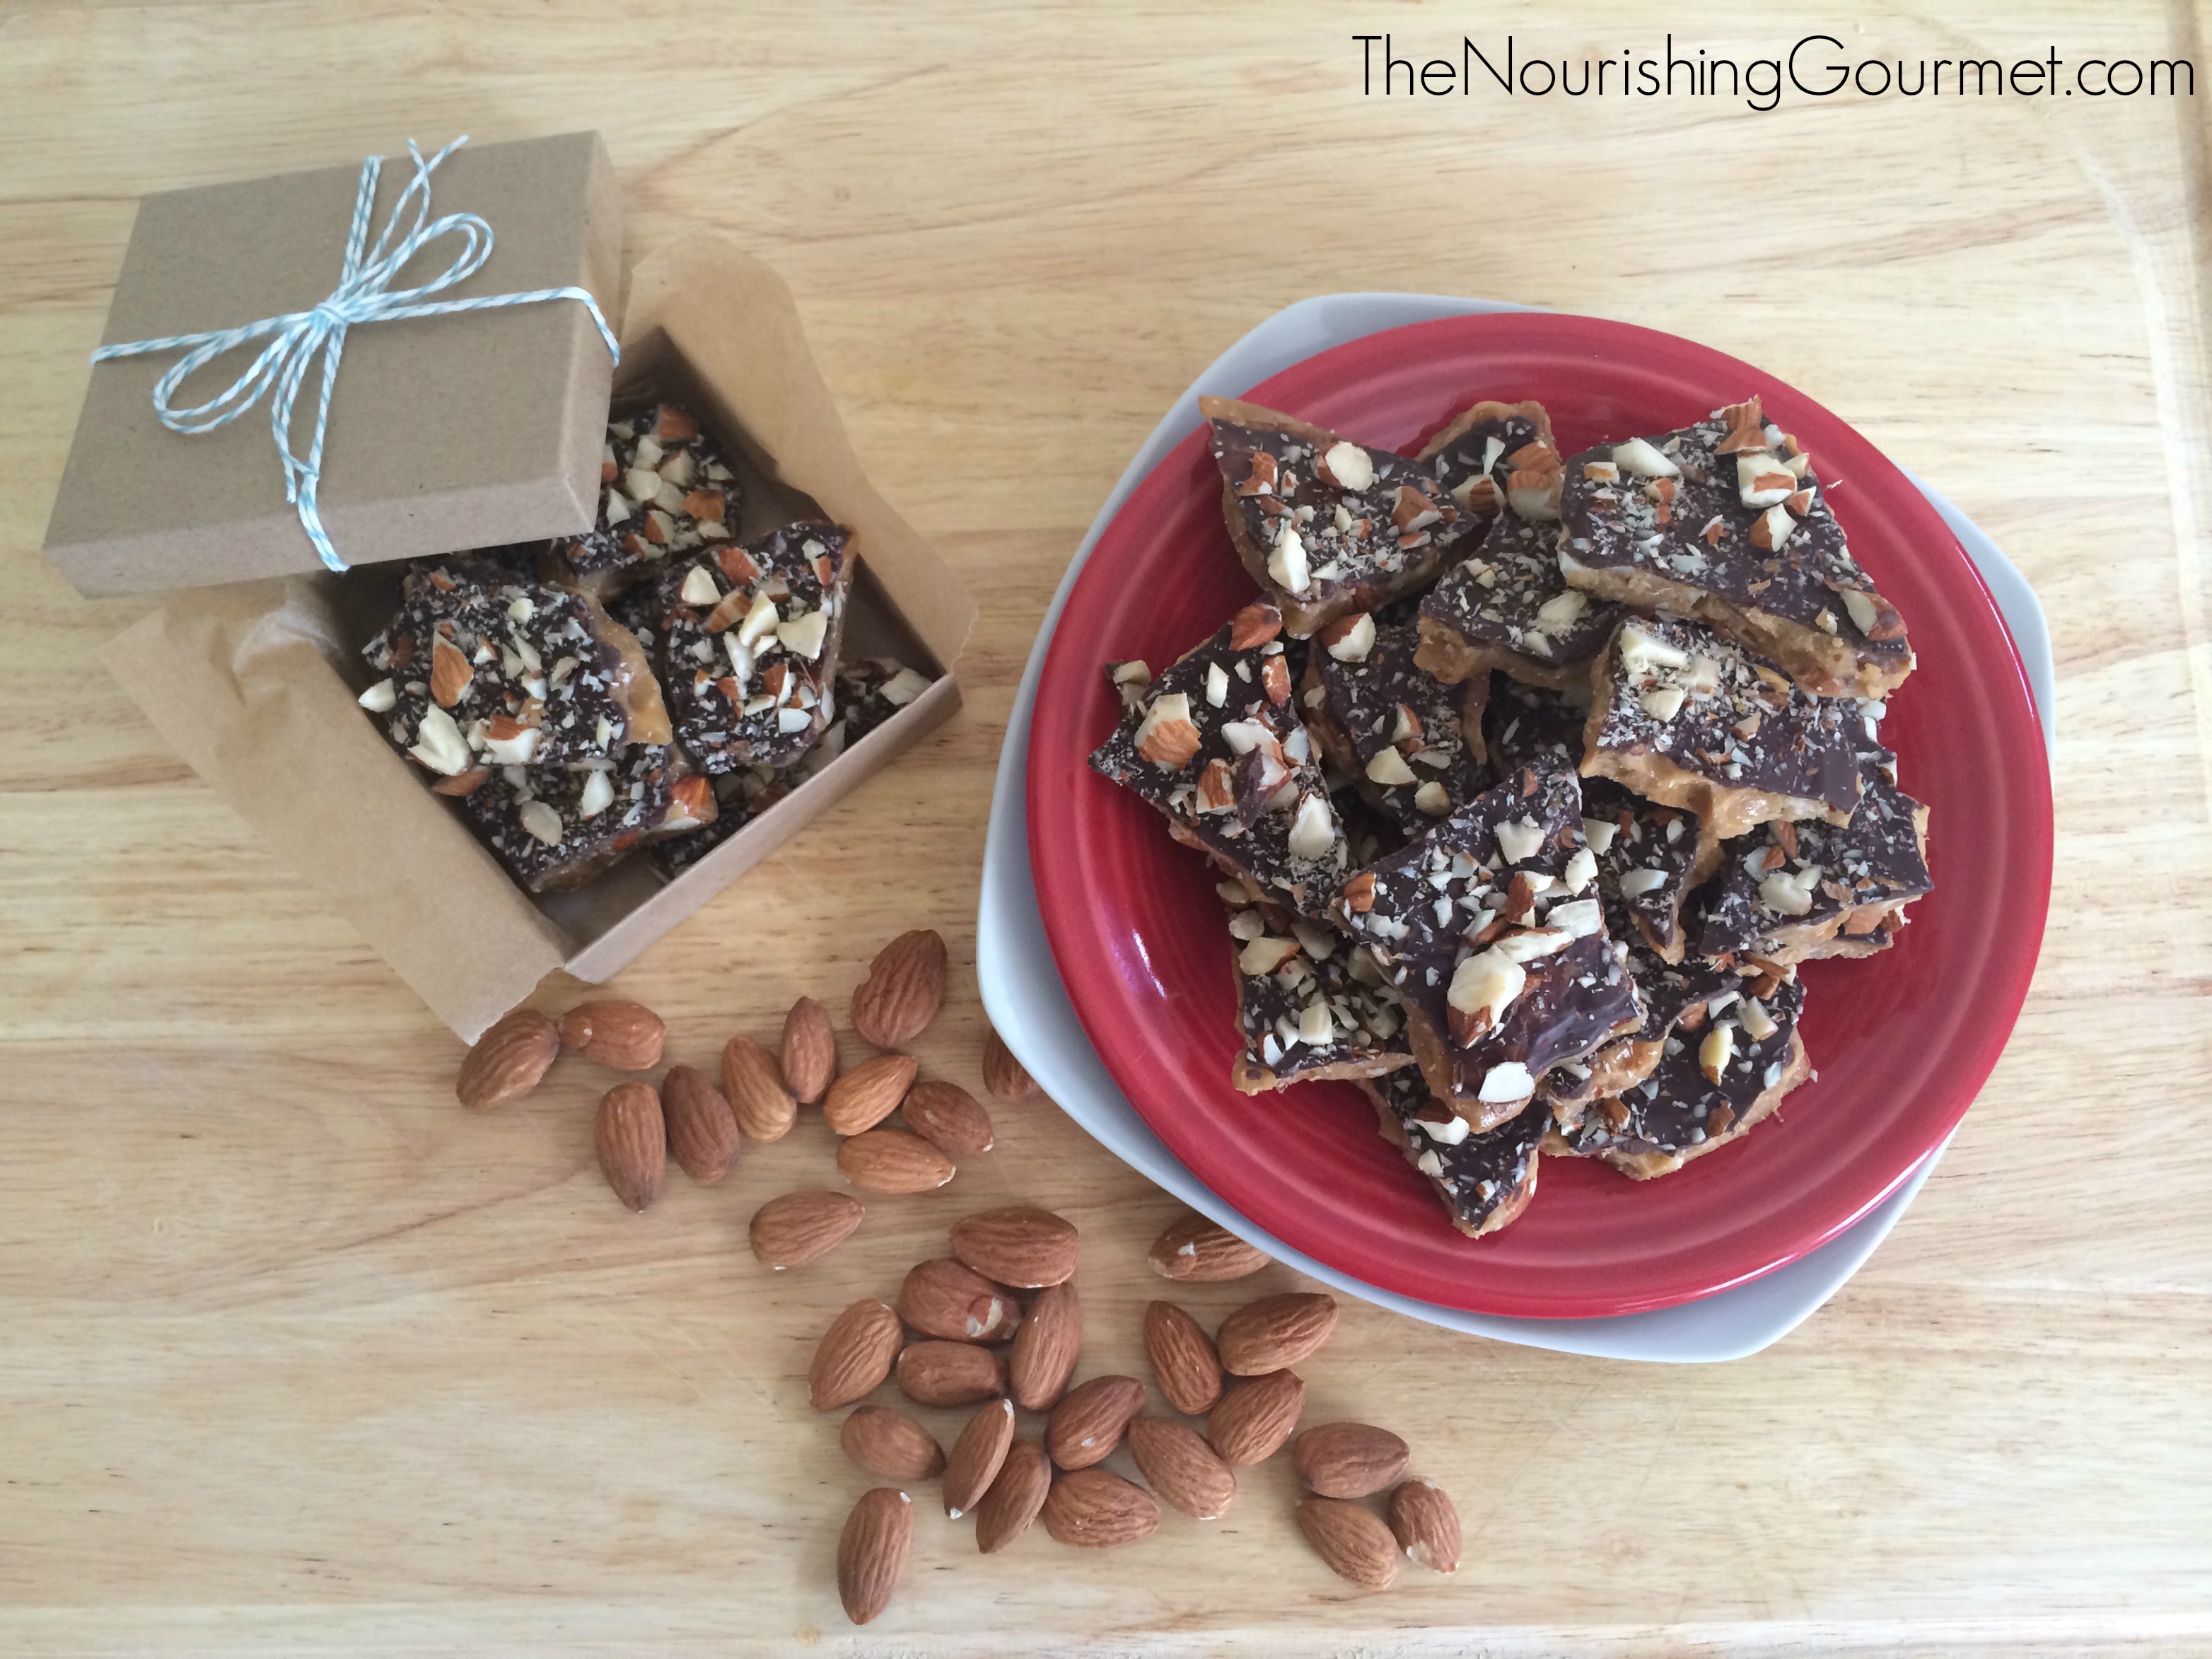
- Break the roca into small pieces and enjoy!
Other sweet treats you may enjoy:
- Cracker Toffee
- Chile-Spiked Dark Chocolate Bark with Pepitas and Mango (dairy-free)
- Gluten and Dairy Free Pancakes (for any extra maple syrup you may have around!)
Latest posts by April Swiger (see all)
- Stuffed Butternut Squash with Bacon, Brown Rice, and Mushrooms - September 23, 2015
- Roasted Beet and Blueberry Salad - June 17, 2015
- Stress Relieving Lavender Lemon Balm Iced Tea - May 15, 2015
Do you think this would work as well with margarine? I’m on a dairy free, gluten free, no eggs, no peanuts, etc, diet while nursing my kiddo and I’m desperate for some holiday favorites.
Hi Theresa! Thanks so much for reading, and for your question 🙂 I have not tried this recipe with margarine, so I don’t know if it would be a good substitute. Regardless, I wouldn’t recommend margarine anyway, as it’s highly processed and not as “heart healthy” as we’ve been led to believe. I’ve only used butter in this recipe, so I’m not confident at this point to recommend something dairy-free that may (or may not) work.
I doubt it would work. Ghee might, though.
Great idea, Christina! I would give ghee or coconut oil a try for a dairy-free option. I have not tried either, but I know Kimi has had success with coconut oil. It’s worth a shot!
This looks fabulous! And yes, you are spoiled living in New England. 😉
Thanks Natalia! It’s a good place to live 🙂
I had a similar question and was going to ask if you thought I could sub coconut oil for the butter. LOL. We can’t do any dairy at all here 🙁 but I LOVE toffee and brittle. I’ll try it and let you know how it works!
Cheryll, please let me know how it works! If I was going to experiment with a dairy-free version, coconut oil would be my first choice.
Cheryll,
I’ve been very happy with my results when using coconut oil instead of butter in candy recipes. I am betting that it will turn out great! In fact, I used it in my caramel sauce with great results. 🙂
this looks sooo good!! do you think it would work with honey too?
I think it would, Maxi (although I haven’t tried yet)! Give it a shot and let me know how it goes 🙂
Oooooooooh my goodness, this looks amazing!!!! I am definitely making this for when my family comes to town for Christmas. They will LOVE it! (And I will definitely wait until then to make it because otherwise I will, ahem, love it a bit too much all by myself…)
Thanks Alison! I would be embarrassed to admit how much my husband and I have eaten this past week 😉
What a fabulous recipe! I will definitely try it out soon, thanks! You did leave detailed instructions, but I do have a candy thermometer and I’d be afraid to mess it up just by sight. Do you know what temperature to heat the butter/syrup mix?
Hi Faye! So glad you’re going to try it! I’m not entirely sure, since I don’t have a candy thermometer myself, but similar recipes are saying the 290-300 F range is when to pull the candy off the heat. Hope that helps!
I often purchase chocolate chips from trader joe’s. supposedly, their products are gmo free. Does anyone know if this includes the lecithin in their chocolate chips?
soy lecithin……or soy anything, Avoid. Go to @Penzeys.com they carry ‘Natural High Fat Cocoa’ >>>NO Soy Lecithin>>>>>>OH MY ! Heavenly Stuff !
Oh, this looks so good. It might be a good real food substitute for my grandma’s famous English toffee recipe that we make every Christmas…
Let me know if you try it, Leah! English toffee is so delicious!
Thank you for posting this recipe! Tonight is my second attempt (it’s cooling in the fridge now). The first time around, I ended up with a very yummy, but very un-brittle-y candy that never hardened. This time around, I used a thermometer and saw that I did not have it on the heat long enough the first time (probably under 2 minutes), because some of the cooking stages can really look like others as it cooks. I had my computer next to me the first time and compared, too! I wonder if you might try this recipe and post it with degrees for those of us who try it who’ve never made candy before. Love your blog, love the recipe, and I can’t wait for what’s to come! Thanks!
Sarah, thanks so much for your comment! I’m so sorry your first attempt didn’t go so well, but glad to hear you tried again tonight! I’ve never used a candy thermometer with this recipe (I don’t even own one), but I know similar recipes say 290-300 F is when you should remove the candy from the heat. Hoping your second attempt came out great!
Sarah,
Hope your second batch worked out! Timing it always a tricky thing with candy making, even when using a thermometer. Here is a guide that could be helpful. I’ve used the timing method, I’ve dropped small pieces of the candy in ice cold water to check each candy stage, and also used a candy thermometer – all with success (but all with some draw backs). I do agree with you, Sarah, that the different stages can look very similar when cooking.
Thank you both for your speedy replies! The roca turned out FABULOUS, 5 stars from my husband and my coworkers, too! (I actually used pecans, for those looking for an alternative). I took mine off the heat around 180-90 or so, just as it was mostly frothy and starting to lose its froth, for what that’s worth. It could be that my thermometer was reading low due to the relatively thin layer of candy because of my saucepan size. I’d recommend halving the recipe for those trying it for the first time–that’s what I did both times so I didn’t waste that “liquid gold” :D. Thanks again! Happy candy making!
Yay! So glad to hear that, Sarah! Yes, halving it is a good idea when experimenting for the first time….and so there’s not a lot laying around the house 😉 Also, I added a note to the end of the recipe with temperatures, and other tips, for those who may benefit from it. Thanks for your feedback about that! Enjoy the roca!
If your candy in the pan is not deep enough, you will not get an accurate temperature reading and using ice water to test will be more accurate.
yes, I agree.. those of us who are candy making challenged would do well to know the temp.. thank u!!!!!!!!!!! this looks A.M.A.Z.I.N.G!!!!
on the sub with honey… I would recommend maple syrup.. honey (IMO) is made to be eaten raw..
🙂
I will, however, try the coconut oil… 🙂
Hi Tammy! Thanks so much for your comment. I put a note at the bottom of the recipe with temperatures, and a few other links that may prove helpful. Let me know if you try it, and how it turns out 🙂
yes, I agree.. those of us who are candy making challenged would do well to know the temp.. thank u!!!!!!!!!!! this looks A.M.A.Z.I.N.G!!!!
on the sub with honey… I would recommend maple syrup.. honey (IMO) is made to be eaten raw..
🙂
I will, however, try the coconut oil… 🙂
My butter is homemade.. and it is also raw.. 🙂
So I had a failed batch too, and I guess I thought it would work if I followed the recipe and pictures. It’s just a bummer cause this is my hubby’s favorite treat/candy and I really wanted it to turn out. It’s hard to want to use another whole cup of maple syrup, which is quite expensive organic. Could you please revise the recipe to say that we should use a candy thermometer and heat to 290-300 degrees, that way these issues are relieved, that is if those using your recipe have one on hand I guess. Thanks! And it looked so pretty too! 🙁 It’s still edible & yummy but just not what you want the final product to be. Thank you for the delicious recipe, I bet it is amazing crunchy like it’s supposed to be!
Crystal, thanks for your comment! I’m so sorry you also had a failed batch. It’s super frustrating regardless, but even more so when the ingredients were expensive. I hate that for you! I’ll put an update in the recipe section about the temperature, but with a disclaimer since I don’t own a candy thermometer, and have never used one. I can’t say for certain that 290-300 F would work from my personal experience (or lack thereof). I’m just going off the recommendation of others who have used a thermometer before.
Kimi posted a comment above with a very helpful link about cooking candy, and the stages. She also mentioned a trick of putting a drop of the mixture in cold water to see how it hardens. Check out that link here (I’ll post it above in the post as well) – http://www.exploratorium.edu/cooking/candy/sugar-stages.html
I so hope you’re able to have a successful batch, Crystal! It can certainly be a tricky recipe. I’ve been making it for a few years, and I’ve found that each batch comes out slightly different from the last. My husband made a batch last week and it was much lighter than the batch shown in the pictures. It was crunchy, but a little softer and tackier than the prior one. It takes a little practice, and I’m still learning too! Maybe I’ll ask for a thermometer for Christmas 😉
Thanks for your feedback, I appreciate it!
So I had a failed batch too, and I guess I thought it would work if I followed the recipe and pictures. It’s just a bummer cause this is my hubby’s favorite treat/candy and I really wanted it to turn out. It’s hard to want to use another whole cup of maple syrup, which is quite expensive organic. Could you please revise the recipe to say that we should use a candy thermometer and heat to 290-300 degrees, that way these issues are relieved, that is if those using your recipe have one on hand I guess. Thanks! And it looked so pretty too! 🙁 It’s still edible & yummy but just not what you want the final product to be. Thank you for the delicious recipe, I bet it is amazing crunchy like it’s supposed to be! I just wish I would have read the comments before making it.
hi!
I left a comment previously before making a batch and now that I’ve made some, I’d like comment again. I didn’t make any substitutions and used a small, stainless pan, 1.5 qt. I think that made a difference. I might use something bigger next time, because it boiled over and I had to lower the heat quite a bit, plus it took forever! It probably took a good 20 min or so and I did use a candy thermometre. The longest part was climbing up to 250 degree range, I even stopped stirring just to get a few other things done. But then, when it did get hotter, the consistency changed, less liquid and more “glooopy” for lack of a better word! And then it started to heat up faster so I went back to stirring constantly. Watch carefully once it gets close, because the temperature climbs fast once it’s really hot. Then in the pan with the almonds, chocolate on top and voila! It did turn out great, my family and I love it and the texture is fabulous, crunchy and perfect! My husband who eats just about anything I make but is picky and gives good “constructive criticism” ;), loves this, so do my kids! Hurray!
So for those of you using candy thermometres and stainless steel, use a bigger pot if possible, be patient and watch carefully once it gets past 250 or so.
Faye, I’m so glad it worked out for you and that your family loved it! Thanks so much for coming to share your experience here. “Gloopy” is a great way to describe it, and it sounds like a slightly larger pan would have made a difference for you! I’m thrilled it still worked well, and so appreciate your sharing it for others to learn from! Enjoy it!
This is so good!! And incredibly easy – yay!!:))
Can’t wait to gift it away. My new favorite food gift. Thanks!:)
You are very welcome, Jill! So glad to hear you loved it, and found it to be an easy recipe!
Just made my 4th batch in the past 7 days. First one was a total bust. Second was chewey instead of brittley but it tasted fantastic, sent it to hubby’s office Christmas party and no one knew it wasn’t supposed to be chewy! Got a candy thermometer from my Sis and these last 2 are perfection. It does sit at 225 or so for a while then shoots up to 300. My thermometer has a carmel stage on it and I took it off the heat just prior to the carmel. It also must be cooked on high heat, not medium for a longer time as that didn’t work at all for me. I cook with gas so my heat comes up quicker than on an electric and seems to work wonderfully. I also used a combo of semi-sweet chips and dark chocolate. Luscious! Family wants another batch for Christmas day. My arm is tired as I did 2 batches in a row today. Thanks so very much April.
Thanks for sharing your experience, Kathy! So glad you finally got a good few batches to share. It can definitely be tricky. I made a batch this past week, and it was a little more chewy than previous batches. Thankfully it did taste amazing, so it will be eaten 🙂 I also have a gas stove, and found that high heat works best as well. Glad you liked the recipe!
I was so thrilled to receive this Almond Roca as a gift from April. It was such a delicious homemade treat. I think the best thing is that the maple syrup mixture is solid enough that is stays together but not overly crunchy (like toffee) making for a smooth delightful bite. Thank you April!
So glad you liked it, Veronica! I was so taken by April’s recipe, that I also made it for gift giving this year. 🙂 It was a big hit.
Could you use coconut oil instead of butter? I might have to make two batches– one for the grown ups and one for the little bellies in my house that don’t tolerate dairy very well! Looks delicious!
Hi Janet – I haven’t personally tried the recipe with coconut oil, but I know others have and had great success with it. I would certainly give it a shot!
If you need a good source for your almonds check us out http://www.burroughsfamilyfarms.com we have organic and truly raw almonds as well as some other yummy stuff!!
I made my first batch tonight and it did’nt harden 🙁 After reading the comments I will give it one more try and leave it at a higher temp longer in a bigger pot. I will update with my second attempt results 🙂
Oh, so sad! Definitely leaving it at a higher temp longer should solve any issues. Where you testing the candy by dropping it into ice water? I’ve found that the most helpful way to see how hard the candy will become once cool.
I made this last year using Green Pastures Coconut Oil/Ghee combination and pumpking/sunflower seeds
instead of butter and nuts due to allergies. It worked well, and was delicious!
Tina,
Thanks so much for sharing your success with the coconut oil/ghee blend! I bet that will be helpful to others too. 🙂
I have tried this 2 times and both times my butter seperated. The first time the candy turned out really crystallized but tasted good. the second time the better separated and the candy never set up. I don’t know what I’m doing wrong can you help me?
Hi Charity – I am so sorry you haven’t had success yet with this recipe. It can definitely be tricky, but regardless, that is very frustrating! I haven’t experienced this issue personally, but found a few tips that may help you out. There are a few factors that could be contributing to your issues with butter separation and crystallization. Let me know if you try again and if any of these tips help – http://challengedairy.com/tips-and-techniques/candymaking-with-butter
Hi, can you please tell me how many grams is in a ‘stick’ of butter?
Also – I’m very jealous of your Maple Syrup stash – here in Australia, we pay about $10 for 1 cup of Maple Syrup. It’s really expensive!
Hi Elizabeth – I googled a quick conversion chart, and I believe there are 113 grams in one US stick of butter. There are 227 grams in TWO sticks of butter, which is what this recipe calls for. I hope that helps!
And yes, maple syrup is super expensive! It’s such a bummer that the most delicious and nourishing foods are so difficult to afford sometimes.
After wasting a cup of organic maple syrup, a half pound of Kerrygold, and a cup of almonds, I’m feeling prompted to warn others to please, please please (!!!!) boil a pot of water and check to make sure their candy thermometer is accurate before attempting a recipe like this! I burned a batch of toffee before realizing that my thermometer is 7 degrees off 🙁 sad. I have a stomach ache thinking of all those awesome ingredients, wasted. Ugh.
Second batch came out delicious, though!
Oh Judy, I’m so sorry that happened to you! That is super frustrating, and something I never would have thought of! Thank you for warning others on here of this potential problem. So glad to hear the second batch came out perfectly though. Enjoy! 🙂
Tried tonight with coconut oil as a non-dairy option based on above comments. The coconut oil completely separated from the maple syrup when it came off the stove unlike the butter. Not sure how that could have worked differently :(. The recipe is smashing with butter, just would like an option to make it non-dairy (anyone?).
I make this about once a week. Best ever “healthy” candy. People who want to change the ingredients may not realize that REAL butter is actually a healthy fat your body needs.
My son and I made our first batch today. We decided to not use a candy thermometer and just follow your directions closely. It turned out perfectly!! We kept reading over the directions and looking at the pictures as the pot was boiling. Looks like we got it off the stove just at the right time. Thanks for the great recipe. So yummy!!
I have never left a review on anything in my life………. But I absolutely had to!! This is the best/easiest/yummiest recipe for roca (toffee) that I have ever made, and I have tried dozens of them. Follow the pictures and it will turn out perfect. I am officially throwing away my candy thermometer. Thank you so much for this fantastic recipe!!
I discovered that for chocolate without sugar if I mix pure unsweetened chocolate with pure cocoa butter 50/50, I don’t need any sweetener I would cover the toffee with this instead of sweetened chocolate. I also use it to make chocolates with nuts and dried fruit inside. My oldest cannot eat dairy or soy and loves this stuff.