• Skip to primary navigation
  • Skip to main content
  • Skip to primary sidebar
  • Skip to footer

The Nourishing Gourmet

Nourishing. Satisfying. Gourmet.

  • About
    • Privacy
    • Contact
  • Recipes
  • Cookbooks
    • Everyday Nourishing Food
    • Salad Cookbook
    • Soup Cookbook

$10 Main

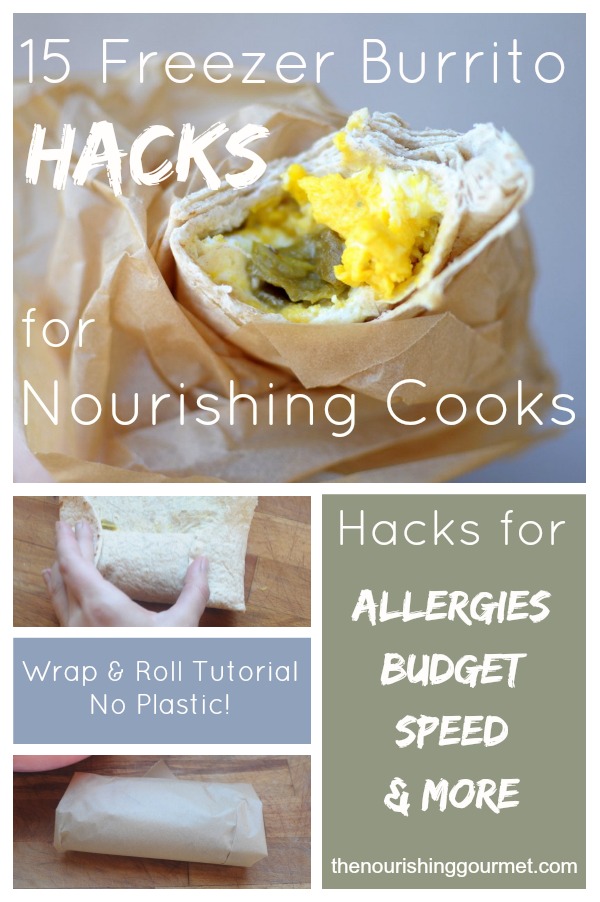
15 Freezer Burrito Hacks for Nourishing Cooks + Goat Cheese-Green Chile Breakfast Burrito Recipe

June 11, 2014 by Alison Diven 24 Comments

15 Freezer Burrito Hacks for Nourishing Cooks: Wrap & Roll Tutorial (No Plastic!) + Hacks for Allergies, Budget, Speed, and More
By Alison Diven, Contributing Writer

Burritos just the way you like them whenever you like them, in minutes. No additives,no plastic, , no iffy oils—just nourishing goodness for no-brainer breakfasts or dinners. Can you tell I love homemade freezer burritos?!

Since I started experimenting with them, my husband has devoured a hot and hearty breakfast every morning with zero fuss, leaving him extra space for his 5 a.m. coffee ritual before work.  He just pops one into the toaster oven to heat while he dresses.

And I, queasy pregnant mama, have an easy lunch or snack for those days when nothing sound good, and I’ve already spent all my energy scrounging for food my toddler deigns to eat.

You know what I mean. Whether you’re tending to babies, stocking the freezer for postpartum life, carting teens around, or just plain busy, we all need convenience food sometimes. These knock the nutritional socks off Evol and Amy’s burritos, can meet your special dietary needs, and are far cheaper to boot.

Wanna know how I’m making it work? Here are 15 freezer burrito hacks to get you started—including ideas for allergy and budget needs—plus my favorite breakfast burrito recipe to inspire you: eggs, goat cheese, and green chiles. You’ve gotta try this killer combo!

Essential Success Hacks

1. Cool all fillings to room temperature or colder before filling burritos. Steam=soggy tortillas. (Thanks to TheKtchn for this tip!)

2. Warm tortillas to room temperature or until they’re pliable for less cracking and breaking, then roll like this:
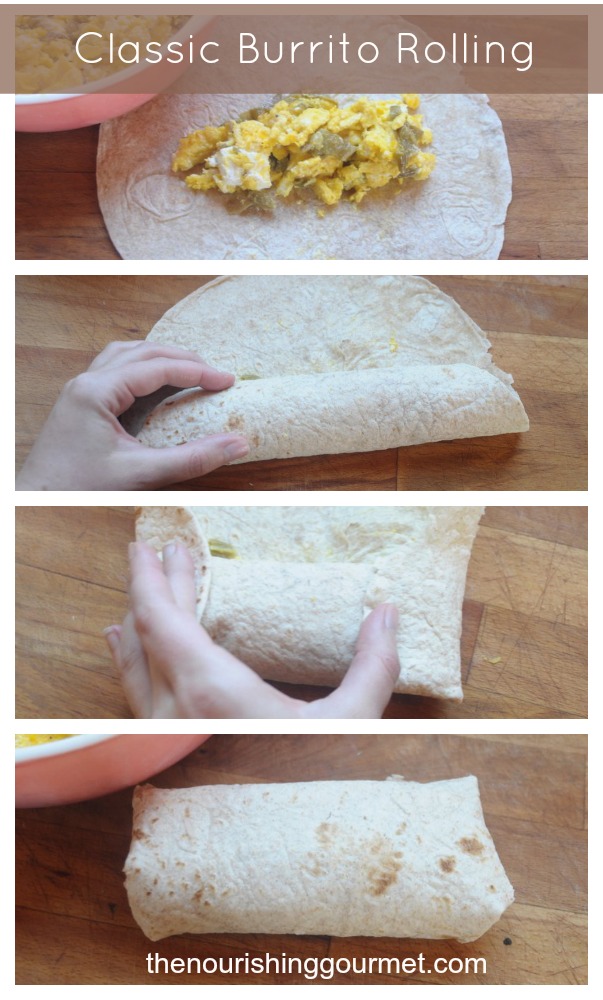
Classic Burrito Rolling

3. Go easy on wet ingredients like salsa and sauces. Drain extra fluids off sautéed vegetables.

4. Wrap your burritos first in parchment paper, then in foil, then in gallon size freezer bags. They’ll last for months this way and are oven-safe, but you’ll never have questionable materials touching your food. Like so:
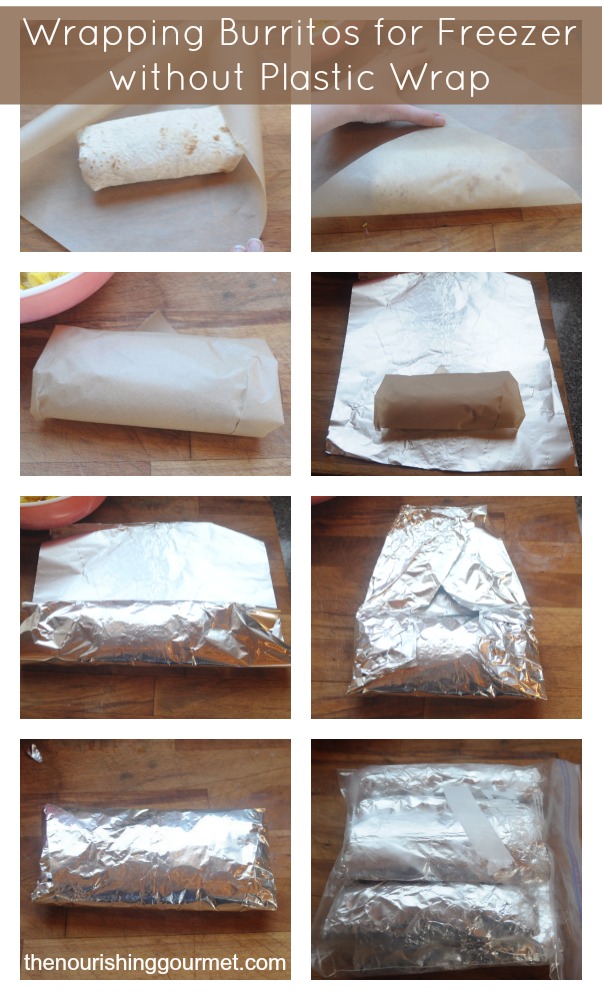
Wrapping Burritos for Freezer without Plastic Wrap.jpg

Time-Saving Hacks

5. Mix all filling ingredients together in a single bowl. Any sacrifice in presentation is worth the faster assembly. Plus, you won’t prematurely run out of an ingredient. (Hats off to Tammy’s Recipes for this awesome tip.)

6. Use store-bought tortillas, but check ingredient lists. In my current season of fatigue, this is my biggest shortcut. I’m fortunate to have locally-made organic wheat tortillas at my fingertips, and I’ve chosen Rudi’s Gluten Free Tortillas for my gluten, dairy, egg, and soy-free son.(Kimi notes: We are also a gluten-free family. Rudi’s probably has one of the nicest textures, but it does contain corn products in it for those sensitive. You could also use (affiliate links) these brown rice tortillas , or these these multi-grain gluten-free tortillas).

7. Bake your scrambled eggs in the oven if you’re making a giant batch of breakfast burritos. They can cook and then cool while you attend to other tasks. See this method.

8. Slow-cook chicken, beef roast, or pork roast the day before for hands-off shredded meat. I do it like this.

9. Make just one flavor variety per burrito prep day and keep it simple, only 2-4 components. You’ll dirty fewer dishes and streamline the whole process.

Allergy Hacks

10. Gluten-free or grain free? Don’t despair! GF people can choose non-GMO corn tortillas (blue corn or organic are sure bets), store-bought GF tortillas, or even better, homemade options like these nutrient-dense soaked buckwheat wraps or these egg-arrowroot paleo wraps. The last recipe is grain-free too, high protein, quick, and wraps beautifully with zero cracking.

11. Egg-free? Wheat tortillas, like Katie’s soaked ones, corn tortillas, or Rudi’s Gluten Free are good choices.

12. Dairy-free is a piece of cake. Almost any tortilla will meet this criterion, and then it’s up to you to leave dairy out of your fillings.

*NOTE: Many of these alternative tortillas are more prone to cracking (except the egg-arrowroot paleo wrap), so fold like this instead:
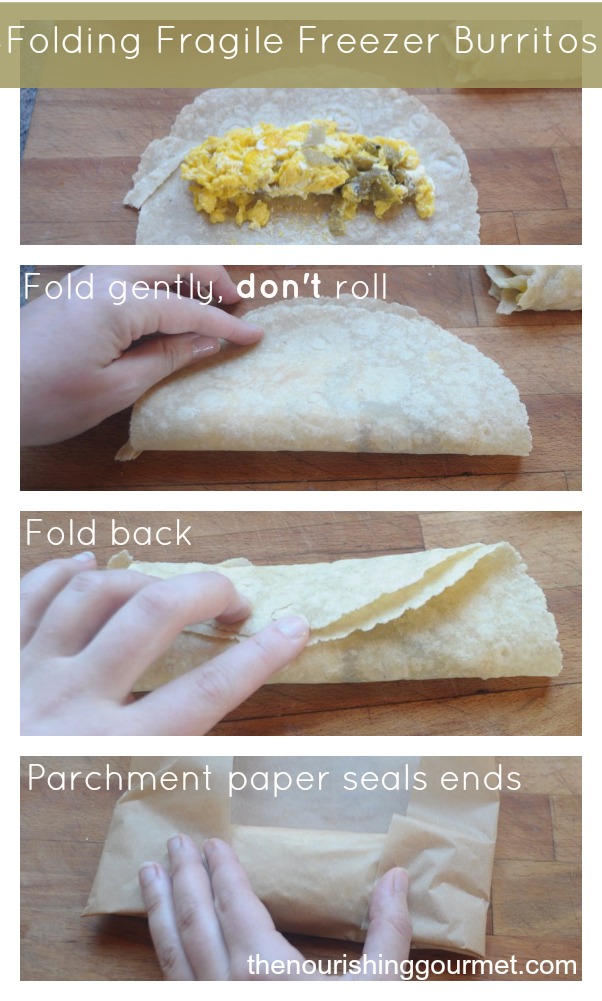
Folding Fragile Freezer Burritos.jpg

Frugal Hacks

13. Use thrifty ingredients like yard eggs, rice, home-cooked beans, or diced potatoes to stretch indulgent items like grass-fed beef, pastured pork sausage or bacon, and cheese.

14. Go pungent with your cheese—think sharp cheddar or goat cheese—so you can use less. Also, check out Costco.. We often get fabulous imported, grass-fed cheeses for much less there.

15. Make your own tortillas. Here’s a soaked whole wheat recipe, Natalia offers a gluten-free buckwheat wrap here, and I can heartily recommend this grain-free paleo wrap.

And now, on to my very favorite breakfast burrito, inspired by Albuquerque’s fabulous Grove Cafe & Market.

Goat Cheese-Green Chile Breakfast Burritos.jpg

Goat Cheese-Green Chile Breakfast Burritos
 
Author:
Alison Diven
Recipe type: Breakfast
Cuisine: New Mexican
Serves: 6
Print
 
These creamy dreamy Southwest burritos will spice up your mornings! Prepare them for a quick fresh treat or freeze a double batch for later (see blog post for details). Select tortillas according to your allergy or dietary needs (again, many ideas in the blog post). You can find New Mexico, or "Hatch," green chiles frozen in many grocery stores or fresh in late summer. Or, substitute sauteed poblano peppers. It'll still be spectacular! A little sausage wouldn't go amiss either.
Ingredients
  • 12 pasture-raised eggs
  • ¼ cup grass-fed butter (we love Kerrygold)
  • ¼ teaspoon salt
  • ¼ teaspoon freshly-ground black pepper
  • 8 ounces soft goat cheese (chevre), separated into chunks
  • ¾ cup chopped roasted New Mexico green chiles, without seeds
  • 6-10 tortillas, depending on size
Instructions
  1. Heat butter in a large skillet on medium-low heat. Gently scramble eggs until soft set, sprinkling with salt and pepper.
  2. Gently warm tortillas.
  3. For a pretty presentation, layer scrambled eggs, goat cheese, and green chiles in tortillas and wrap.
  4. For speed, gently mix goat cheese and chiles in scrambled eggs and divide among tortillas.
  5. Enjoy!
3.2.2700


Filed Under: $10 Main, Breakfast and Brunch, Dairy Free, Gluten Free, Main Dishes, Nourishing Frugal Tips, Vegetarian

Cook Once, Eat Thrice with a Slow Cooker Beef Roast (GF & DF-Adaptable)

May 13, 2014 by Alison Diven 11 Comments

Cook Once, Eat Thrice.jpg

By Alison Diven, Contributing Author

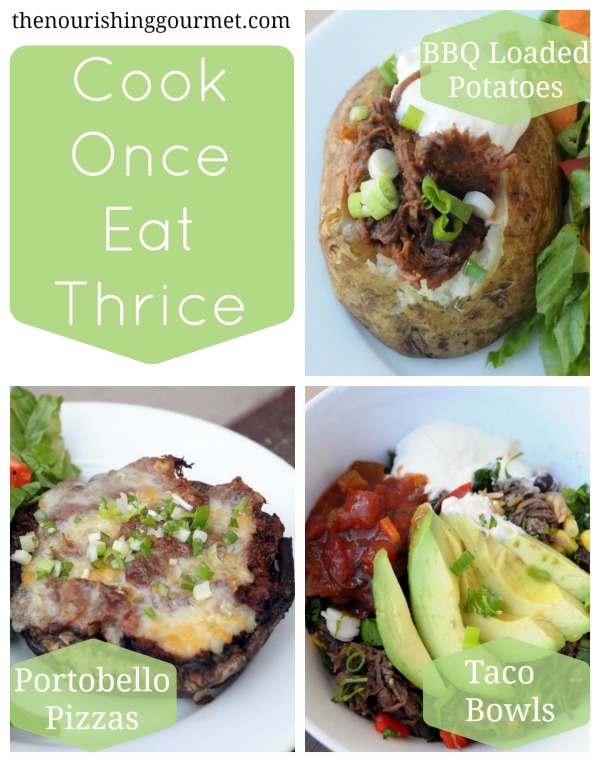
Are you having one of those weeks? Do you need an action plan for a few days of no-stress, family-pleasing, yet healthful meals? After multiple rounds of illness in our household, I sure do! Picture this: cook (very) simply tomorrow night, then have the next two nights virtually off, while enjoying 3 different dinners—BBQ loaded baked potatoes, deluxe taco bowls, and portobello mushroom pizzas.

We’re following this plan ourselves right now, and it’s such a relief. The flavors are familiar, the cooking simple, and I know we’re all still eating healthy meat, nourishing fats, and even vegetables. For a pregnant mama coddling a sick toddler and exhausted husband, this is very good news, indeed.

It all starts with slow cooking a beef roast, then shredding the meat and seasoning it three simple ways. First, it gets smothered in BBQ sauce atop baked potatoes with all the fixings and a side salad. Then, it joins fresh vegetables, beans, and rice with salsa and sour cream for a Tex-Mex treat. Finally, it meets Italian herbs, portobello mushrooms, and cheese (if you like) for a quick broil, with leftover side salad. Simple and satisfying.

It’s a fabulous way to stretch an already affordable cut of beef, and without a single complaint about leftovers. I’ve written the instructions for a family of 4, but it would also work for a family of 6 without using a bigger roast; just scale up the other ingredients. For those on a no-dairy diet, it’s easy to leave out the cheese, sour cream, and butter.

Because I’m so intimately acquainted with the brain fog that comes with challenging seasons—first trimester, anyone?—I’ve made this plan as user friendly as possible. You’ll find a printable shopping list and explicit step-by-step instructions for each night. So just print and go, girl! You can do this.

Recipe Notes

  • Because my goal is ease, I call for store-bought BBQ sauce and salsa, canned beans, and an optional box of baby greens. You’ll want to look for ingredient lists that are free of GMOs, corn syrup, yucky food additives, and your family’s allergens. Of course, you’re welcome to make your own and save money that way! Kimi notes: I keep (affiliate link) Eden’s beans on hand for recipes such as this. It’s cooked with kombu, a nutritious seaweed that makes them digestible. 
  • The one condiment I do call for making at home is salad dressing. It’s just SO easy and far superior (and cheaper) to what’s available even in health food stores, especially the fats, which are important to me.
  • A whole chicken or pork shoulder would be excellent substitutes for the beef pot roast. The flavors will still work beautifully.
  • I always recommend grass-fed beef and dairy products, when possible. Not only are they healthier for you, the cow, and the planet, they often just taste better. You won’t believe the magic grass-fed beef, slow cooking, and salt and pepper make together! Be sure to save the bones and extra cooking liquids for your next batch of bone broth.
  • If you end up with leftover odds and ends, you can mix and match them to make a couple of fabulous breakfast frittatas or omelets.

Shopping List & Recipes

Click to download the Cook Once, Eat Thrice Shopping List PDF. You’ll also want to print all three step-by-step recipes below.

Cook Once, Eat Thrice Night #1: BBQ Loaded Baked Potatoes
 
Author:
Alison Diven
Cuisine: American
Serves: 4
Print
 
Cook once today and enjoy ultra easy meals for two more nights. The simple tasks for today include 1) slow cooking the beef roast, 2) baking potatoes, 3) cooking rice, 4) seasoning the beef, 5) preparing a simple salad and dressing, and 6) assembling tonight's dinner. Tasks 1-5 can be fit in at any time of day, as you have time. Total active time is less than 30 minutes!
Ingredients
For the Meat
  • 3 lbs bone-in beef pot roast, preferably grass-fed
  • 1½ to 2 teaspoons sea salt
  • 1 teaspoon freshly ground black pepper
  • ½ cup BBQ sauce, plus more to taste
  • ½ teaspoon ground cumin
  • ¼ teaspoon dried oregano
  • ¼ teaspoon crushed red pepper flakes
  • 1 Tablespoon tomato paste
For the Rice
  • 1½ cups rice, white or brown
  • water or broth as directed by package or rice cooker
  • 1 teaspoon salt
  • 1 teaspoon chili powder
For the Salad (Nights 1 & 3)
  • 1-2 heads lettuce OR 1 large box baby greens
  • Your favorite salad vegetables, like carrots & celery or tomatoes & cucumbers
  • 1 cup extra virgin olive oil
  • ⅓ cup raw apple cider vinegar
  • 1 tablespoon Dijon mustard
  • salt and pepper to taste
For Baked Potatoes
  • 4 large baking potatoes, preferably organic
  • 2 tablespoons extra virgin olive oil
  • 1 bunch green onions, sliced
  • 4 ounces cheddar cheese, shredded (optional)
  • Butter for serving (optional)
  • Sour cream for serving (optional)
Instructions
  1. Cook meat. In the morning, place the roast in the slow cooker and sprinkle salt and pepper on top. Cover and cook on low for about 8 hours, until very tender and “shreddable.”
  2. Bake potatoes. 1-1/2 hours before dinner, turn the oven to 400. While pre-heating, scrub potatoes, pat dry, prick skin, and rub with olive oil. When oven is hot, place potatoes on a cookie sheet and bake for 50-60 minutes, turning over midway, or until the flesh is soft when tested with a fork.
  3. Cook Rice. Meanwhile, cook rice according to package or rice cooker directions, adding salt and chili powder before cooking. Place cooked rice in storage container and refrigerate.
  4. Flavor meat. When meat is done, remove meat to large bowl and shred with two forks. Spoon some of the cooking juices into the meat to moisten it. Put one third of the shredded meat into a small saucepan, one third into a storage container, and one third into another storage container. To the saucepan, add ½ cup BBQ sauce and set aside. To the first storage container, add ½ teaspoon cumin and combine. Cover and refrigerate. To the second storage container, add ¼ teaspoon oregano, ¼ teaspoon crushed red pepper flakes, and 1 tablespoon tomato paste. Combine, adding more cooking juices as needed to incorporate tomato paste. Cover and refrigerate.
  5. Prepare salad and dressing. Wash and cut up vegetable toppings. Set aside. Combine 1 cup olive oil, ⅓ cup apple cider vinegar, 2 tablespoons Dijon mustard, etc and emulsify with whisk, blender, or immersion blender. Add salt and pepper to taste. Set aside.
  6. Assemble Meal. Warm BBQ sauce and meat reserved in saucepan. Slice green onions. Serve potatoes topped with butter, BBQ beef, sour cream, shredded cheese, and green onions. Serve ½ the salad greens topped with ½ the vegetable toppings with the homemade salad dressing.
3.2.2499

Cook Once, Eat Thrice Night #2: Shredded Beef Taco Bowls
 
Author:
Alison Diven
Cuisine: Mexican
Serves: 4
Print
 
If you followed the plan for Night #1, you'll have dinner on the table in 15 minutes tonight! Be sure to save any leftover vegetables and toppings.
Ingredients
  • Prepared cumin-flavored beef from Night #1
  • Prepared rice from Night #1
  • 1 can black, pinto, or kidney beans
  • ½ cup frozen organic corn kernels
  • 1 large bell pepper
  • 2 medium tomatoes (if in season)
  • 1 large or 2 small avocados
  • 1 handful cilantro
  • ½ cup salsa
  • ½ cup sour cream (optional)
  • Leftover sliced green onions
Instructions
  1. Rinse and drain beans. Rinse frozen corn in warm water and set aside for a few minutes to thaw. Chop bell pepper, tomatoes (if using), and cilantro. Slice avocados.
  2. Meanwhile, gently warm shredded cumin beef and rice. You can use a single large skillet on low and place the beef on one half and the rice on the other half.
  3. Assemble taco bowls, layering rice, beans, beef, vegetables, avocado, sour cream, and salsa.
3.2.2499

Cook Once, Eat Thrice Night #3: Portobello Mushroom Pizzas
 
Author:
Alison Diven
Cuisine: Italian
Serves: 4
Print
 
Tonight's the last night of the 3-day plan. Enjoy another speedy, delicious dinner that requires only a quick broil to get on the table. Have leftover odds and ends after the 3 days? Most ingredients will go toward an absolutely killer breakfast frittata or omelet tomorrow morning. Have fun!
Ingredients
  • Prepared oregano-tomato shredded beef from Night #1
  • 4 large or 6-8 smaller portobello mushrooms
  • 2 Tablespoons extra virgin olive oil
  • 4 ounces Italian melting cheese (like mozzarella), sheep-milk feta, or goat chevre
  • Leftover chopped bell pepper and/or tomato (optional)
  • Leftover green onions (optional)
  • Leftover salad greens from Night #1
  • Leftover salad vegetable toppings from Night #1
  • Leftover salad dressing from Night #1
Instructions
  1. Set oven to broil.
  2. Gently brush dirt off mushrooms. Cut out mushroom stems. Brush tops (smooth side) of mushrooms with olive oil and place top side up on baking sheet.
  3. Broil mushrooms for 3 minutes, watching carefully to prevent burning.
  4. Turn over mushrooms and spread shredded beef over the shallow cavity. If you have any left over, add chopped bell pepper and/or tomato. Top with cheese.
  5. Broil for 2-4 more minutes, watching very carefully to prevent burning.
  6. Serve immediately alongside salad greens, salad vegetable toppings, and salad dressing. Sprinkle green onions on top, if you have any leftover.
3.2.2499

Looking for More Easy Family Dinners?

Check out these delicious slow-cooker, quick, and one-pot meals:
Shawarma Whole Chicken in the Slow Cooker
Easy Thai Curry Noodle Soup
14 Easy Dinner Recipes (That Are Healthy and Frugal Too!)
Cucumber Tuna Boats
3 Ingredient Teriyaki Pan Fried Chicken (Easiest Recipe Ever!)
Sriracha-Lime Salmon One-Pot Meal

Filed Under: $10 Main, 52 ways to save money on a healthy diet, Dairy Free, Gluten Free, Main Dishes, Nourishing Frugal Recipes, Nourishing Frugal Tips

Easy Thai Curry Noodle Soup

February 27, 2014 by Katie Mae 6 Comments

Thai Curry Noodle Soup

By Katie Mae Stanley, Contributing Writer

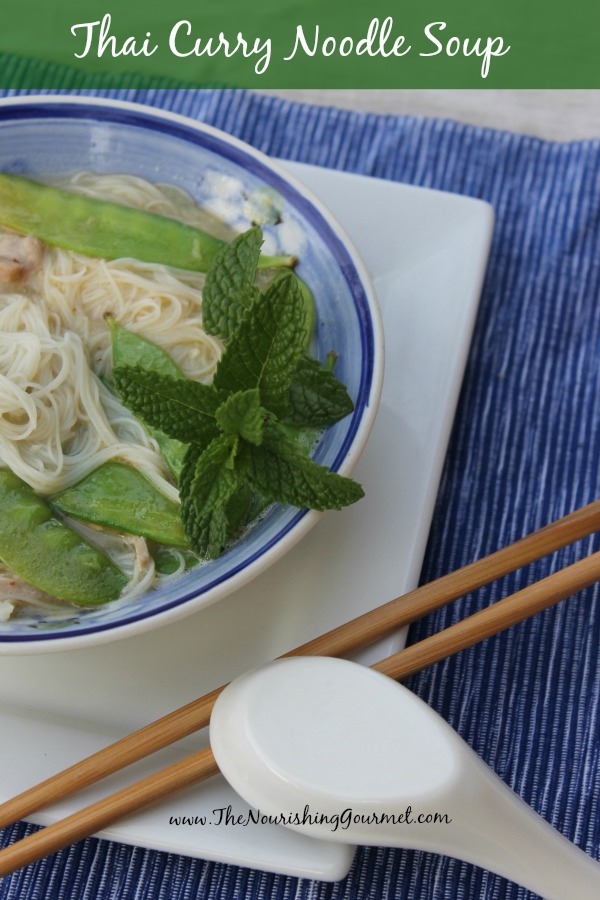
Light and flavorful, this simple Thai curry noodle soup will warm you on a cool evening. It is a perfect, frugal meal to throw together when you are short on time and is bursting with flavor.

Using homemade chicken stock adds an extra boost of nutrition to this tasty soup. Fresh stock is a frugal and easy way to nourish your family. Coconut milk not only makes your dish creamy and decadent is bursting with nutrition as well.

(Post may contain affiliate links. Thanks for supporting this blog!) 

When buying coconut milk it is important as part of a real foods diet to know what is in your milk. Many brands contain carrageenan, sugar and other preservatives. There are a few suitable options out there. Native Forest, is an excellent brand that is organic and BPA free. Another good brand is Thai Kitchen, which is not BPA free but the company claims that their product is “BPA safe”. Thai Kitchen is more creamy and has always been my favorite brand. And check out this brand, and this one, for guar gum-free coconut milk.

Thai is one of my favorite cuisines, there is no denying that. There is few thing less satisfying for me than creating ethnic dishes at home. When you use your own ingredients you can know that your food will be free of unhealthy oils, sugars and preservatives that are frequently found when dinning out.

Homemade Thai Inspired Recipes:

  • Easy and Delicious Thai Curry
  • Simple Nourishing Thai Noodle Soup
  • Thai Inspired Pizza with Peanut Sauce
  • Massaman Curry
  • Cold Thai Noodles and Vegetable Salad
  • Simple Thai Broth

Thai Curry Noodle Soup
 
Author:
Katie Mae Stanley @ The Nourishing Gourmet
Recipe type: Soup
Cuisine: Thai
Serves: 4-6
Print
 
Light and flavorful, this simple Thai curry noodle soup will warm you on a cool evening. It is a perfect meal to throw together when you are short on time and is bursting with flavor.
Ingredients
  • 2 quarts chicken broth
  • 1 can full-fat coconut milk
  • 1 16 oz vermicelli rice noodles
  • 1 lb chicken breast or thighs, thinly sliced
  • 1 medium white onion, thinly sliced
  • ½ lb fresh sugar snap peas
  • 2 tsp thai red curry, or curry paste of choice (I use this one)
  • 1 tsp fresh ginger
  • 2 cloves of garlic
  • 1 inch of lemon grass, split
  • optional garnishes
  • Fresh basil (Thai is preferred)
  • Fresh spearmint leaves
  • Fresh cilantro
Instructions
  1. In a large sauce-pot add the coconut milk, curry paste, lemon grass, garlic and ginger. Cook on low for 5 minutes.
  2. Add the onions cook for another five minutes.
  3. Pour in the broth and add the chicken and sugar snap peas. Simmer for about 5 minutes for until the chicken is cook through.
  4. Add the rice noodles, turn off the heat and cover until the noodles are softened.
  5. Garnish with thai basil, spearmint leaves and cilantro if desired.
3.2.2265


Filed Under: $10 Main, $5 Dishes, Dairy Free, Gluten Free, Main Dishes, Nourishing Frugal Recipes, Soups Tagged With: Frugal Meals, Thai, Thai Curry

Buckwheat Crepes (as Gluten Free Sandwich Wraps)

February 21, 2014 by Natalia Gill 23 Comments

Buckwheat Crepes as Sandwich Wraps

By Natalia Gill, from An Appetite For Joy

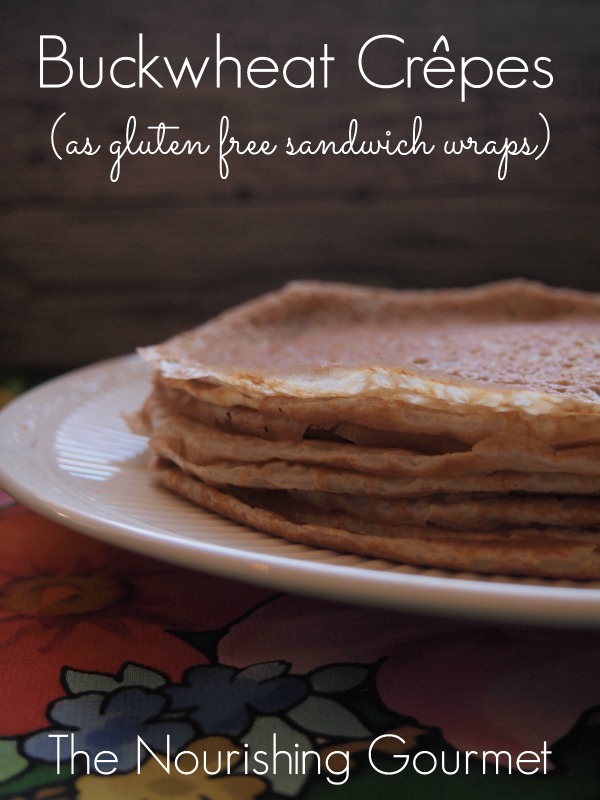
Delicate and gourmet, satisfying and rustic, buckwheat crepes can play a versatile role in any real food kitchen. Top them with a heap of blueberries, a drizzle of maple syrup for breakfast, and with some coconut whipped cream, if you want to make it extra special. Stuff them with chicken and mushrooms for dinner. Wrap your favorite sandwich toppings in a crepe for an easy & substantial lunch!

This recipe is a gluten free version of my mom’s beloved crepes. They can easily be made dairy free as well! Staple ingredients (buckwheat flour, milk, eggs) are combined in a blender, making for easy mixing and clean up. An overnight soak results in a crepe with a light flavor and texture that is more easily digested. (Read about the benefits of soaking grains here).

Although I have been making crepes for years, we have just started enjoying them as sandwich wraps. This is one of the simple ways my family is reducing the gluten in our diets.

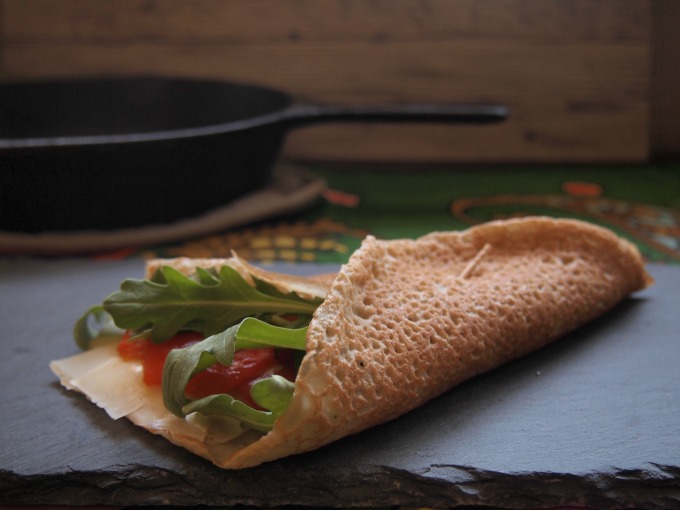
Crepe sandwiches make a great light dinner or a lunch that is easy and appealing enough for children to make themselves. Here, I wrapped one around some Parmesan cheese, roasted red pepper and arugula. Ham and cheese is also a favorite!

Buckwheat Crepes as Gluten Free Sandwich Wraps

“THE WEEK OF CREPES”

Coincidentally, this recipe comes to you in perfect timing as we approach “the week of crepes”. For the Russian Orthodox, Cheesefare (“Maslinitsa”) begins this Monday, February 24.

Cheesefare, which lasts a week, is a last hoorah before Orthodox lent begins. During this time, meat is not allowed, but fish, dairy and eggs are still permitted, so Russians eat loads of crepes before they have to give them up for 40 days. Giving up crepes (“blinchiki”) for any length of time is a big deal to a Russian!

LENTEN FAST GUIDELINES

The Lenten fast (see the 2014 dates here) is more or less vegan. Here are the parameters:

  • Meat is not allowed, with the exception of shellfish, which is included because it was not traditionally considered a luxury food.
  • There are a couple of specified dates that fish is allowed. But for the most part, it is not permitted.
  •  Some people omit all oils during this time while others interpret the “no oil rule” to refer specifically to olive oil.
  • Olive oil and wine are permitted on certain days, signified by a picture of a cluster of grapes on the calendar.

There is a measure of grace thrown into the rules. If someone has a medical condition that makes it a challenge to participate, they are not expected to. If someone who is fasting goes to eat at someone’s house where off-limits foods are served, they may eat them. Being a grateful guest trumps sticking to the rules.

MY EXPERIENCE WITH THE LENTEN FAST

My father is Orthodox and I participated in the fast with him once, about ten years ago. At the time I was eating a highly processed diet and it was a wonderful cleanse for me, both spiritually and physically. My mind was clear, I required less sleep and I felt very light and energized overall. Not to say that it wasn’t a challenge, but I did reap a lot of benefits.

I’ve considered participating in it again, but now that my diet is much more nourishing than it was ten years ago, I’m concerned that I won’t experience the same energy boost that I did before. As a mother of young children I need all the energy I can get!

It’s hard to imagine six weeks without broth and eggs in my diet. I’m so used to fueling myself with these traditionally nourishing foods. On the other hand, I remind myself that fasting is a very traditional practice and perhaps our bodies were designed to work best in a feast/famine, celebration/fasting routine.

I will continue to ponder and pray, but for now I don’t know if I will commit to this year’s Lenten fast. But one thing I do know for certain is that I will gladly partake in crepes next week!

Do you make fasting part of your routine? Why or why not? I’m interested to hear your thoughts on this!

Related Gluten-Free Recipes on The Nourishing Gourmet:

  • Gluten-free Blender Pancakes
  • Gluten-Free Pizza Crust (made with whole quinoa) 
  • Gluten-Free Whole Grain Biscuits 
  • Gluten Free Spiced Apple Muffins 
  • Mini Millet Zucchini Muffins 
  • Grain-Free Spiced Apple Muffins 

Recommended Kitchen Items for recipe:

(Affiliate Links)

  • Find Buckwheat, coconut oil, honey and more at Vitacost. On Amazon, you can also find raw whole buckwheat, coconut oil, and honey. 
  • Cast iron pan (Here is an enameled version)

Buckwheat Crepes
 
Author:
Natalia Gill
Serves: 4
Print
 
Buckwheat crepes are a versatile gluten free food and work great as an every day sandwich wrap. The batter for these is made right in the blender for easy clean up. This recipe makes about 13 7-inch crepes
Ingredients
  • 2 cups non-dairy milk (I used canned 9% fat coconut milk)
  • 2 tablespoons milk kefir (or water kefir, kombucha, lemon juice)
  • 2 tablespoons ghee or coconut oil
  • 1.25 cups buckwheat flour (if grinding your own, use hulled groats)
  • pinch of salt
  • 1 teaspoon honey (optional)
  • 6 eggs
  • a little ghee or coconut oil to prepare the pan for the first pancake
Instructions
  1. Blend together the milk, 2 tablespoons ghee, flour, kefir, salt and honey in a blender (put in the wet ingredients first). Leave on the counter to soak for 12-24 hours (overnight).
  2. When they are done soaking, add the eggs to the batter and blend again to combine.
  3. Heat a 7-inch cast iron skillet over medium heat. I sometimes bump it up to high heat to speed up the process, then reduce it back to medium when I start cooking the crepes. You want the skillet nice and hot.
  4. Add a small amount (1 teaspoon or so) of ghee or coconut oil to the pan to prepare it for your first pancake. Ladle ⅓ cup of the batter (a scant ladle full) into the skillet and swirl it around confidently until it covers the bottom of the pan and starts to set. Allow it to cook for about a minute, maybe less. Keep an eye on it.
  5. Once it seems done (you'll quickly get the hang of it) use a spatula to loosen it off the pan a bit and (again, with confidence) flip it over. Let it cook for 15-30 seconds, until golden. Repeat until your batter is done. Swirl the batter in the blender from time to time to keep the flour from settling.
  6. You will likely not need any more ghee or coconut oil for the remaining pancakes since there is some in the batter. From time to time the heat might need to be adjusted as the pan will get increasingly hot throughout the cooking.
Notes
I have found that a 7-inch cast iron skillet works best. Even an inch larger can make them a challenge to flip.

I once made the mistake of grinding up chia seeds into the batter and it got very smoky! So I definitely don't recommend incorporating ground chia or flax.
3.2.2265


Filed Under: $10 Main, Baked Goods, Breakfast and Brunch, Dairy Free, Gluten Free, Main Dishes, Snacks, Vegetarian Tagged With: Blintz, Buckwheat, Buckwheat Flour, Crepes, Fasting, Gluten-free Diet, Making Crepes, Sandwich Wraps, Wraps

« Previous Page
Next Page »

Primary Sidebar

Follow Me

  • Facebook
  • Instagram
  • Pinterest
  • RSS

Search

Please Read:

The information you find here at The Nourishing Gourmet is meant to help you become a better cook! This site is primarily for sharing family friendly recipes. It's not meant to give medical advice or to make any health claims on the prevention or curing of diseases.This site is only for informational and educational purposes. Please discuss with your own, qualified health care provider before adding in supplements or making any changes in your diet. Also, any links to sponsors or affiliates (including Amazon) may give me a percentage of the sale or a pay per click. Thank you for supporting this site.

Categories

  • $10 Main (43)
  • $5 Dishes (43)
  • 52 ways to save money on a healthy diet (53)
  • AIP (23)
  • Baked Goods (84)
  • Beverages (72)
  • Breakfast and Brunch (63)
  • Condiments (8)
  • Dairy Free (498)
  • Desserts (185)
  • Dietary Needs (6)
  • Egg Free (14)
  • Egg Free (92)
  • For the Kids (70)
  • For the Love of Food and Books (18)
  • Gluten Free (491)
  • Grain Free (98)
  • Health (75)
  • Kitchen Tools (5)
  • Main Dishes (128)
  • Nourishing Frugal Recipes (169)
  • Nourishing Frugal Tips (70)
  • Nourishing Practices (57)
  • Nutrient Dense Foods (70)
  • Q and A (16)
  • Salads (40)
  • Sides (104)
  • Snacks (126)
  • Soups (50)
  • The Healthy $1 Menu (21)
  • The Low Energy Guide to Healthy Cooking (20)
  • THM (5)
  • Trim Healthy Mama (5)
  • Uncategorized (848)
  • Vegan (243)
  • Vegetarian (363)

Recent Posts

  • Eating for Comfort and Sustenance
  • Perfect Instant Pot Black and Brown Rice
  • What Worked and What Didn’t in My Cooking Life Last Year
  • Mocha Dark Chocolate Bombs (low sugar)
  • Gingerbread Caramel Corn
  • Thyme and Garlic Potato Stacks
  • The Great Big Holiday Salad
  • 30 Favorite Kitchen Stocking Stuffers
  • Luxurious DIY Lip Balm
  • Spicy Korean Beef and Cabbage

Recent Comments

  • Kim on Eating for Comfort and Sustenance
  • Michelle Sanders on Chile-Spiked Dark Chocolate Bark with Pepitas & Mango (Dairy Free)
  • KimiHarris on Eating for Comfort and Sustenance
  • KimiHarris on Eating for Comfort and Sustenance
  • KimiHarris on Eating for Comfort and Sustenance

Fresh: Nourishing Salads for All Seasons

Footer

Privacy

Copyright © 2026 · Foodie Pro & The Genesis Framework