• Skip to primary navigation
  • Skip to main content
  • Skip to primary sidebar
  • Skip to footer

The Nourishing Gourmet

Nourishing. Satisfying. Gourmet.

  • THM Coaching
  • About
    • Privacy
    • Contact
  • Recipes
  • Cookbooks
    • Everyday Nourishing Food
    • Salad Cookbook
    • Soup Cookbook

Katie Mae

Instant Raspberry Hot Cocoa Mix (Dairy-free)

January 9, 2017 by Katie Mae 3 Comments

instant-raspberry-hot-cocoa

By Katie Mae Stanley of Nourishing Simplicity

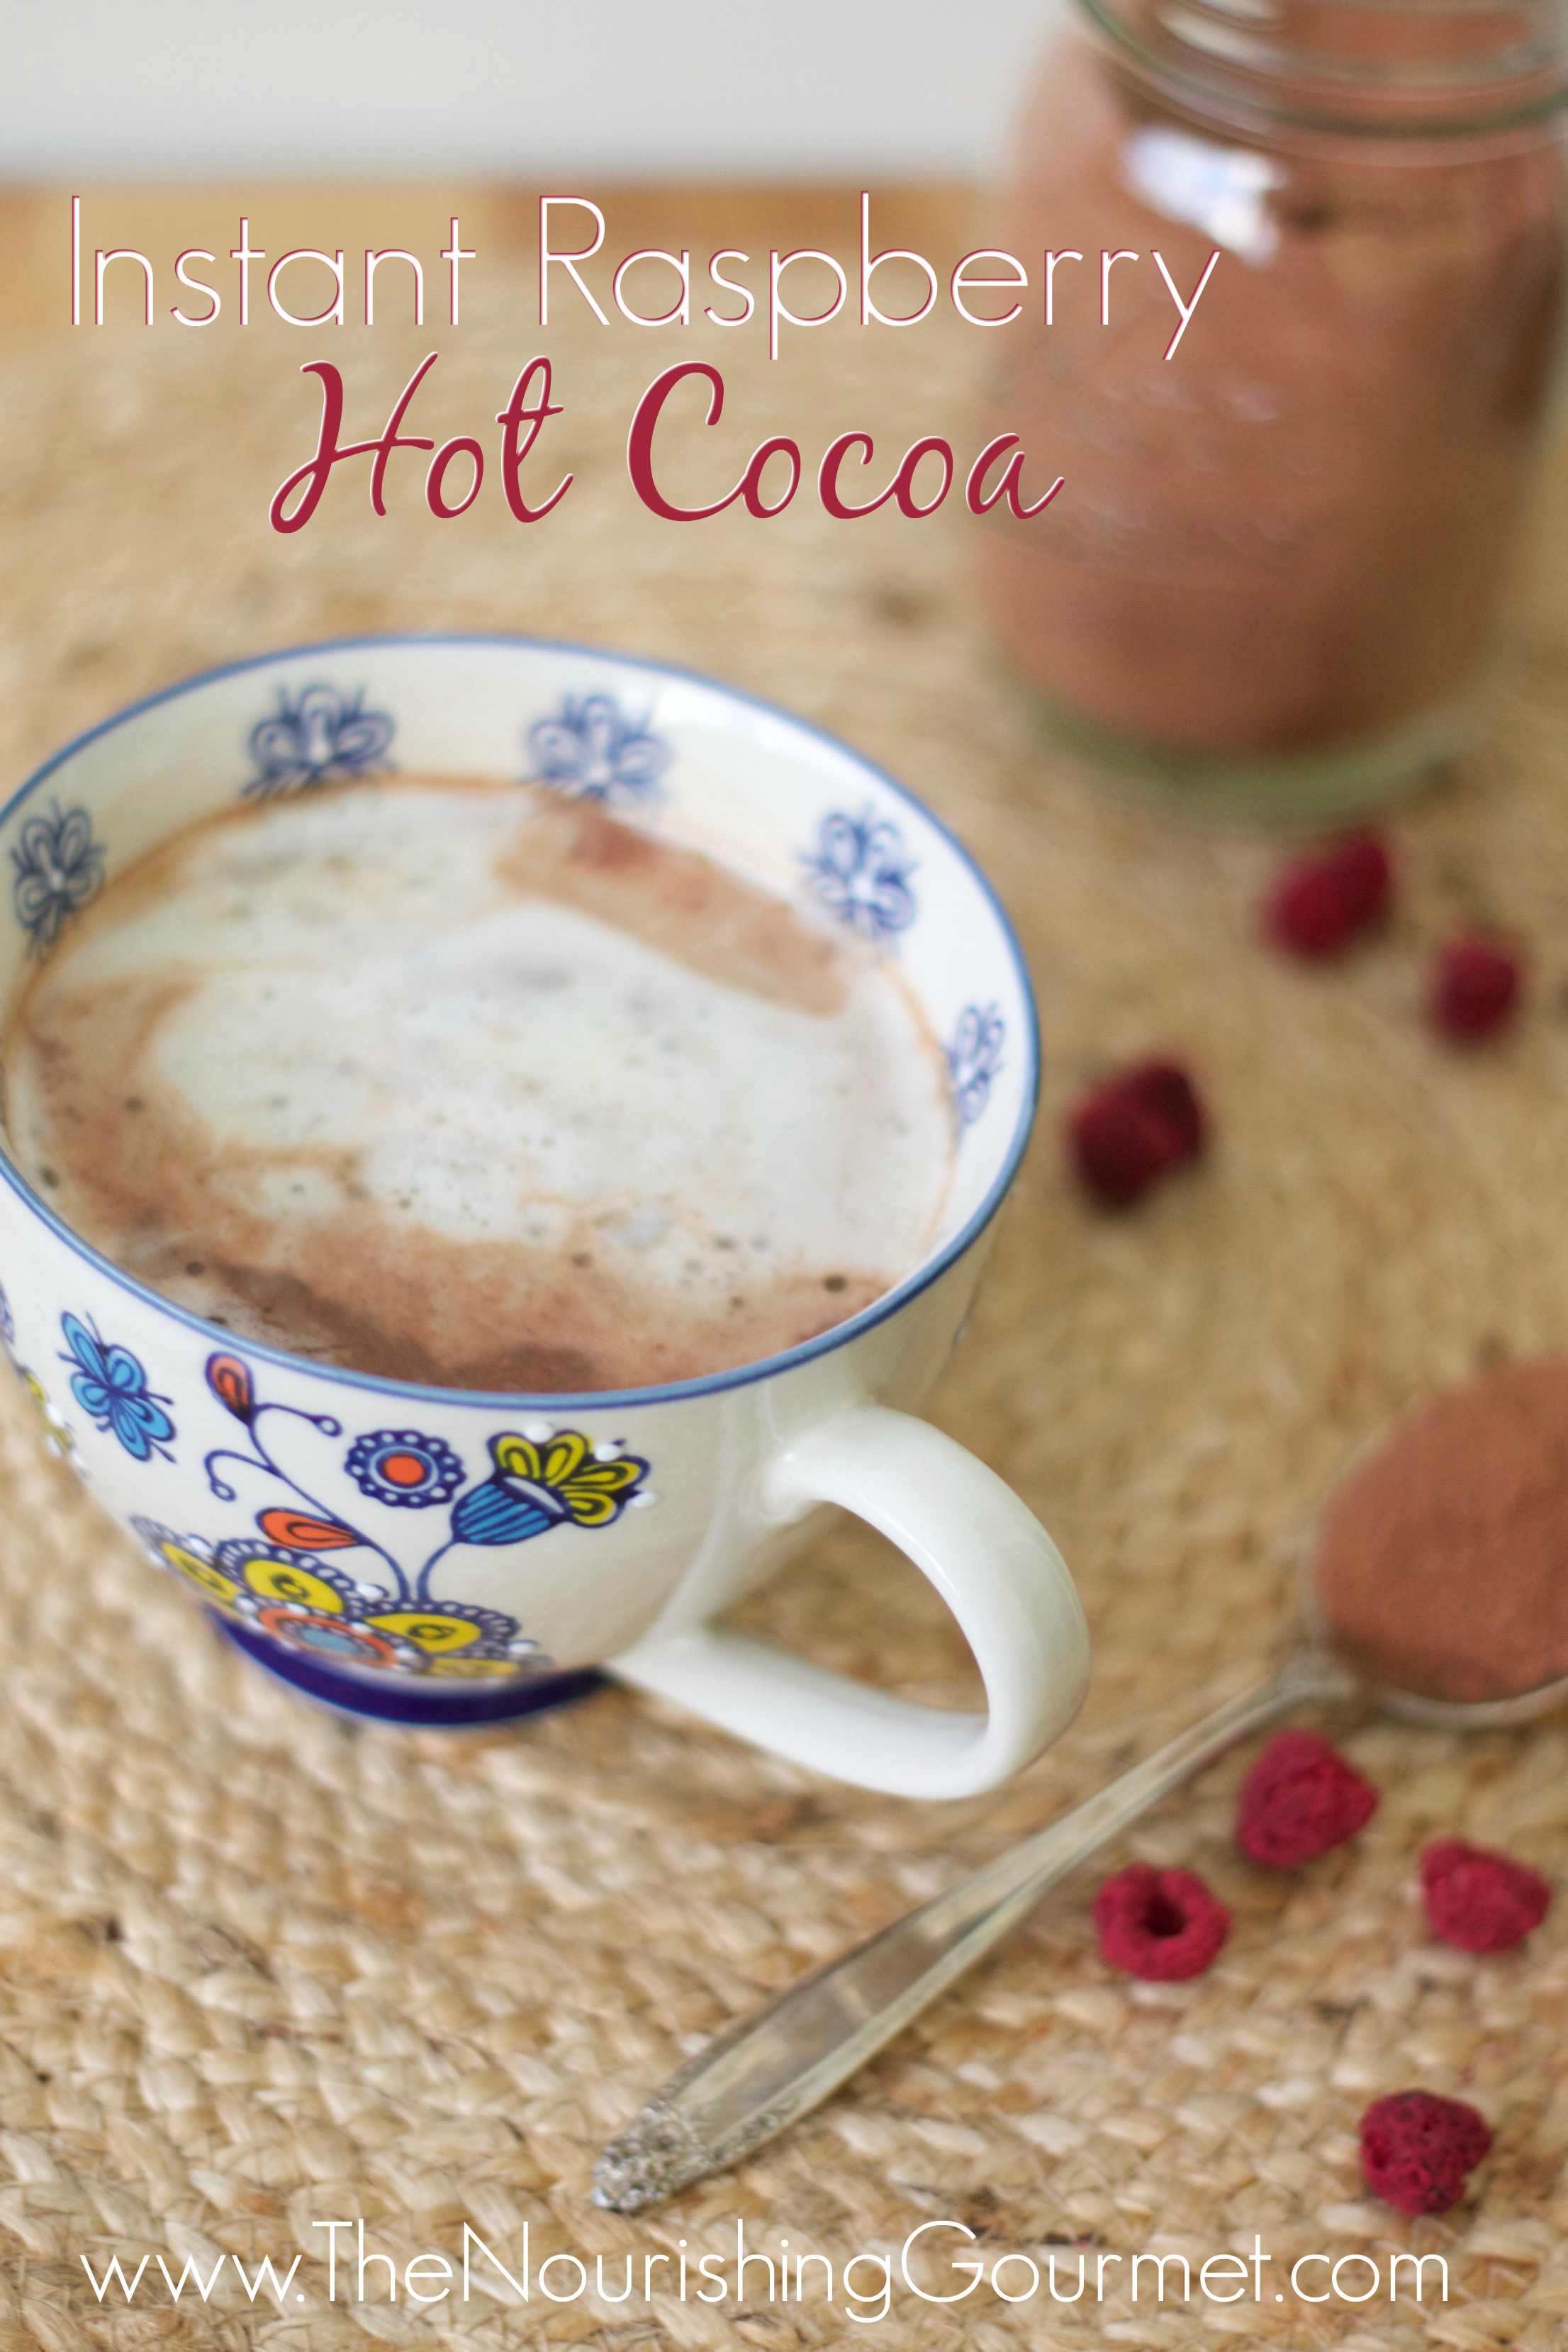
Rich cocoa mingling with creamy coconut and tangy raspberries.

Cold winter days were made for hot cocoa. It’s the time of year that is perfect for warming yourself by the fire and wrapping your hands around a steaming mug of cocoa.

You love hot cocoa, you savor the simple art of heating the milk on your stove in your favourite stainless steel pot and mixing your cocoa and sweetener together and whisking it into the milk.

But some days, you just can’t. You may be having a busy day. Or maybe you are just.too.tired.

Instant cocoa mixes from the store are tempting for those days when you aren’t going to be able to make a cup from scratch. Unfortunately, the ingredients are generally not nourishing. If you need it to be dairy-free, you are going to be hard pressed to find one.

Did you know that you can make your own dairy-free mix in 5 minutes?

Coconut milk powder is my go to for making instant hot cocoa. It is dairy-free and full of nutrients.

A basic mix is always nice to have on hand but sometimes you want something a little different. Raspberry and chocolate have long been a favourite combination of mine, second only to peppermint. I have enjoyed many cups of raspberry Earl Grey hot cocoa over the years.

This instant raspberry hot cocoa mix only has five ingredients, coconut milk powder, cocoa powder, unrefined sugar, freeze dried raspberries, and unrefined salt. It is perfect for those days when you need an easy to prepare cup of hot cocoa! If you prefer you can use powdered cow or goat milk.

Ingredients Needed:

  • Powdered coconut milk
  • Freeze Dried Raspberies
  • Cocoa Powder

Instant raspberry hot cocoa mix is also a perfect gift when paired with a cute mug!

Instant Raspberry Hot Cocoa Mix

  • 2 cup freeze dried raspberries
  • 1 cup coconut milk powder
  • 1 cup powdered cocoa (Fair trade and organic, preferred)
  • 3/4 cup unrefined sugar
  • 1/8 tsp unrefined salt

Directions:

1: Place all the ingredients in a blender. Blend on high for about one minute or until the raspberries are completely powdered.

2:  Sift the mix into a bowl using a sifter or a fine mesh strainer to remove the raspberry seeds.

3: Store in a glass jar for up to a year.

Mix 1 to 3 TBS of cocoa mix with 8 ounces of hot water depending on the desired strength of the cocoa. Stir until smooth. Top with coconut milk whipped cream if desired.

Instant Raspberry Hot Cocoa
 
Serves: 3½ cups
Print
 
Ingredients
  • 2 cup freeze dried raspberries
  • 1 cup coconut milk powder
  • 1 cup powdered cocoa
  • ¾ cup unrefined sugar
  • ⅛ tsp unrefined salt
Instructions
  1. Place all the ingredients in a blender. Blend on high for about one minute or until the raspberries are completely powdered.
  2. Sift the mix into a bowl using a sifter or a fine mesh strainer to remove the raspberry seeds.
  3. Store in a glass jar for up to a year.
  4. Mix 1 to 3 TBS of cocoa mix with 8 ounces of hot water depending on the desired strength of the cocoa. Stir until smooth. Top with coconut milk whipped cream if desired.
3.3.3077


Some links may be affiliate links. I may earn a small commission on items purchased through my links. 

Filed Under: Beverages, Dairy Free

Pumpkin Spice Hot Cocoa

October 14, 2016 by Katie Mae 7 Comments

pumpkin-spice-hot-cocoa

By Katie Mae Stanley of Nourishing Simplicity

Warm spices mingling with rich cocoa, a touch of pumpkin mixed in, topped with maple whipped cream – it’s a whole new way to enjoy fall.

Every year as the cooler weather settles in the world gets a tiny bit extremely excited about pumpkin spice lattes and other fall drinks. I didn’t get the hype for several years until I made one myself, after that I was hooked.

This year as autumn made it’s appearance I decided that I needed a change – enter pumpkin spice hot cocoa! Chocolate and pumpkin are a surprising, yet delicious combination. That’s why recipes such as my pumpkin chocolate chip muffins are so tasty.

I am a huge fan of hot cocoa, and all forms of dark chocolate, if truth be told. I pretty much have a hot cocoa recipe to go with each season now that this tasty pumpkin spice version has been added to my list. You can easily use pumpkin pie spice from the store, but I have been using my own blend that takes less than five minutes to whip up.

Other Autumn Drinks to Enjoy:

  • Bittersweet Chai Hot Cocoa
  • Coconut Ginger Apple Cider
  • Pumpkin Chai Tea Latte
  • Pumpkin Pie Fauxccino 
  • Fresh Apple Cider

Pumpkin Spice Hot Cocoa

Serves 2

Ingredients:

2 cups raw milk (or milk or milk substitute of your choice)
1/4 cup pumpkin puree
3 TBS cocoa powder
3 TBS maple syrup
2 tsp vanilla extract
2 tsp pumpkin pie spice
1/8 tsp unrefined salt
Maple whipped cream (optional)

1. Heat your milk in a small saucepan. (If you are using raw milk and want to preserve the enzymes do not heat above 110.)

2. While the milk is heating, mix the remaining ingredients in a small bowl, making a paste.

3. Once the milk is warm, mix the cocoa paste into the milk with a whisk.

4. Pour into two mugs and top with maple whipped cream and extra pumpkin pie spice if desired.

Pumpkin Spice Hot Cocoa
 
Serves: 2
Print
 
Pumpkin Spice Hot Cocoa
Ingredients
  • 2 cups raw milk (or milk or milk substitute of your choice)
  • ¼ cup pumpkin puree
  • 3 TBS cocoa powder
  • 3 TBS maple syrup
  • 2 tsp vanilla extract
  • 2 tsp pumpkin pie spice
  • ⅛ tsp unrefined salt
  • Maple whipped cream (optional)
Instructions
  1. Heat your milk in a small sauce pan. ( If you are using raw milk and want to preserve the enzymes do not heat above 110).
  2. While the milk is heating, mix the remaining ingredients in a small bowl, making a paste.
  3. Once the milk is warm, mix the cocoa paste into the milk with a whisk.
  4. Pour into two mugs and top with maple whipped cream and extra pumpkin pie spice if desired.
3.3.3077

What is your favorite autumn hot drink?

Filed Under: Beverages, Desserts Tagged With: hot cocoa, pumpkin pie spice, pumpkin pie spice hot cocoa

Thai Chicken Fried Rice

July 20, 2016 by Katie Mae 2 Comments

Thai Chicken Fried Rice NG

By Katie Mae Stanley of Nourishing Simplicity

Savory grains of rice are mixed with fresh summer vegetables, tender chicken, and spicy basil.

Thai chicken fried rice is the perfect dish to enjoy anytime, especially in the summer when gardens are bursting with zucchini, bell peppers, string beans, and basil, all of which make up this dish.

I am a huge rice fan. Part of that comes from living in Mexico for ten years where I ate it almost every day. The other part is simply because rice is pretty tasty. It helps that rice is an excellent way to stretch pricier items like meat. Even now that I have been State-side for over two years I crave rice if I go more than a few days without eating it.

Rice is the humble staple of many cultures. Whether it is Arabic rice, Chinese egg fried rice, Jamaican rice and peas, or a savory miso rice congee, rice is an integral part of life. It is the substance that keeps many people going.

Unless it is necessary for me to go grain-free I don’t see my kitchen ever going without rice.

Thai is one of my weakness when it comes to picking a restaurant to eat at. If I could, I would eat it out at least once a week but that is not exactly budget friendly.

Thankfully over time I have started to learn how to recreate some of my favorite dishes, like yellow curry or Kimi’s simple Thai broth. It was only a matter of time that I finally broke down to create a Thai chicken fried rice that satisfied my cravings.

This Thai chicken fried rice is a combination of three of my favorite restaurants in various parts of California.

I mentioning making velvet chicken in this recipe. It is a process of poaching the chicken to make it more tender. It is a beneficial step but not necessary. There are times when I skip it, so don’t pressure yourself to do it. If you have a little extra time then it is worth it in my book.

If you are confused about why we are okay with white rice read more about it here.

Thai Chicken Fried Rice

Ingredients:

  • 2 cups steamed white rice (Jasmine preferred), made at least a few hours before and chilled
  • 1 pound chicken breast, thinly sliced and velveted (optional)
  • 1 cup Thai basil*
  • 1 cup zucchini, quartered and thinly sliced
  • 1 cup string beans or long beans, chopped into 1/4 inch pieces
  • 1 red bell pepper, thinly sliced
  • 4 cloves garlic, crushed
  • 4 tablespoons coconut oil
  • 2 teaspoons coconut/palm sugar
  • 2 teaspoons soy sauce/tamari for gluten free
  • 1/2 teaspoon unrefined salt

* If Thai basil can not be found, feel free to substitute with sweet basil. To cut the basil roll a few leaves at a time into a cigar shape and thinly slice.

Directions:

1. Cook the rice a few hours to a day or two in advance. Allow to cool.

2. Thinly slice the chicken breast. Use the velveting method to par-cook the chicken or set the raw chicken aside to cook in the skillet.

3. Quarter the zucchini, cutting it 1/4 of an inch thick. Remove the end from the string or long beans, cutting them into 1/4 inch pieces. Cut the bell pepper in half, removing the seeds. Thinly slice the bell pepper. Roll a few basil leaves at a time like a cigar. Thinly slice the rolls of basil. Crush the garlic.

4. Mix the soy sauce, palm sugar, and salt in a small dish.

5. In a wok or cast iron skillet heat the oil for two minutes.  Add the green beans and bell pepper. Cook on high heat for 5 minutes, allowing them to blister, stirring frequently.

6. Add the chicken and crushed garlic. Stir until the chicken is almost cooked.

7. Add the rice, zucchini, the soy sauce mixture. Stir for 3-5 minutes until thoroughly mixed and heated through. Add the basil and stir again.

Top with extra basil if desired.

Thai Chicken Fried Rice
 
Print
 
Ingredients
  • 2 cups steam white rice (Jasmin preferred)
  • 1 lb chicken breast, thinly sliced and velveted (optional)
  • 1 cup Thai basil*
  • 1 cup zucchini, quartered and thinly sliced
  • 1 cup string beans or long beans, chopped into ¼ inch pieces
  • 1 red pepper, thinly sliced
  • 4 cloves garlic, crushed
  • 4 TBS coconut oil
  • 2 tsp coconut/palm sugar
  • 2 tsp soy sauce/tamari for gluten free
  • ½ tsp unrefined salt
Instructions
  1. * If Thai basil can not be found, feel free to substitute with sweet basil. To cut the basil roll a few leaves at a time into a cigar shape and thinly slice.
  2. Cook the rice a few hours to a day or two in advance. Allow to cool.
  3. Thinly slice the chicken breast. Use the velveting method to par-cook the chicken or set the raw chicken aside to cook in the skillet.
  4. Quarter the zucchini, cutting it a ¼ of an inch thick. Remove the end from the string or long beans, cutting them into ¼ inch pieces. Cut the bell pepper in half, removing the seeds. Thinly slice the bell pepper. Roll a few basil leaves at a time like a cigar. Thinly slice the rolls of basil. Crush the garlic.
  5. Mix the soy sauce, palm sugar, and salt in a small dish.
  6. In a wok or cast iron skillet heat the oil for two minutes. Add the green beans and bell pepper. Cook on high heat for 5 minutes, allowing them to blister, stirring frequently.
  7. Add the chicken and crushed garlic. Stir until the chicken is almost cooked.
  8. Add the rice, zucchini, the soy sauce mixture. Stir for 3-5 minutes until thoroughly mixed and heated through. Add the basil and stir again.
  9. Top with extra basil if desired.
3.3.3077

Some links may be affiliate links. I may earn a small commission on items purchased through my links. 

Filed Under: Dietary Needs, Egg Free, Egg Free, Gluten Free, Nourishing Frugal Recipes, Uncategorized Tagged With: chicken fried rice, fried rice, Thai chicken fried rice, Thai fried rice

Vanilla Bean Creme Fauxccino

June 6, 2016 by Katie Mae 3 Comments

Vanilla Bean Creme Fauxccino NG

By Katie Mae Stanley of Nourishing Simplicity

This drink is sure to hit the spot on a hot day. It is creamy, slightly sweet, and bursting with vanilla.

Few things are better than drinking a cold icy drink out of a mason jar with a fun straw in the summer. This vanilla bean creme fauxccino is definitely at the top of my list right now. Hot days make me want to wander into a coffee chain and order a nice big blended iced drink. Honest moment here, I may have in the past couple months given in and ordered a few with less syrup and dairy-free milk.

As you know, I am a big fan of fauxccinos for many reasons- they are delicious, so much better for you, less expensive, and easy to whip up! You can have your own ready in less time than it takes to drive to the coffee shop!

This specific fauxccino is coffee free, it’s a milk based drink instead. I used almond milk, but you can adapt to whatever type of milk you prefer. The key to this icy drink is making frozen milk cubes. They ensure that your drink doesn’t become watery.

Other Fauxccinos to Enjoy:

  • Salted Caramel Mocha
  • Chai Tea
  • Java Chip

Vanilla Bean Creme Fauxccino

1 cup milk (raw, almond, or coconut)
8 milk ice cubes (raw, almond, or coconut)
2 TBS maple syrup or raw honey
1/2 vanilla bean caviar*
1/2 tsp vanilla extract
Whipped cream (optional)

1. Freeze milk of choice in an ice cube tray until solid.

2. *Cut a vanilla bean in half, slice it open. Use the sharp side of the knife to scrape out the caviar (seeds).

3. Place all the ingredients in a blender. Blend on high until smooth.

4. Pour into a glass and top with whipped cream if desired.

Vanilla Bean Creme Fauxccino
 
Serves: 2 cups
Print
 
Ingredients
  • 1 cup milk (raw, almond, or coconut)
  • 8 milk ice cubes (raw, almond, or coconut)
  • 2 TBS maple syrup or raw honey
  • ½ vanilla bean caviar*
  • ½ tsp vanilla extract
  • Whipped cream (optional)
Instructions
  1. Freeze milk of choice in an ice cube tray until solid
  2. *Cut a vanilla bean in half, slice it open. Use the sharp side of the knife to scrape out the caviar (seeds).
  3. Place all the ingredients in a blender. Blend on high until smooth.
  4. Pour into a glass and top with whipped cream if desired.
3.3.3077

Some links may be affiliate links. I may earn a small commission on items purchased through my links. 

Filed Under: Beverages, Dairy Free, Desserts, Dietary Needs, Egg Free, Uncategorized, Vegan Tagged With: healthy frapuccino, Vanilla Bean Creme Fauxccino

Next Page »

Primary Sidebar

ConvertKit Form

Get Every Recipe

And the insider's view from our kitchen

Success! Now check your email to confirm your subscription.

There was an error submitting your subscription. Please try again.

We won't send you spam. Unsubscribe at any time. Powered by ConvertKit

Follow Me

  • Facebook
  • Google+
  • Instagram
  • Pinterest
  • RSS

Search

Please Read:

The information you find here at The Nourishing Gourmet is meant to help you become a better cook! This site is primarily for sharing family friendly recipes. It's not meant to give medical advice or to make any health claims on the prevention or curing of diseases.This site is only for informational and educational purposes. Please discuss with your own, qualified health care provider before adding in supplements or making any changes in your diet. Also, any links to sponsors or affiliates (including Amazon) may give me a percentage of the sale or a pay per click. Thank you for supporting this site.

Categories

  • $10 Main (42)
  • $5 Dishes (43)
  • 52 ways to save money on a healthy diet (53)
  • AIP (23)
  • Baked Goods (83)
  • Beverages (72)
  • Breakfast and Brunch (61)
  • Condiments (8)
  • Dairy Free (492)
  • Desserts (184)
  • Dietary Needs (6)
  • Egg Free (11)
  • Egg Free (86)
  • For the Kids (66)
  • For the Love of Food and Books (18)
  • Gluten Free (484)
  • Grain Free (95)
  • Health (75)
  • Kitchen Tools (4)
  • Main Dishes (126)
  • Nourishing Frugal Recipes (167)
  • Nourishing Frugal Tips (70)
  • Nourishing Practices (56)
  • Nutrient Dense Foods (70)
  • Q and A (15)
  • Salads (39)
  • Sides (101)
  • Snacks (124)
  • Soups (50)
  • The Healthy $1 Menu (21)
  • The Low Energy Guide to Healthy Cooking (18)
  • THM (2)
  • Trim Healthy Mama (2)
  • Uncategorized (846)
  • Vegan (241)
  • Vegetarian (361)

Recent Posts

  • 2 Ingredient Peppermint Bark
  • Herbal Hibiscus Lemonade (Keto, THM)
  • Creamy Curry Red Lentil Soup
  • One-Pot Gluten-Free Mac and Cheese
  • Healthy Pumpkin Spice Granola
  • Crispy Pumpkin Spice Granola (oil-free)
  • Why I Use THM Principles Now
  • Vietnamese Beef Noodle Salad
  • Coconut Flour Pancakes
  • Instant Pot Mexican Shredded Chicken

Recent Comments

  • Dorene St G on Cracker Toffee (Easy Peasy Christmas Candy)
  • Nadia Kriston on Finding a Toaster Oven Without Nonstick
  • KimiHarris on How to make heavenly coconut milk whipped cream (with an isi dispenser)
  • KimiHarris on Autumn Beef Stew (Tomato Free)
  • KimiHarris on How to make heavenly coconut milk whipped cream (with an isi dispenser)

Fresh: Nourishing Salads for All Seasons

Get Every Recipe

And the insider's view from our kitchen

Success! Now check your email to confirm your subscription.

There was an error submitting your subscription. Please try again.

We won't send you spam. Unsubscribe at any time. Powered by ConvertKit

Footer

Privacy

Copyright © 2023 · Foodie Pro & The Genesis Framework