• Skip to primary navigation
  • Skip to main content
  • Skip to primary sidebar
  • Skip to footer

The Nourishing Gourmet

Nourishing. Satisfying. Gourmet.

  • THM Coaching
  • About
    • Privacy
    • Contact
  • Recipes
  • Cookbooks
    • Everyday Nourishing Food
    • Salad Cookbook
    • Soup Cookbook

Vegetarian

Greek Sweet Potato Hash – $15 Meal from Trader Joe’s

March 31, 2016 by Natalia Gill 1 Comment

$15 Trader Joe's Meal - Sweet Potato Hash -- The Nourishing Gourmet

By Natalia Gill of An Appetite For Joy

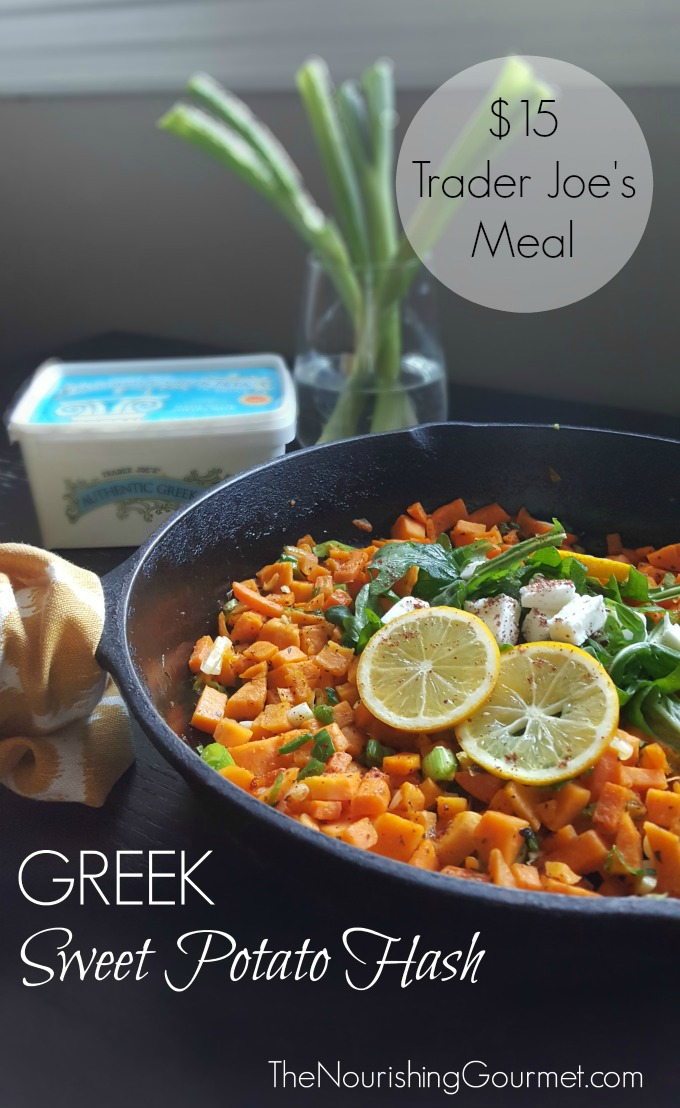
What could be better than diced sweet potatoes fried up with garlic and green onions, then topped with wild peppery arugula, salty feta and a sprinkle of sumac? Not much in this world if you ask me.

This Greek sweet potato hash is also versatile – delicious on its own or stuffed into a pita pocket or lettuce wrap!

One thing I love about the direction Kimberly takes with this blog is learning to save money while eating right. She came up with the idea of buying meal ingredients at Trader Joe’s with $15 in pocket and I thought it was a fun challenge!

I didn’t include cooking fat and spices in the cost. To more than offset this, know that there will be plenty of leftover sweet potatoes, arugula and sheep feta. My son loves packing the feta with olives in his lunch. And the extra sweet potatoes come in handy for our favorite dessert – Sweet Potato Pie with Lemon Zest.

3 FAVORITE TJ’S FINDS

When creating the recipe, I wanted to highlight a few of my favorite items at Trader Joe’s:

Sweet potatoes – I find TJ’s to have good prices on basic organic sweet potatoes.

Wild arugula – This was a new one for me. I like that there are a couple of wild-grown foods in the store as a cost-saving option compared to organic (wild blueberries and now wild arugula). This bagged arugula was amazingly fresh and the best arugula I have ever purchased from a grocery store. It was almost as tasty as the one I buy from a local farmer.

Sheep feta – I love this stuff. It comes in a sizable block that is pre-cut into manageable pieces. This cheese is much creamer than cow-milk feta and easier on digestion, like goat’s milk. It lasts all week for us!

COST BREAKDOWN

3 lb bag of sweet potatoes – $4.49
wild arugula – $2
green onions – $1.29
sheep feta – $6.49
lemon – 50 cents

TOTAL – $14.77

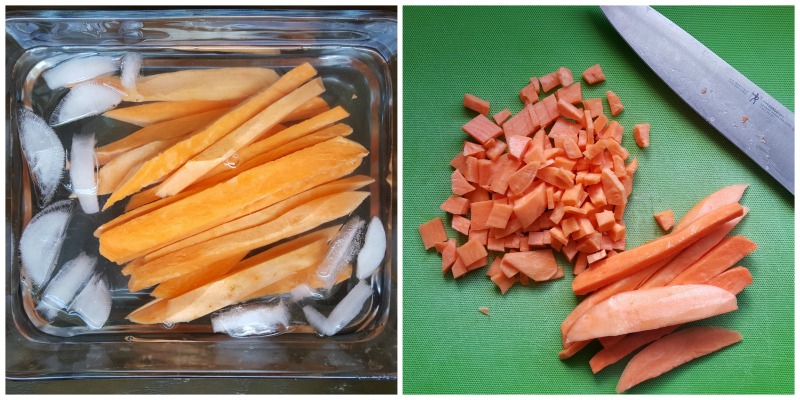
This meal comes together in a flash, especially if you can grab a few minutes earlier in the day to prepare the sweet potatoes (I like breaking up cooking tasks). I just cut them into french fry shape (a good knife makes this easy!) and soak in ice water in the fridge til I’m ready to cook.

$15 Trader Joe's Meal - Sweet Potato Hash -- The Nourishing Gourmet

NEED MORE EASY, FRUGAL MEAL IDEAS?

Paprika Chicken Legs (Slow Cooker)
Homemade Instant Noodle Bowls
Easy Mini Meatloaves (Paleo)
14 Easy Dinner Recipes that are Healthy and Frugal too!

Greek Sweet Potato Hash - $15 Meal from Trader Joe's
 
Author:
Natalia Gill
Recipe type: Main
Cuisine: Greek-inspired
Serves: 4-6
Print
 
This Greek-inspired sweet potato hash makes a great light meal for spring or summer. Enjoy it on its own or stuffed into a homemade pita, tortilla or lettuce wrap. A cup of bone broth on the side completes the meal.
Ingredients
  • 2 pounds sweet potatoes (about 4 large), peeled and diced small
  • 4 scallions, diced
  • 2 cloves of garlic, minced
  • 1-2 tablespoons dried oregano, to taste
  • unrefined salt and pepper, to taste
  • 2 tablespoons cooking fat (ghee, bacon fat, coconut oil, etc.)
  • OPTIONAL TOPPINGS:
  • chunks of sheep feta
  • arugula
  • sumac
Instructions
  1. This is a one-pot meal if you halve the recipe. But with the quantity of sweet potatoes, it's necessary to make it in two skillets.
  2. Heat two skillets over medium heat and add 1 tablespoon cooking fat to each. When hot, add diced sweet potatoes and cook until they start to soften, about 5-10 minutes. Add a little salt.
  3. Add the scallions and cook another 5 minutes, or until they start to get a little crispy. (Add extra fat if needed.)
  4. Reduce the heat to medium-low. Add the garlic and oregano and cook another 5 minutes being careful not to burn the garlic.
  5. Season to taste with salt and pepper.
  6. Serve with a lemon wedge, a pile of arugula on top and some feta if desired. I also like to sprinkle on a little sumac.
3.3.3077

Filed Under: 52 ways to save money on a healthy diet, Breakfast and Brunch, Egg Free, Gluten Free, Main Dishes, Nourishing Frugal Recipes, Uncategorized, Vegetarian Tagged With: Greek, sweet potatoes, Trader Joe's, Vegetarian

Water Kefir – A Simple & Refreshing Probiotic Soda (With a Step-by-Step Guide)

January 13, 2014 by Natalia Gill 69 Comments

Water Kefir - A Refreshing, Simple-to-Make Probiotic Soda (With Step-by-Step Photos!) at The Nourishing Gourmet

By Natalia Gill, from An Appetite For Joy

Water kefir is a lightly sweet and refreshing tonic, bubbling over with healthy bacteria (You can read about the health benefits of fermented foods here) .  The taste is pleasant on its own or it can be elevated with an endless combination of flavors.  Spicy lemon ginger and cultured grape soda are pictured here (our current favorites!)

As part of the 21 Steps to a Nourishing Diet Series, water kefir can be a nice segue into home fermentation.  This cultured drink is very inexpensive to make, virtually fail-proof and packs a healthy wallop of probiotics.  I can’t think of an easier, more instantly rewarding way to start fermenting.

Basic water kefir is made by dropping water kefir “grains” (which are not really grains at all but a symbiotic culture of bacteria and yeast or SCOBY) into sugar water and allowing it to ferment on the counter for a few days.  The grains (which look like small, clear jellies) can be used over and over indefinitely, and usually multiply, allowing them to be passed on to others.

Our experience with water kefir

My family started drinking water kefir about a year ago.  At the time, I was getting into home fermentation in an effort to get a wider range of probiotics into our diet.  Probiotic-rich foods not only create a more favorable balance of gut flora, but amazingly, the bacteria work to physically repair the gut lining.

After purchasing a crock, I successfully (and to my surprise, quite easily) made this No-Pound Old Fashioned Lacto-Fermented Sauerkraut.  I was preparing to embark on Continuous Kombucha Brewing when some water kefir grains dropped into my lap at the playground of my son’s school.  Not literally, although wouldn’t that be something!  They came freshly prepared by a friend in a wide-mouth quart-sized mason jar (as pictured in “step 1” below).

Several days later, I nervously strained the finished water kefir and reused the grains to make my first new batch.  Within hours it started coming to life.  I relaxed as the mixture bubbled away happily in a dark and formerly stagnant corner of my kitchen counter.  It was fun to check in now and then, giving the mason jar a little twist to encourage bubbles to surface (I read later that this is a good thing to do if you think of it.)  Plus, the taste was quite pleasant!

My children and I benefited right away.  My 2-yr old daughter had recently snubbed her nourishing diet for a phase of picky eating that was starting to affect her digestion.  Her digestion normalized after the first round of water kefir.  I was also thrilled to be getting probiotics into my son again, who at the time did not like soured milk products or sauerkraut.

My husband obliged but never really noticed any benefit.  If anything, he felt better without it, so he gave it up after a while.  Lately though as I’ve been experimenting with new flavors, he’s been giving it another try.  I’m wondering if the added complexity of flavored water kefir (the tang of cultured grape or the sour-spicy combo of lemon-ginger) will allow his body to receive it better.  Taste does impact digestion.

Follow these step-by-step photos to brew your own water kefir 
(see recipe for exact measurements and variations)

  • If you receive grains from a friend, they will likely come mid-ferment as shown in Step 1.
  • If you purchase dehydrated grains from a place like Cultures for Health, you will receive detailed instructions on how to rehydrate them, which will probably be very similar to the diagram below, but it may take a few rounds for the grains to recalibrate before your water kefir is enjoyable.

How to Make Water Kefir

Questions and Answers about Water Kefir 

What types of sugars can I use?  What about coconut palm sugar, honey and maple syrup?

  • Unrefined cane sugar is recommended with molasses (added and/or still intact) to provide minerals that the grains need.  Lately I have been use sucanat (#affiliatelink) and my grains are thriving.  However, I started with organic cane sugar (fine granulated) and that also worked well and is more cost effective.  *With sucanat, I use a generous 1/4 cup + 1t molasses and ferment for 48 hours.  With organic cane sugar I use a level 1/4 cup + 1t molasses and ferment for 72 hours. 
  • It is possible to use coconut palm sugar, honey and maple syrup as well (substituting equally) but over time the grains will weaken as the sugar makeup isn’t optimal.  This should only be done when you your grains have multiplied and you have extra to experiment with.  I recently experimented with honey and it made a nice drink, though the grains did not multiply as they usually do.  Maple syrup may work better because it is typically not as antimicrobial as is honey.

How much should I drink?

As you might imagine, there are no hard and fast rules.  We started out drinking an ounce or two after each meal.  This was a good way to see how our bodies responded to it.  You may want to start with even less if your diet doesn’t include a lot of fermented foods.  Now we are a little more erratic, but I’d say we have about 2-6 ounces on most days.  We sometimes take breaks by putting it into hibernation.  It’s always wise to listen to your body and practice moderation, even with the good stuff.

Can I take a break from making it?

Yes!  Grains can be put into hibernation mode or dehydrated.  To hibernate, just mix up a new batch (as pictured in “step 6”) and stick it in the fridge instead of leaving it out to ferment.  I’ve left mine there for almost a month with no problems but I’d suggest checking on them after 1-2 weeks as all grains are different.

I have yet to dehydrate our grains, but here is how to do it from what I understand.  Rinse the grains with filtered water and spread them out between two sheets of parchment and leave in a safe, but ventilated place to dry out at room temperature for 1-4 days.  You want them to be very dry.  You can also use a dehydrator.  They should keep for several months.

What is the alcohol content and is it safe for kids?  

The alcohol content is very low – well below 1% which is less than overripe fruit.  It climbs a little if using straight juice or when doing a second fermentation (as described in the recipe notes) but it would be a challenge to get even mildly intoxicated by drinking water kefir.

My children might drink it once or twice a day, in small 2-3 ounce glasses (less if it’s a second fermentation).  It is an individual judgement call as there are no strong warnings against giving it to children.  I did read once, in a book by Maria Montessori, that she did not recommend giving fermented drinks to children.  I assume she was referring to alcohol, but it did make me take pause.

How much sugar remains after fermentation?

This is taken from the Q & A section about water kefir grains from Cultures of Health. “The sucrose is converted to glucose+fructose. The glucose is used by the kefir grains for grain-building and reproduction, and the fructose remains in the drink at about 20% of the original level. The longer the finished kefir sits, the less sweet it will be, so some fructose is apparently converted in that process as well.”

Where did kefir grains originate? 

Water kefir is truly cosmopolitan.  From Italy to the Far East to Mexico, various names and twists exist.   It’s origins are unclear, but it is speculated to have originated in Mexico, where, according to research, “tibicos” culture forms on the pads of the Opuntia cactus (read more here).  Milk kefir grains, which have a different composition, likely originated in the Caucasus Mountains region.

Do you have any questions or an experience to share?  We would love to hear!


Basic Water Kefir Instructions (see notes for variations)
 
Author:
Natalia Gill
Recipe type: Beverage
Print
 
Light and bubbly, water kefir is a simple and delicious way to balance and strengthen digestion.
Ingredients
  • ¼ - ⅓ cup unrefined sugar
  • 1t unsulphured blackstrap molasses (or your chosen source of minerals)
  • 2.5 - 3 cups spring water (leave enough room for your grains and extra space at the top for fermentation gas)
  • ¼ - 1 cup of water kefir grains
Instructions
  1. Shake up the sugar, molasses, and spring water in a wide-mouth quart-sized mason jar until dissolved. (You don't want your grains getting stuck in a bottleneck on their way out!) Leave an inch or two at the top to allow for the build-up of carbon dioxide.
  2. Add in rinsed grains and close the lid. Some people use cheesecloth with the mason jar band in lieu of the lid, but I've always sealed it. (If you purchased dehydrated grains, follow instructions for rehydration. The directions are similar, but it will take a few rounds to get them going before the water kefir is palatable.)
  3. Leave the grains to ferment at room temperature for 48-72 hours (2-3 days). It's good to taste a spoonful of the drink at 48 hours. If it is too sweet for your liking, let it go another day. It isn't recommended to go beyond 72-96 hours because the grains will weaken.
  4. Strain your finished water kefir and store it in the fridge. I use old juice jars or swing top bottles for this.
  5. Rinse your grains (filtered water is best, but tap is ok) and repeat. Again. And again...
Notes
Once you are comfortable with your grains and if they are multiplying well, split some off for experimentation and let the fun begin! There is no limit to what you can create.

Cultured juice sodas: take your finished water kefir (pictured in step 3) and add about ¾-1 cup of juice. I love using a quality, not-from-concentrate grape juice for this. Cherry would be wonderful as well. It is critical to leave even MORE room at the top because it is going to get VERY fizzy! Do not add the grains back in. Leave it to ferment on the counter for another 12-24 hours. (Sometimes I let it sit for only a few hours.) The longer it goes, the less sweet it will be. Refrigerate when you're happy with how it tastes. This is called a second fermentation.

You can also add juice straight to your finished water kefir (after straining the grains) without a second ferment. Pop it into the fridge, and enjoy as is. Try the juice of one lemon and a tablespoon of finely grated ginger for a beautiful probiotic lemonade! I've even heard of making cultured mojitos this way, by adding the juice of a lime and muddling some fresh mint.

Dried and/or fresh fruit: It's common to add dried and/or fresh fruit into the batch either before it ferments, or into the finished, strained water kefir. Pineapple, lemon slices and dried unsulphured figs are popular choices. Tepache is a traditional drink of Mexico made with pineapple, brown sugar and cinnamon.

Coconut Water Kefir: follow the instructions using coconut water instead of spring water. You will not need any sugar or molasses. Add the grains right in. The fermentation is MUCH faster. Check it in 6 hours and don't let it go for much longer than 12-15. Some may like the taste, but many will not. It is dry (unsweet) and quite yeasty. But this could be a great option for those avoiding sweeteners.

Cultured Herbal Teas: Steep herbs and/or spices in your spring water and let cool before following the basic recipe. Rosehip and/or hibiscus is delightful!

Dairy Kefir: Water kefir grains will weaken when used in milk (milk grains are best), but if you have extra grains and want to experiment just add the grains to milk with no sugar or molasses. Alternatively, you can add an ounce of finished, strained water kefir directly to milk. Check it after 24 hours or so.

Coconut Milk: This is also a fun thing to experiment with although it will weaken the grains over time. Transfer half a can of coconut milk into a glass container and add 2 tablespoons of grains. Taste it after 24 hours and keep it going if it's not tangy enough for you. The coconut milk can thicken during the process, especially after it is refrigerated and could be used to make cultured coconut whipped cream.
3.2.2265

Filed Under: Beverages, Dairy Free, Gluten Free, Nourishing Practices, Vegan, Vegetarian Tagged With: Beverages, Fermentation, Grain Free, Healthy beverages, Kefir, Kefir Grains, Nourishing Frugal Recipes, Vegan, Vegetarian, Water Kefir

Garlicky Thyme Sautéed Mushrooms

December 7, 2010 by KimiHarris 5 Comments

Mushrooms are wonderful and I have been especially craving them lately.  I added them to my quinoa stuffing and to my stew, but I wanted them in all of their glory. So, I decided to sauté them as a nice side dish. This side is easy to make, the hardest part is simply cutting up the mushrooms. Garlic and thyme and balsamic vinegar add plenty of flavor with the olive oil and butter (a classic French combination for sautéing) adds richness and even more flavor.

This would make a nice side to a steak, or a yummy filling for an omelet or simply served as a side to scrambled eggs and toast as I did (with a new baby in the house, our meals have been super simple as of late). While I love mushrooms for their delightful taste, they are also very good for you (so I am told). Mushrooms are an excellent source selenium as well as many other nutrients.

Garlicky Thyme Sautéed Mushrooms

You can really use whatever fat or oil you want for this dish. Bacon grease would be good, but butter and olive oil is very nice.         Serves 4

    1 pound of crimini mushrooms (or mushrooms of choice)
    1-3 cloves of garlic, peeled and finely minced or put through a garlic press
    1 teaspoon of dried thyme
    2 tablespoons of butter
    2 tablespoons of olive oil
    1/2 to 1 tablespoon of balsamic vinegar, to taste

1- Wash the mushrooms by gently wiping with a damp cloth and then slice.

2- In a large pan, heat the butter and olive oil over med-high heat until hot but not smoking. Add the mushrooms and dried thyme and sprinkle with a bit of salt. Sauté for several minutes, stirring as needed to prevent burning and then add the minced garlic. Cook until the mushrooms are starting to brown and soft. Drizzle with balsamic vinegar and give a quick stir. Adjust the flavors with salt and vinegar as needed and serve.

Filed Under: Gluten Free, Sides, Vegetarian Tagged With: Sides, Vegetarian

Fall Essential: Roasted Delicata Squash Slices ( or “Fries”)

October 15, 2010 by KimiHarris 22 Comments


One of the quintessential fall produce items is winter squash, and I am loving it! However, I wasn’t always a squash fan. I remember once going over to a friend’s house in high school and they served huge halves of acorn squash with brown sugar as the sole dinner item. I liked the flavor fine, but after eating such a large amount of it, the texture started getting to me. Now I happily eat squash and can truthfully say that I love it!

Delicata squash played an important role in helping me learn to love squash. This sweet squash is absolutely delicious. We typically cut it in half, seed it and roast it slathered in butter, and sometimes just a touch of maple syrup. Delicious. But my now four year old seems to have a bit of a hard time with the texture, just like I used to. But when I made these delicata squash “fries”  (as she named them), she loved them, and Joel and I did too. We like butternut squash fries, but they do tend to be pretty soft and you have to be really careful not to overcrowd the pan otherwise they will get soggy. These stay firm and have a much closer texture to potatoes. And with their natural sweetness, they are a great treat. I think that a lot of young children could like these.

We loved them simply roasted, but they would also be delicious with a little Mexican flare with cumin and garlic, or you could highlight it’s natural sweetness with a bit of maple syrup or honey too. I think that squash carries many flavors well (I think that a curry version could be good too!).

…

Read More

Filed Under: $5 Dishes, Dairy Free, Gluten Free, Sides, Vegan, Vegetarian Tagged With: $5 Dishes, Dairy Free, GAPS Friendly, Gluten Free, Grain Free, Vegan, Vegetarian

Next Page »

Primary Sidebar

ConvertKit Form

Get Every Recipe

And the insider's view from our kitchen

Success! Now check your email to confirm your subscription.

There was an error submitting your subscription. Please try again.

We won't send you spam. Unsubscribe at any time. Powered by ConvertKit

Follow Me

  • Facebook
  • Google+
  • Instagram
  • Pinterest
  • RSS

Search

Please Read:

The information you find here at The Nourishing Gourmet is meant to help you become a better cook! This site is primarily for sharing family friendly recipes. It's not meant to give medical advice or to make any health claims on the prevention or curing of diseases.This site is only for informational and educational purposes. Please discuss with your own, qualified health care provider before adding in supplements or making any changes in your diet. Also, any links to sponsors or affiliates (including Amazon) may give me a percentage of the sale or a pay per click. Thank you for supporting this site.

Categories

  • $10 Main (42)
  • $5 Dishes (43)
  • 52 ways to save money on a healthy diet (53)
  • AIP (23)
  • Baked Goods (83)
  • Beverages (72)
  • Breakfast and Brunch (61)
  • Condiments (8)
  • Dairy Free (492)
  • Desserts (184)
  • Dietary Needs (6)
  • Egg Free (11)
  • Egg Free (86)
  • For the Kids (66)
  • For the Love of Food and Books (18)
  • Gluten Free (484)
  • Grain Free (95)
  • Health (75)
  • Kitchen Tools (4)
  • Main Dishes (126)
  • Nourishing Frugal Recipes (167)
  • Nourishing Frugal Tips (70)
  • Nourishing Practices (56)
  • Nutrient Dense Foods (70)
  • Q and A (15)
  • Salads (39)
  • Sides (101)
  • Snacks (124)
  • Soups (50)
  • The Healthy $1 Menu (21)
  • The Low Energy Guide to Healthy Cooking (18)
  • THM (2)
  • Trim Healthy Mama (2)
  • Uncategorized (846)
  • Vegan (241)
  • Vegetarian (361)

Recent Posts

  • 2 Ingredient Peppermint Bark
  • Herbal Hibiscus Lemonade (Keto, THM)
  • Creamy Curry Red Lentil Soup
  • One-Pot Gluten-Free Mac and Cheese
  • Healthy Pumpkin Spice Granola
  • Crispy Pumpkin Spice Granola (oil-free)
  • Why I Use THM Principles Now
  • Vietnamese Beef Noodle Salad
  • Coconut Flour Pancakes
  • Instant Pot Mexican Shredded Chicken

Recent Comments

  • Dorene St G on Cracker Toffee (Easy Peasy Christmas Candy)
  • Nadia Kriston on Finding a Toaster Oven Without Nonstick
  • KimiHarris on How to make heavenly coconut milk whipped cream (with an isi dispenser)
  • KimiHarris on Autumn Beef Stew (Tomato Free)
  • KimiHarris on How to make heavenly coconut milk whipped cream (with an isi dispenser)

Fresh: Nourishing Salads for All Seasons

Get Every Recipe

And the insider's view from our kitchen

Success! Now check your email to confirm your subscription.

There was an error submitting your subscription. Please try again.

We won't send you spam. Unsubscribe at any time. Powered by ConvertKit

Footer

Privacy

Copyright © 2023 · Foodie Pro & The Genesis Framework