• Skip to primary navigation
  • Skip to main content
  • Skip to primary sidebar
  • Skip to footer

The Nourishing Gourmet

Nourishing. Satisfying. Gourmet.

  • THM Coaching
  • About
    • Privacy
    • Contact
  • Recipes
  • Cookbooks
    • Everyday Nourishing Food
    • Salad Cookbook
    • Soup Cookbook

paleo

7 Layer Mexican Dip (Healthy, Paleo, and Dairy-free)

January 31, 2014 by KimiHarris 10 Comments

7 layer mexican dip (grain-free, dairy-free)

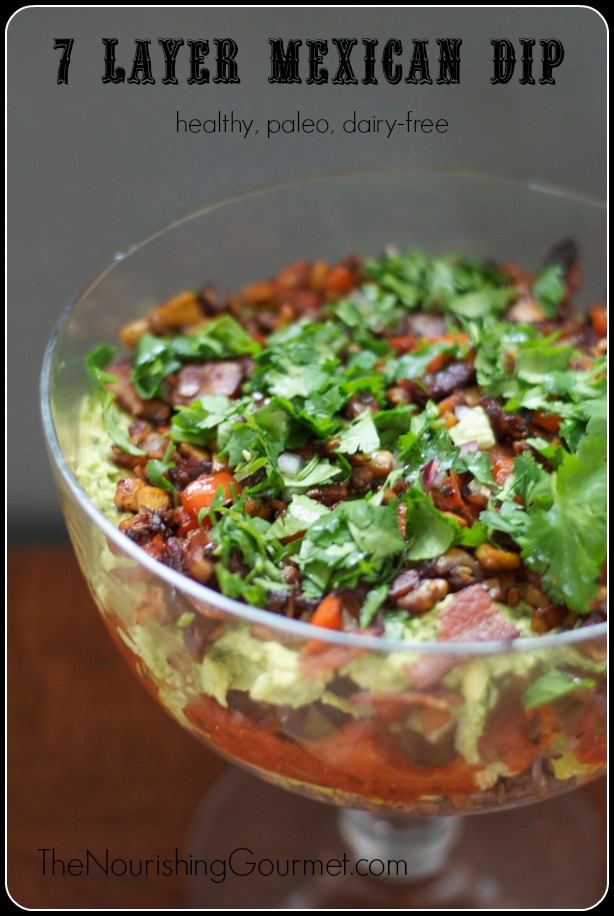
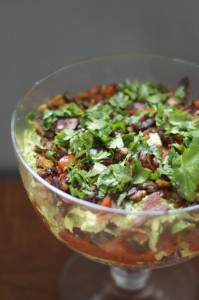
“Mmmmmmmmmm”, my three year old, intones while dipping into her 7 layer dip. With flavorful Mexican beef, salsa, olives, homemade guacamole, and a smokey bacon, mushroom, and red pepper layer, our children hardly felt deprived while they enjoyed their meal. In fact, they thanked me many times for making this Mexican layered dip! They could have cared less that it was healthy – they just knew they liked it. (We love Mexican inspired dishes, including Mexican Quinoa Bowls, Mexican Roasted Potatoes, and tacos too!)

This dip is lovely for a casual meal, party food, or for enjoying during the Superbowl.

I wanted to share this recipe as part of the 21 steps to a nourishing diet series as I think it’s an excellent example of how a nourishing diet isn’t at all about what you take out, but instead what you put in. When we make meals such as above, we leave feeling satisfied in every way. We feel well nourished, our delight in food was satisfied, and we feel that proper boost of energy that comes from enjoying good food. This is the goal for our eating habits. Yes, there may be some struggle to retrain our taste-buds in certain recipes (at first, I didn’t always enjoy unrefined sweeteners, for example, now I don’t really like “normal desserts”), but many times, our main dish meals are just so great, that it’s no adjustment at all.

The great thing about a dip like this, is that you can make as many layers as you want, and vary it to desire. For example, while this one is a “paleo” version, you certainly can make homemade refried beans, add some cooked Mexican flavored black beans, use a good quality sour cream, or shredded cheese, or make it simpler with only 3-4 layers of your favorite layers. The point is, it’s as flexible as you need it to be.

There is also a give and take with how much time you are willing to invest into making it. This took me about 45 minutes to make. If I didn’t make the lovely bacon/vegetable layer, it would have been shorter. If I was really wanting to go all out, I could have made dairy-free sour cream, and homemade salsa too.

A word about what to use to dip with: The rest of my family used organic blue chips. I was amused to see my children eat less chips than normal as they were so focused on eating the delicious 7 layer dip.  I used crisp endive leaves (just gently rinse and pat dry before serving), and it was delightful. If you have a little extra time, you can always make some paleo chips (examples: Almond flour chips , vegetable chips, or Plantain Chips ).

I chose to put this in a fancy serving bowl, but using a glass casserole dish is also perfect for layering. I personally prefer to buy borosilicate glass pieces, as it generally breaks into large pieces, instead of shattering into millions of pieces, so I think it’s safer. Amazon carries several brands of, including Simax (#affiliate link) which fits the bill.

7 Layer Mexican Dip (Healthy, Paleo, and Dairy-free)
 
Author:
Kimi @ The Nourishing Gourmet
Recipe type: Main Dish or Appetizer
Serves: 8
Prep time: 20 mins
Cook time: 25 mins
Total time: 45 mins
Print
 
Easily adaptable, fun, and loved by all ages, this is a favorite in our household.
Ingredients
  • Layer one: Mexican Ground Beef (see recipe card below)
  • Layer two: 1-2 cups thinly sliced Romaine heart (see video demonstration on easy way to wash)
  • Layer three: 1½ cups of salsa (can be homemade, but I used a sugar-free, organic store-bought brand)
  • Layer four: 6 ounces of olives, sliced or quartered
  • Layer five: Chunky Guacamole (see recipe card below)
  • Layer six: Smokey Bacon and Vegetables (see recipe card below)
  • Layer seven: Chopped Cilantro
Instructions
  1. In a large saucepan, make the Mexican ground beef according to directions below, Set aside beef, and put hot water in the pan to deglaze, Scrap off any browned bits, and rinse off.
  2. Make the Smokey Bacon and Vegetable layer next in the same pan, making the Guacamole while the vegetables are cooking.
  3. In a clean casserole dish, or dish of choice, layer the ingredients. We like this best when the beef and bacon layers are still a little warm. If chilling, make sure you have drained the beef and the vegetable/bacon layer of extra fat well (fat will congeal once chilled). Enjoy!
3.2.2265

Chunky Mexican Guacamole
 
Author:
Kimi @ The Nourishing Gourmet
Prep time: 5 mins
Total time: 5 mins
Print
 
This is my favorite method of making guacamole! Adjust the flavors at the end with salt and lime to make it just perfect.
Ingredients
  • 2 large or 4 small ripe Hass avocados
  • ¼ cup finely chopped red onion (for an especially mild guacamole, use 2 tablespoons)
  • 1 large garlic cloves, finely minced or put through a garlic press
  • ¼ bunch of cilantro, washed, and finely chopped
  • ½ teaspoon of unrefined salt, or to taste
  • 1 lime (I use one half, normally)
Instructions
  1. Cut the avocados in half, take out the pit, and scoop into a medium bowl. Smash with a fork or with a clean meat mallet.
  2. Stir in the onions, garlic, cilantro, salt, and the juice from half of a lime.
  3. Adjust flavors with salt or lime juice, as needed.
  4. Enjoy!
3.2.2265

Smokey Bacon Mushrooms and Red Peppers
 
Author:
Kimi @ The Nourishing Gourmet
Prep time: 5 mins
Cook time: 7 mins
Total time: 12 mins
Print
 
Ingredients
  • 4 slices of smoked bacon
  • ⅓-1/2 pound white mushrooms
  • 1 large red pepper
Instructions
  1. Cook the bacon in a large pan over medium, to medium-high heat. Flip frequently to cook evenly, until crisp and well done. Remove from pan.
  2. Meanwhile, trim the stems of the washed mushrooms, and chopped into small pieces. Seed and chop the red pepper.
  3. Once the bacon is cooked, leave about 2 tablespoons of the hot grease in the pan, and add the peppers and mushrooms. Cook for about 7 minutes, stirring here and there, or until the vegetables are soft and starting to brown. Crumble the bacon back in. If there is any extra grease, drain, otherwise taste, and salt, if needed, and sprinkle with lime juice, if desired.
3.2.2265

Mexican Ground Beef
 
Author:
Kimi @ The Nourishing Gourmet
Prep time: 2 mins
Cook time: 10 mins
Total time: 12 mins
Print
 
This simple recipe is flavorful and delicious without a specialty seasoning packet (which is often filled with unsavory ingredients).
Ingredients
  • 1 pound of ground beef, grassfed beef preferable
  • 3 medium garlic cloves, finely minced or put through a garlic press
  • 1 teaspoon each ground cumin and dried oregano
  • ½ teaspoon unrefined salt
  • 1 lime
Instructions
  1. In a large pan, over medium-high heat, cook the beef, garlic, cumin and oregano, stirring frequently, until cooked (the meat will no longer be pink). If using grassfed beef, it often will not have much fat drippings, but if it does, drain.
  2. Salt, and sprinkle the juice of half the lime. Taste-test, and adjust with more salt and lime juice, as needed.
3.2.2265


Filed Under: Dairy Free, Gluten Free, Main Dishes, Sides Tagged With: 7 Layer Dip, 7 Layer Mexican Dip, Beef, Dip, Layered Mexican Dip, Mexican, Mexican Beef, paleo, Seven Layer Dip

Fig & Walnut White Chocolates

November 25, 2013 by Anna Harris 10 Comments

thenourishinggourmet-november

By Anna Harris, Contributing Writer

Creamy honey-sweetened white chocolate confections are studded with the crunch of toasted walnuts and the syrupy chew of black mission figs.

As it turns out, white chocolate from home, naturally sweetened and flavored is a challenging creature. Lots of research backed up this recipe that just kept writing itself out in flavors in my mind’s taste buds. So the trick with homemade white chocolate seems to be to add loads of additional flavor as well as to properly temper this fickle and fragrant fat. The flavor comes from the honey, in this case I used dehydrated honey, or honey granules to keep the intensity of sweetness without extra moisture. A heavy cream powder or coconut cream powder for a paleo version, adds richness and that “white” chocolate flavor. The pure, raw cocoa butter on it’s own, while it smells utterly heavenly and promising, needs a boost to combat the oily taste of it on it’s lonesome.  A pinch of fine salt, those gorgeous black and miniature beads from  real vanilla beans, these ingredients deliver the hoped-for heavenly flavors.

While some may find some of the ingredients finicky and may not wish to whip up a batch weekly, around the holidays, with fancy and unhealthy ingredients alluring us with every shopping trip, I find this recipe perfect for real food lovers like myself. I do appreciate the blessing of a dessert that is not only decadent and addictingly delicious (I think I ate 8 pieces during my photo shoot alone) but offers sweet benefits of wholesome fats and natural sweeteners. For even more nutritional bonuses, soak your raw nuts in salted water over night and dehydrate them before lightly toasting!

Note from Kimi: I highly recommend the below coconut milk powder! It doesn’t have any of the same concerns as regular milk powder, and is very delicious. It makes AMAZING hot chocolate. Plus, it looks like it’s cheaper than the heavy cream powder. 🙂 Just note that it does have a trace of casein in it, so those very sensitive to dairy, should be cautious (it hasn’t bothered me at all, but you should be forewarned if extremely dairy sensitive).

Here is a list of needed ingredients for this recipe (affiliate links): Pure Honey granules (make sure you get a pure version), coconut milk powder or heavy cream powder, Navitas Cocoa butter, or organic cocoa butter melting disks,  and vanilla paste.
…

Read More

Filed Under: Dairy Free, Desserts, Sides, Uncategorized, Vegetarian Tagged With: Dessert, Honey, paleo

Marinated Cherry Tomatoes | Raw, Vegan & Grain-Free

September 6, 2013 by Danielle Rouse 4 Comments

Cherry Tomatoes Marinated in fresh herbs, white wine vinegar and extra virgin olive oil on thenourishinggourmet

Colorful heirloom cherry tomatoes marinated in an herb infused white wine vinegar and olive oil dressing.

It’s my favorite time of year in our back yard garden! Our tomatoes are ripe and ready to be eaten. You just can’t beat home grown fresh off the vine tomatoes. In fact, we rarely eat them out of season because those in the supermarket are just tasteless and blah.

I am always looking for new ways to enjoy my tomato bounty. This recipe for marinated whole cherry tomatoes is a great way to use them. The taste is similar to bruschetta, but what I love about marinating them whole, is being able to pull a jar out of the fridge and pop one in your mouth like you would other pickled or lacto- fermented vegetables.

They are the perfect addition to your appetizer platter or tapas style meal. They also make an amazing topper for a raw zucchini salad.

Raw, Vegan, Grainfree Marinated Tomatoes from thenourishinggourmet.com

My kids devoured these tomatoes (you can seem them digging into the jar after this photo shoot on instagram)! My husband and kids have requested these tomatoes twice now since we made them for the first time. They are a hit with the whole family.

Marinated Cherry Tomatoes | Raw, Vegan & Grain-Free
 
Print
 
Marinated whole cherry tomatoes in an herb infused vinaigrette
Ingredients
  • 4 cups whole cherry tomatoes (I used 2 yellow and 2 red)
  • ⅓ cup thinly sliced and then diced red onion
  • ⅓ cup white wine vinegar
  • ½ cup extra virgin olive oil
  • 4 sprigs fresh oregano leaves removed
  • 4 sprigs fresh thyme leaves removed
  • ¼ cup chopped fresh basil
  • sea salt and pepper to taste
Instructions
  1. Wash and remove stems of cherry tomatoes and place them in a large bowl
  2. In a small bowl, whisk together all of the other ingredients.
  3. Pour the dressing over the cherry tomatoes. Gently stir, coating all of the tomatoes, cover and place in the fridge to marinate for several hours. (I stirred them a few times when I went into the fridge)
  4. I then poured our tomatoes into a mason jar with a lid to store in the fridge for 1-2 weeks.
  5. The number of servings depends on what you use them for. Makes 2 large zucchini salads.
3.2.2124

bioDanielle Rouse is the creative energy behind; Fresh4Five Real Food | Fresh Ideas. Danielle is the mother of three with a passion for nutrition and cooking with fresh and wholesome ingredients. She’s become an expert at developing recipes to meet the complex dietary needs of her family.

In 2009, her youngest son was diagnosed with multiple food intolerances. It turned out to be what Danielle calls “A blessing in disguise” as it opened her eyes to her own food intolerances and completely changed her entire family’s way of eating; for the better. Since witnessing amazing overall health improvement in her family, Danielle yearned to learn more about the connection between our food and our health. She enrolled in the Canadian School of Natural Nutrition in January 2013, studying to become a Registered Holistic Nutritionist. Danielle can not wait to follow her dream and use her new education to help others on their journey to health and wellness.

On Fresh4Five Danielle shares an array of family friendly recipes that are among other things, free of Gluten, Dairy, Soy, Nuts and Paleo Friendly

Follow Danielle on Twitter and Facebook.

Filed Under: Dairy Free, Gluten Free, Sides, Snacks, Vegan, Vegetarian Tagged With: paleo

Primary Sidebar

ConvertKit Form

Get Every Recipe

And the insider's view from our kitchen

Success! Now check your email to confirm your subscription.

There was an error submitting your subscription. Please try again.

We won't send you spam. Unsubscribe at any time. Powered by ConvertKit

Follow Me

  • Facebook
  • Google+
  • Instagram
  • Pinterest
  • RSS

Search

Please Read:

The information you find here at The Nourishing Gourmet is meant to help you become a better cook! This site is primarily for sharing family friendly recipes. It's not meant to give medical advice or to make any health claims on the prevention or curing of diseases.This site is only for informational and educational purposes. Please discuss with your own, qualified health care provider before adding in supplements or making any changes in your diet. Also, any links to sponsors or affiliates (including Amazon) may give me a percentage of the sale or a pay per click. Thank you for supporting this site.

Categories

  • $10 Main (42)
  • $5 Dishes (43)
  • 52 ways to save money on a healthy diet (53)
  • AIP (23)
  • Baked Goods (83)
  • Beverages (72)
  • Breakfast and Brunch (61)
  • Condiments (8)
  • Dairy Free (492)
  • Desserts (184)
  • Dietary Needs (6)
  • Egg Free (11)
  • Egg Free (86)
  • For the Kids (66)
  • For the Love of Food and Books (18)
  • Gluten Free (484)
  • Grain Free (95)
  • Health (75)
  • Kitchen Tools (4)
  • Main Dishes (126)
  • Nourishing Frugal Recipes (167)
  • Nourishing Frugal Tips (70)
  • Nourishing Practices (56)
  • Nutrient Dense Foods (70)
  • Q and A (15)
  • Salads (39)
  • Sides (101)
  • Snacks (124)
  • Soups (50)
  • The Healthy $1 Menu (21)
  • The Low Energy Guide to Healthy Cooking (18)
  • THM (2)
  • Trim Healthy Mama (2)
  • Uncategorized (846)
  • Vegan (241)
  • Vegetarian (361)

Recent Posts

  • 2 Ingredient Peppermint Bark
  • Herbal Hibiscus Lemonade (Keto, THM)
  • Creamy Curry Red Lentil Soup
  • One-Pot Gluten-Free Mac and Cheese
  • Healthy Pumpkin Spice Granola
  • Crispy Pumpkin Spice Granola (oil-free)
  • Why I Use THM Principles Now
  • Vietnamese Beef Noodle Salad
  • Coconut Flour Pancakes
  • Instant Pot Mexican Shredded Chicken

Recent Comments

  • Dorene St G on Cracker Toffee (Easy Peasy Christmas Candy)
  • Nadia Kriston on Finding a Toaster Oven Without Nonstick
  • KimiHarris on How to make heavenly coconut milk whipped cream (with an isi dispenser)
  • KimiHarris on Autumn Beef Stew (Tomato Free)
  • KimiHarris on How to make heavenly coconut milk whipped cream (with an isi dispenser)

Fresh: Nourishing Salads for All Seasons

Get Every Recipe

And the insider's view from our kitchen

Success! Now check your email to confirm your subscription.

There was an error submitting your subscription. Please try again.

We won't send you spam. Unsubscribe at any time. Powered by ConvertKit

Footer

Privacy

Copyright © 2023 · Foodie Pro & The Genesis Framework