In the midst of preparing for Easter, today we Christians pause to remember the sacrifice Christ made on the cross. Sunday we will celebrate his glorious resurrection. My husband just released a single, “Ransom”, that celebrates what Christ did for us on Calvary. Read the words, listen to the song, or purchase it here. Beautiful lyrics and music.
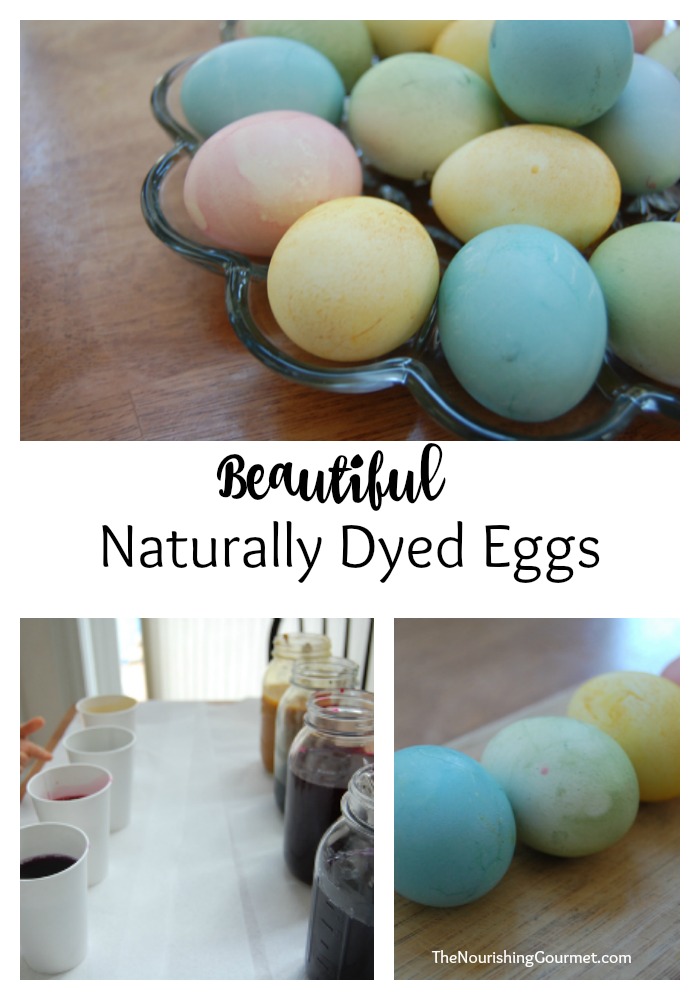
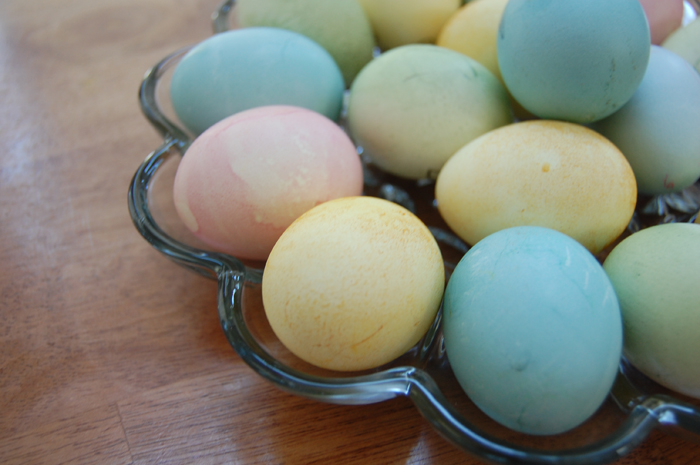
Who says that natural dyes have to be ineffective and drab? Our dyes produced lovely yellows, blues, pinks, and greens. I actually find that I like these colors better than the bright fake ones. Using this method, or the onion skin method produced great results for us! I am so glad that I challenged myself to try out some natural methods this year.
I found the options for how to make natural dyes overwhelming, so I decided to choose ingredients that would be both frugal and also make effective dyes: Beets for pink, red cabbage for blue, turmeric for yellow, and chlorophyll for green (I already had some that I use as a supplement, so I decided to try it. It works! I mention what brand I used, but I am sure you could experiment with other brands as well). These dyes are a cinch to put together, though I recommend making them the day before dye day.
I choose to do “cold dips” so that my four year old and her cousins could enjoy the process. But for darker colors, you can hard boil eggs right in the dye (for up to 30 minutes).
However, I did discover one trick for cold dyes. If you warm up your natural dyes before you “cold dip”, they will set even better and much more quickly! When warm, the red dye made out of beets happens almost instantly, the turmeric takes only a minute to get a beautiful golden color, and the blue sets just about as fast. I didn’t try the chlorophyll warm yet though.
If you need more recipe ideas for Easter, you may find some in my Ode to Spring. Since then I also added Roasted Asparagus and Mushrooms with a Lemon Butter Sauce, Aeblesivers (with a gluten and dairy free option), and Simple Deviled Eggs, all of which would be Easter worthy recipes.

Directions
Blue Dye: Take a small cabbage and shred. Put four cups into a medium sized pan with 4 cups of water, 1 tablespoon vinegar and 1 tablespoon salt. Simmer for 30 minutes and strain.
Pink Dye: Take 3 medium sized beets and chop. Place in a medium sized pot with four cups of water, 1 tablespoon vinegar and 1 tablespoon salt. Simmer for 30 minutes and strain.
Yellow Dye: Mix 6 tablespoons of turmeric with 4 cups of water, 1 tablespoon of salt and 1 tablespoon of vinegar. Simmer for a couple of minutes.
Green Dye: In 2 cups of water add 1/2 tablespoon vinegar and 1/2 tablespoon of salt. Add 50 drops of
ChlorOxygen®, or your choice of concentrate of chlorophyll.
For the cold dip method: Give the concentrates a stir if needed, and fill a paper cup 3/4 full of dye. Carefully lower an egg into the dye and leave in until it reaches desired color. For faster action dye, warm the dye before the dip. You will get almost instant results with warm red dye, and a beautiful yellow and blue in one minute of warm dye. The green takes the longest to dye, I left mine up to 30 minutes.
Drip dry on cooling sheets and store in the refrigerator for up to one week.
For more ideas and directions, check out Martha Stewart’s directions (just make sure to add salt to her recipes).

Disclaimer: Some links may be affiliate.
Latest posts by KimiHarris (see all)
- 2 Ingredient Peppermint Bark - December 21, 2022
- Herbal Hibiscus Lemonade (Keto, THM) - March 16, 2022
- Creamy Curry Red Lentil Soup - December 8, 2021
Great ideas for natural colours! If you want a marbled look, you can crack the surface of the eggshell lightly first, it’s a technique used in traditional CHinese tea leaf eggs (:
http://mummyicancook.blogspot.com/2011/04/tea-leaf-eggs.html
These are beautiful! I’m wondering if we need to make the full 4 cups or if half a recipe would be enough to do a few eggs (ok, 5 dozen probably, lolz!)?
These are beautiful! Thank you for sharing.
Nice eggs, and thanks for sharing your husband’s song!
I love your blues! I did a bunch of different natural dyes this week too. I was surprised that it was the pink that was the most difficult to achieve. Mine always ended up ruddy muddy. I’m giving the last egg a good long soak in beet juice to see if it will take. Still fun though and the girls love the colors. And I don’t have to worry about the artificial colors making my sensitive daughter go crazy. ☺
Lovely eggs! But I’m really commenting to tell you and Joel how great the song is. The lyrics and music are beautiful, just like you said. I’m so glad you told us about it. Happy Resurrection Day!
Do these dyes freeze well? I’m always trying to find ways to use up beets I get in my CSA basket. Maybe this summer I can make up a set of colours and freeze them until next Easter?
The eggs are beautiful! And so is your hubby’s song. Downloaded it and shared it on Facebook! Thank you for sharing it with us on your blog… Joyous Easter to your family.
Lovely eggs! Thank you, too, for sharing Joel’s song. I downloaded it and shared it on Facebook. Beautiful lyrics. May your family have a joyous Easter…
Beautiful eggs and beautiful song!!! Thank you so much for sharing 🙂
Blessings,
Mindy
What great egg coloring ideas. When my children were little, for several months before Easter I would start saving onion skins. Then I would put the eggs in the onion skins and carefully put them down into a clean panty hose and take a twisty and boil for about 20 minuits. Beautiful marbled looking eggs. White skins would make sort of green, brown skins would make brownish eggs. I learned this from my art teacher in college. Now I do it with my grandchildren.
What great egg coloring ideas. When my children were little, for several months before Easter I would start saving onion skins. Then I would put the eggs in the onion skins and carefully put them down into a clean panty hose and take a twisty and put around the top boil for about 20 minuits. Beautiful marbled looking eggs. White skins would make sort of green, brown skins would make brownish eggs. I learned this from my art teacher in college. Now I do it with my grandchildren.
Beautiful colors! I love that they are all natural too!!
Hi Kimi,
What beautiful eggs! And what you said about Easter was so sweet. Hope you had a wonderful day.
Love,
Mary
Your eggs are beautiful. I love your recipes:) I have a question about the blue coloring…I am actually attempting to make a natural food coloring to frost my son’s 1st birthday cake this weekend. I thought I would attempt the method you had for making blue coloring but mine turned out purple. You didn’t specify what color of cabbage. I assumed it was a red/purple cabagge is that right? I followed your instructions but my liquid was purple. Your eggs are very blue and the exact color I am trying to achieve! thanks so much – Jodi
I figured it out. If I add some baking soda it turned the cabbage blue! We have really hard water where I live maybe that has something to do with it! When I added vinegar it just made it magenta.
Jodi, I discovered while playing around with red cabbage that, while it makes blue for eggs, it does make purple for frosting because the frosting stays moist. It seems only to become blue when dry. So you have to add the baking soda to it for frosting if you want the blue!
Interestingly, the more baking soda you add, it becomes green. But that makes frosting inedible. We did some eggs like this, but it was unreliable. Sometimes the color just wouldn’t take to the egg.
I was able to do these this year, and wow, what beautiful eggs we had! Not to mention, it doubled as a science experiment for homeschool. 😉
I would add to this another we tried which was making a cold dip out of paprika. It was a wonderful brilliant orange. I followed your instructions for yellow/turmeric (which I actually decreased to 3T and it still worked brilliantly) and did 3T paprika instead. Thanks so much!! Hope your Easter was wonderful. 🙂