• Skip to primary navigation
  • Skip to main content
  • Skip to primary sidebar
  • Skip to footer

The Nourishing Gourmet

Nourishing. Satisfying. Gourmet.

  • THM Coaching
  • About
    • Privacy
    • Contact
  • Recipes
  • Cookbooks
    • Everyday Nourishing Food
    • Salad Cookbook
    • Soup Cookbook

Naturally Dyed Eggs (in Onion Skins)

April 19, 2011 by KimiHarris 23 Comments

Thanks for stopping by! If you're interested in healthy eating check out my free gifts! and subscribe to get regular email updates. *Some links may be affiliate.*

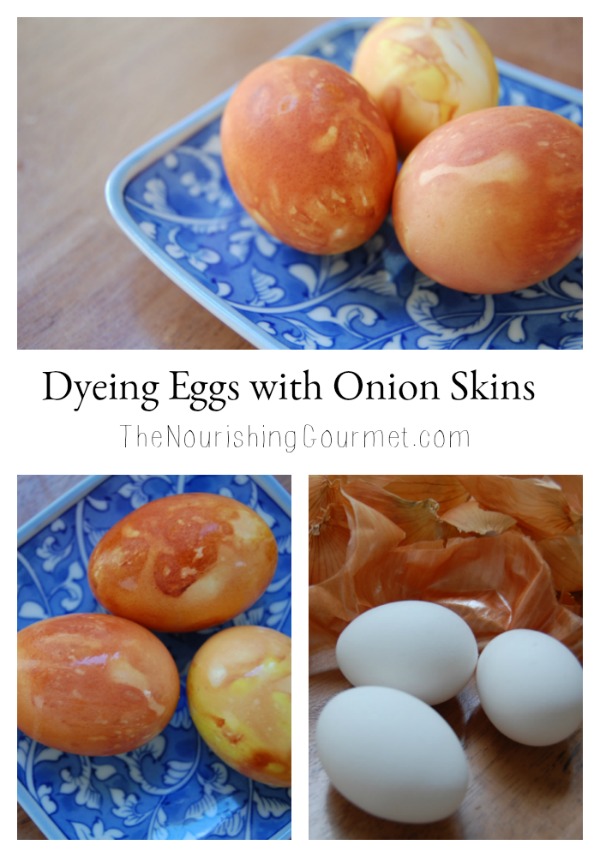
Have you ever tried this method of dyeing eggs? Onion skins are wrapped around eggs and hard boiled. Once unwrapped, marbled eggs appear with beautiful variations of color.

It’s so simple, easy, and pretty too! What I love about some of these natural dyes is the subtle color, instead of the fake brightness of the dye kits. (See how to produce DIY homemade dyes too).


You Need:

  • White Eggs
  • Onion skins (try to keep them as big as possible when unpeeling)
  • Rubber bands or kitchen twine
  • Thin cloth, such as cheesecloth (cloth napkins or cheesecloth are probably your best bet)
  • Pot with lid to boil eggs

This is so simple and produces beautiful marbled eggs!

Directions:

1) Wrap each egg in the onion skins.

Place in the cloth or cheesecloth and wrap it in the towel, securing it with a rubberband or twine.


2) Place in a pot and cover with cool water. Bring to a boil. Turn off heat and cover. Allow the eggs to sit in the hot water for 15 minutes. Then pour off the hot water and cool with running cold water. Unwrap your eggs and admire the pattern. Serve warm or refrigerate.

What about you? Have you naturally dyed eggs before? I would love to hear about your experience!

Some links affiliate.

The following two tabs change content below.
  • Bio
  • Latest Posts

KimiHarris

I love beautiful and simple food that is nourishing to the body and the soul. I wrote Fresh: Nourishing Salads for All Seasons and Ladled: Nourishing Soups for All Seasons as another outlet of sharing this love of mine. I also love sharing practical tips on how to make a real food diet work on a real life budget. Find me online elsewhere by clicking on the icons below!

Latest posts by KimiHarris (see all)

  • 2 Ingredient Peppermint Bark - December 21, 2022
  • Herbal Hibiscus Lemonade (Keto, THM) - March 16, 2022
  • Creamy Curry Red Lentil Soup - December 8, 2021

Filed Under: For the Kids, Nourishing Frugal Tips

Previous Post: « Celebration Aebleskivers (with a gluten and dairy free option!)
Next Post: Simple Deviled Eggs »

Reader Interactions

Comments

  1. sarah

    April 19, 2011 at 9:06 am

    I admired the cool looking results of that method but I have to ask – do the eggs taste like onion?

    Reply
    • KimiHarris

      April 19, 2011 at 9:08 am

      Not at all! 🙂

      Reply
  2. KimiHarris

    April 19, 2011 at 9:10 am

    I should have also mentioned that some people put in herbs, grasses, bits or rice and other edible items inside the onion skins on the eggs to create more texture. This would be really pretty. To make it work, you should probably wet all of the ingredients, so that it sticks on the eggs better.

    Reply
  3. Rachel

    April 19, 2011 at 9:32 am

    Nice job! Those are really pretty!

    Reply
  4. Amanda

    April 19, 2011 at 9:59 am

    Awesome! I have some questions:

    1. Does using red onion skins make a difference in the color? I only have reds right now, but I’d be super excited to see if it comes out red/purple/pink-ish!

    2. Will it dye brown eggs or deepen the color? Or will it just not show up well at all? I might need to buy some white eggs.

    3. Does it stain the cloth? Will it wash out?

    4. If you put rubber bands around the egg itself before wrapping it in the onion skin will it not take color where the rubber band is? I’m thinking about a tie-dye stripe look …

    Thanks so much! I can’t wait to try this!

    Reply
    • Judy

      April 20, 2011 at 6:58 am

      Amanda, I used red onion skins and the color was very pale blue/purple which was very pretty but only on white eggs. You can use the orange onion skins to deepen brown eggs but I doubt you’d get much of a pattern. I often put onion skins into the cooking water for hard boiled eggs just for the beautiful deep, deep, orange color, even though I’ll soon crack them for devilled eggs.

      Reply
  5. Kate

    April 19, 2011 at 2:35 pm

    I dyed easter eggs naturally last year using tumeric, blueberries, red/purple cabbage, etc. They came out gorgeous!! But, since I am in the throws of morning sickness this Easter – I’m going for an all-natural dye kit. I’ll keep you posted.

    http://sacredbee.wordpress.com/2010/04/03/natural-easter-egg-dyeing/

    Reply
  6. Julie

    April 19, 2011 at 2:49 pm

    Lovely affect! I wonder if you could use beets to also dye eggs a pinky-red color?

    Reply
  7. Theresa

    April 19, 2011 at 3:17 pm

    BROWN EGGS and GREEN EGGS are awesome to dye with! The depth of the color is so beautiful. 🙂

    Reply
  8. Patricia

    April 19, 2011 at 4:01 pm

    Kimi, your eggs are lovely! I want to try this for sure. The past two years we have been using onion skins to dye our Easter eggs red, using this method: http://greekfood.about.com/od/greekcookingtips/ht/redeggs.htm
    They come out looking just like the picture.

    Reply
  9. Susan

    April 19, 2011 at 4:14 pm

    Those look beautiful!!! Thanks for sharing!

    Reply
  10. Pat @ Elegantly, Gluten-Free

    April 19, 2011 at 5:18 pm

    Lovely! Some years back I colored some eggs with natural things loose in the boiling water –onion skins, beets, grape juice — but I didn’t know about wrapping them close in cheesecloth like you describe. I wish I had! They’re beautiful.

    Happy Easter!

    Reply
  11. RachelK

    April 20, 2011 at 4:11 am

    Did you use hard boiled eggs to start with or did you use raw eggs that hard boiled in the process?

    Reply
  12. Annabelle

    April 20, 2011 at 4:33 am

    Hi Kimi I read your two Easter posts with great interest, the eggs look amazing and I think I might buy one of those special pans!!

    I did want to ask though, if you were to try making soaked hot cross buns, what would you soak the flour in? Do you think it’s possible?

    Reply
  13. Lucille Korvin

    April 20, 2011 at 5:15 am

    I also have Annabell’s question. Hot cross buns are our Good Friday tradition, but I’ve never tried a soaked version.

    The egg dyeing looks lovely, I will surely try it.

    Reply
  14. nickyb

    April 20, 2011 at 12:37 pm

    My mother used to dye eggs like this when we were little…she used rubber bands to hold the onion skins on which made really interesting curvy patterns on the eggs. I’m going to try this this year – thanks for the reminder!

    Reply
  15. Lynda

    April 20, 2011 at 12:55 pm

    I now this isn’t as natural as onion skins and such, but as far as non-toxic, we make the most beautiful colored eggs with grated crayons, any colors. Easy for the little ones, dramatic results for the big ones. 🙂 I like to do a few to quench my creative spirit. My 3 year old is really into it this year.

    Of course, you have to do it when the eggs are still hot from boiling, so be sure to handle with tongs or towel. Hold in the towel for them to scribble with actual crayons, put on a holder (we use mineral water lids) for sprinkling with grated crayon. It’s not an issue with them getting burned, so don’t worry.

    It’s a nice activity to stretch over a few days too. Six at a time, depending on your little one’s attention span.

    Reply
  16. Michelle @ Find Your Balance

    April 20, 2011 at 5:33 pm

    I think that is fabulous! What a great idea!

    Reply
  17. Joyce Johnson

    April 21, 2011 at 3:36 pm

    Here is the link to Martha Stewart’s natural ‘egg dying’ that we have used for many years. So fun to do.

    http://www.marthastewart.com/article/natural-egg-dye

    Reply
  18. Nannie

    April 28, 2011 at 5:19 am

    Wow! I am so impressed with the beautiful natural-color materials for Easter egg dying!!!
    All these years when my children and I thought we needed special dyes for Easter eggs, and I really had all I needed on hand already. Just sorry I have to wait until next Easter to try this. Having no children around now, I used food coloring and instructions on the box to make colored eggs for a centerpiece. They were the pretty bright rainbow colors (and yes, I had to keep them in the fridge each night.) My granddaughter has enlightened me on several great and healthier ideas now, and I am loving it! Really, Dear, you are a wonderful mom. Nannie

    Reply
  19. annie

    March 10, 2013 at 7:51 am

    Afte creating these beautiful natural-looking onion skin dyed eggs, I buy/make/find a vine and fashion it into a nest shape, place it in a basket with some moss and put the eggs inside for a natural looking centerpiece for the Easter table. It definitely brings Spring a bit closer!

    Reply

Trackbacks

  1. Naturally Dyed Easter Eggs (Pink, Green, Yellow and Blue) says:
    April 22, 2011 at 11:28 am

    […] actually find that I like these colors better than the bright fake ones. Using this method, or the onion skin method produced great results for us! I am so glad that I challenged myself to try out some natural […]

    Reply
  2. Easter Eggs, Treats, and Food says:
    April 4, 2012 at 9:53 am

    […] year I experimented with two ways to naturally dye eggs. Onion Skin dyed eggs are actually beautiful. And you can also dye eggs a wide variety of colors, such as pink, green, […]

    Reply

Leave a Reply Cancel reply

Your email address will not be published. Required fields are marked *

This site uses Akismet to reduce spam. Learn how your comment data is processed.

Primary Sidebar

ConvertKit Form

Get Every Recipe

And the insider's view from our kitchen

Success! Now check your email to confirm your subscription.

There was an error submitting your subscription. Please try again.

We won't send you spam. Unsubscribe at any time. Powered by ConvertKit

Follow Me

  • Facebook
  • Google+
  • Instagram
  • Pinterest
  • RSS

Search

Please Read:

The information you find here at The Nourishing Gourmet is meant to help you become a better cook! This site is primarily for sharing family friendly recipes. It's not meant to give medical advice or to make any health claims on the prevention or curing of diseases.This site is only for informational and educational purposes. Please discuss with your own, qualified health care provider before adding in supplements or making any changes in your diet. Also, any links to sponsors or affiliates (including Amazon) may give me a percentage of the sale or a pay per click. Thank you for supporting this site.

Categories

  • $10 Main (42)
  • $5 Dishes (43)
  • 52 ways to save money on a healthy diet (53)
  • AIP (23)
  • Baked Goods (83)
  • Beverages (72)
  • Breakfast and Brunch (61)
  • Condiments (8)
  • Dairy Free (492)
  • Desserts (184)
  • Dietary Needs (6)
  • Egg Free (11)
  • Egg Free (86)
  • For the Kids (66)
  • For the Love of Food and Books (18)
  • Gluten Free (484)
  • Grain Free (95)
  • Health (75)
  • Kitchen Tools (4)
  • Main Dishes (126)
  • Nourishing Frugal Recipes (167)
  • Nourishing Frugal Tips (70)
  • Nourishing Practices (56)
  • Nutrient Dense Foods (70)
  • Q and A (15)
  • Salads (39)
  • Sides (101)
  • Snacks (124)
  • Soups (50)
  • The Healthy $1 Menu (21)
  • The Low Energy Guide to Healthy Cooking (18)
  • THM (2)
  • Trim Healthy Mama (2)
  • Uncategorized (846)
  • Vegan (241)
  • Vegetarian (361)

Recent Posts

  • 2 Ingredient Peppermint Bark
  • Herbal Hibiscus Lemonade (Keto, THM)
  • Creamy Curry Red Lentil Soup
  • One-Pot Gluten-Free Mac and Cheese
  • Healthy Pumpkin Spice Granola
  • Crispy Pumpkin Spice Granola (oil-free)
  • Why I Use THM Principles Now
  • Vietnamese Beef Noodle Salad
  • Coconut Flour Pancakes
  • Instant Pot Mexican Shredded Chicken

Recent Comments

  • Dorene St G on Cracker Toffee (Easy Peasy Christmas Candy)
  • Nadia Kriston on Finding a Toaster Oven Without Nonstick
  • KimiHarris on How to make heavenly coconut milk whipped cream (with an isi dispenser)
  • KimiHarris on Autumn Beef Stew (Tomato Free)
  • KimiHarris on How to make heavenly coconut milk whipped cream (with an isi dispenser)

Fresh: Nourishing Salads for All Seasons

Get Every Recipe

And the insider's view from our kitchen

Success! Now check your email to confirm your subscription.

There was an error submitting your subscription. Please try again.

We won't send you spam. Unsubscribe at any time. Powered by ConvertKit

Footer

Privacy

Copyright © 2023 · Foodie Pro & The Genesis Framework