Growing up my mother would dust off our aebleskiver pans on Easter and make mounds of aebleskiver pancakes (which are round, fluffy pancakes). Honey and butter were melted together to make a delectable syrup, and we stuffed ourselves full. It’s one of those sweet family memories which I savor. As an adult, I’ve been pleased to find them easy to make, and just as special to my little one. I’ve been developed a gluten and dairy free version that’s just as good (and it’s soaked too!). I give both recipes below.
Aebleskivers are a Danish specialty, but have been gaining appreciation in the US lately. They are sometimes called “Pancakes Puffs”, which, while descriptive, doesn’t seem quite as cool of a name as aebleskivers. Regardless of what you call these, these are delicious! You do need a special pan for these, but since they are gaining in popularity, they are becoming more and more easy to find. I’ve seen them lurking at many kitchen stores lately, but you can also buy them on Amazon. We use the cast iron variety and the Norpro Danish Aebleskiver Pan on Amazon is a great deal for only $12.41. I try not to recommend specialty cookware, as it tends to clutter up the kitchen. But I have to say that this is one item that I find worth having around to carry on our lovely family tradition.
Today I am going to share two recipes with you, based off of the recipe we used all of my growing up years. One uses the traditional ingredients, but is soaked. This makes light and fluffy whole wheat aebleskivers. The second is a gluten and dairy free version. It’s actually quite good. I asked my grandparents to taste test and they thought it would be something that anyone could enjoy, gluten free or not. I used millet and amaranth flour for a more nutritious pancake, but you can use whatever flours you like.
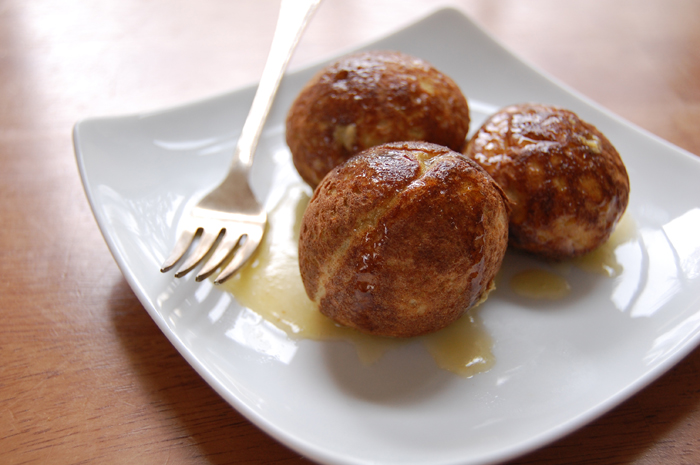
To serve, you can use our traditional honey/butter syrup, which is simple honey and butter in equal portions melted together. Or you can serve with jams, maple syrup, or even make them savory. You can even fill them with savory or sweet fillings! (Something I haven’t tried yet).
- 2 cups of buttermilk
2 cups of whole wheat pastry flour, preferably freshly ground
1) Gently mix together the above ingredients and leave out overnight in a warm place for 12-24 hours.
- 3 eggs, separated
2 tablespoons sweetener (whole cane sugar, coconut sugar, maple sugar)
1 teaspoon baking powder
1 teaspoon baking soda
1/2 teaspoon salt
2) In a clean bowl, whip the egg whites into soft peaks.
3) Mix together the egg yolks, baking powder and soda, and salt with the buttermilk and flour mixture until well combined. Fold in the egg whites. Cook according to the directions below.
Gluten and Dairy Free Aebleskivers
I added the chia seeds for added stability, but the eggs would probably be enough to hold the pancake together. I have also used 10-12 drops of Now Whole Leaf Stevia Extract instead of the two tablespoons of sweetener.
- 2 1/2 cups of gluten free whole grain flour ( I used 1 cup of freshly ground amaranth, and 1 1/2 cups of freshly ground millet)
1 1/2 cups of water or dairy free milk of choice
2 tablespoons raw apple cider vinegar
1 tablespoon of chia seeds, ground in coffee grinder (not used for coffee)-Optional
1) Mix together the above ingredients and leave out, covered in a warm place for 12 to 24 hours.
- 3 eggs, separated
2 tablespoons sweetener (whole cane sugar, coconut sugar, or maple sugar)
1/2 teaspoon unrefined salt
1 teaspoon baking powder
1 teaspoon baking soda
2) In a clean bowl whip the egg whites into soft peaks.
3) Mix together the egg yolks, baking powder and soda, and salt with the flour mixture until well combined. Fold in the egg whites. Cook according to the directions below.
Directions for Cooking
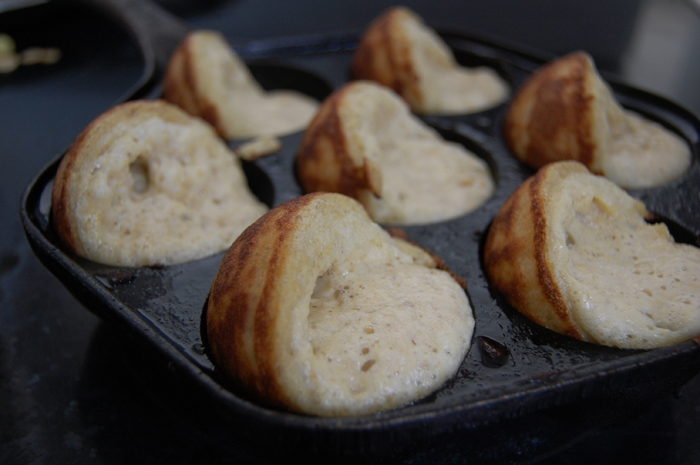
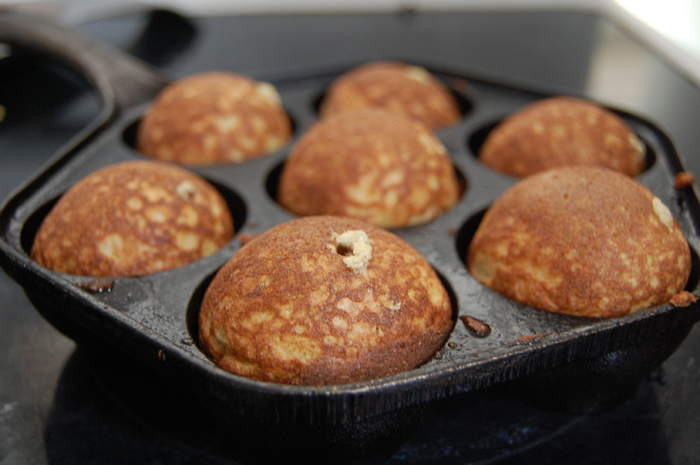
Heat a seasoned, cast iron pan over medium heat until a sprinkle of water jumps and sizzles on the pan. Grease with palm shortening, coconut oil, or butter, and fill 3/4 full of batter. Allow the bottom to brown and set. Using a toothpick or wooden skewer, turn a quarter turn (it will look like this). It sounds strange, but it’s not hard! Then turn once, or twice more, as it continues to brown . You should be left with a round pancake! Adjust heat as needed as you continue cooking and serve right away, as they will deflate some as they cool.
Enjoy!
Latest posts by KimiHarris (see all)
- 2 Ingredient Peppermint Bark - December 21, 2022
- Herbal Hibiscus Lemonade (Keto, THM) - March 16, 2022
- Creamy Curry Red Lentil Soup - December 8, 2021


I used to have these growing up (my Dad is from Denmark) but I had no idea they were graining popularity in the US. Maybe I’ll have to take a crack at them myself.
My kids love these, but I only remember that I have the pan when it’s in the way! So glad you posted a soaked recipe for them~time to dust off the pan and set it out in plain sight! 🙂
Do you think a muffin tin would work, even if it might be funky-shaped?
I was born and raised in Denmark, and tradition has it that we serve these at Christmas with jam and powdered sugar, and usually served with Jule gloegg (Hot Christmas spice wine with cinnamon sticks, raisins, and blanched/sliced almonds ) Soo delicious.
I am thrilled to find a Gluten free recipe as my daughter just found out she has a Gluten allergy, and this is her FAVORITE food at Christmas. Thank you for sharing.
A muffin tin would not work. Since Aebleskiver are cooked on the stove-top, a muffin tin would be too thin. I also think it would be impossible to turn them. The real Aebleskive pans are quite easy to find these days, anything from non-stick to cast iron, and they vary greatly in price, so look around. Enjoy, it is quite a treat 🙂
These look so good. First of all, how do you pronounce aebleskivers — and then I also wonder about using a muffin pan. I spent my high school years in Racine WI — a very Danish town. We had Pringle all the time, so so good — I wonder if you have a gluten-free recipe for it? Never heard of these puffs, so am anxious to try — despite my German heritage.
I too was raised in Racine, Wi. I grew up on O&H Kringle. I miss it so. I just got a pan to make these for my birthday, looking forward to tasting them
These sound like a fun treat! In your recipe do you mean to put:
1 teaspoon baking powder
1 teaspoon baking powder
OR
1 teaspoon baking powder
1 teaspoon baking soda
Thanks,
Lorraine
Oops! Thanks for catching that. The second is supposed to be baking soda. 🙂
I see that you have equal amounts of flour and buttermilk. If anyone doesn’t have flour but wants to use whole wheat berries or anything else, I’ve found that measuring 3/4 cup of berries (this equals 1 C. flour) into a blender per 1 C. liquid, makes a perfect blender batter. I usually blend for about 2 1/2 minutes. I’ve not tried your recipe yet, but it looks like it would work well. So your recipe would be 1 1/2 C. grains and 2 C. buttermilk……
Thank you for all of your wonderful posts! – Judy
Does 3/4C berries ground to 1 cup of fluor even if it’s sprouted grain? I have just started grinding my own and I had been told that with sprouted flour you need more not less. Any help with this would be appreciated. Right now I only have Kamut and I’m having a hard time figuring it out as my recipes don’t turn out the same.
Thanks!!
Amy
Oh yay! I grew up eating aebleskievers on Christmas morning at my grandparent’s (they are Danish). I’ve been wanting to buy a pan these last couple years and carry on the tradition, and now I think I might finally take the plunge. Thanks for the great recipes as well, as I was wondering how to make them more traditional and healthy. 🙂
Oops, ignore this post.. accidentally clicked post early before I was done typing.
Oh yay! I grew up eating aebleskievers on Christmas morning at my grandparent’s (they are Danish). I’ve been wanting to buy a pan these last couple years and carry on the tradition, and now I think I might finally take the plunge. Thanks for the great recipes as well, as I was wondering how to make them more traditional and healthy. 🙂 Something fun we always did was dip them in syrup and then dip into powdered sugar… yummm!
One of my favorite wedding gifts was our aebleskiver pan. My Husband is the expert at our house. He uses a small knitting needle to turn them. One of our favorite things to do is put jam in the middle as you turn them. Delicious!
And to those above, a muffin pan probably won’t work as you need the round shape for them to turn and cook evenly on the stovetop.
Could you substitute kefir for the buttermilk?
Definitely!
I’m not familiar with the special pan, but it looks like it would make a great muffin pan too (especially if you camp).
Ohh, I didn’t know about the 1/4 turn trick! Thanks. I bought a vintage cast iron skillet abelskiver pan on ebay this past January. In the summer when I have time I’ll be experimenting with grain free abelskivers 🙂
I love abelskivers! I have a pan in my cupboard which I purchased prior to my son’s birth (3 years ago). I’ve never used it–he’s allergic to eggs. Is there any way I can make them without eggs? Xanthan Gum? Egg Replacer? Still learning new options for these things.
it’s look delisicius!!!!!!
Those are beautiful! I might have to see if it’s at all possible to make them GAPS friendly 🙂 Thanks for sharing your tradition Kimi 🙂
These are beautiful! I could see them being a huge hit at my house.
I found you through allthingsformom.com. LOVE your site!
I love these things! We have a abelskiver pan… really want to make a sourdough version of it. Hope I will be able to! :o)
Kimi – THANK YOU THANK YOU THANK YOU!!! We have these every Easter and occasionally during the year. My mom has celiac disease and I can’t wait to try this out on her!
🙂 i’m from Denmark and I too have lovely family memories of eating aebleskivers! not for easter, though… in Denmark we eat them around Christmas time. I did a soaked whole grains and sourdough version for Christmas this year and it was delicious!! these look gooood!
My mouth is watering! My mother had a cast iron vintage pan and we ate these when I was a child. Funny, I have no idea how that started! But I have just received the pan for my own children and was thinking of cranking some out when you posted this! I am grateful because now I don’t have to do the work of altering the recipe. Thanks!
Thanks so much for posting the gluten free, dairy free option! I LOVE aebleskivers, my Mom makes them and they are so incredible but due to allergies at our house we haven’t been able to have them. I’m really excited to give your recipe a try. Have you ever filled yours? We would always fill them before you turn them, they are great with fruit, pumpkin, cherries, lemon curd basically anything etc. So tasty. Thanks again.
We made these yesterday and they were awesome. Here is a recipe for a really great syrup to dip these aebleskivers in.
1 stick of butter
1/2 c. of buttermilk or Kefir
1/2 c. coconut sugar,
stir constantly until you get a boil,
then remove from heat and add 1 tsp vanilla and 1/2 tsp baking soda, stir, will foam up. It is yummy.
Here is a great syrup for these aebleskivers.
1 stick of butter
1/2 c buttermilk or kefir
1/2 c. coconut sugar
In medium sauce pan bring these to a boil, stirring constantly,
then remove from heat and add 1 tsp vanilla and 1/2 tsp baking soda. Stir, will foam up. Place in serving device and enjoy your aebleskivers.
They remind me of Hong Kong Cakes
I think we will make your Aebleskivers for Valentines! We tried this recipe last year in our electric “Baby Cakes Cake Pop” maker! They turned out wonderful and soooo easy! The whole pan turns over so it cooks on both sides! Gluten free option worked also. Bought our “Cake Pop” maker at the local Kohl’s department store with coupon. 🙂
Can you freeze the leftovers for microwaving later as quick breakfast treats?
Thank you for providing a GF AND dairy free recipe. I am having a big group of friends over and would like to make these in advance. Do you know if they freeze well once cooked in the pan? If so, how would you recommend heating them up? Should I defrost them first and then bake? Or bake them frozen?
Thanks again for your great post!
So glad to find this recipe in a GF and DF form
My dad’s grandparents all immigrated from Denmark and these were a favorite in my grandparent;s’ house, and my dad made them for us too. I inherited my pan from one of my aunts, when my dad rescued it after she passed away. I stopped eating wheat and dairy 20 years ago and this is one of the few things I really miss. We ate them at Christmas time, along with other Danish cookies and pastries.
I look forward to sharing this with my sister.
This weekend calls for a batch of Abelskivers! I need to practice the 1/4 turn, fill as you go trick. Thank You!!