• Skip to primary navigation
  • Skip to main content
  • Skip to primary sidebar
  • Skip to footer

The Nourishing Gourmet

Nourishing. Satisfying. Gourmet.

  • THM Coaching
  • About
    • Privacy
    • Contact
  • Recipes
  • Cookbooks
    • Everyday Nourishing Food
    • Salad Cookbook
    • Soup Cookbook

Side

Pan-Fried Thai Chicken with Carrot and Ginger Salad

July 16, 2015 by Katie Mae 14 Comments

Pan Fried Thai Chicken with Carrot and Ginger Salad - a great meal for a hot summer night. -www.thenourishinggourmet.com

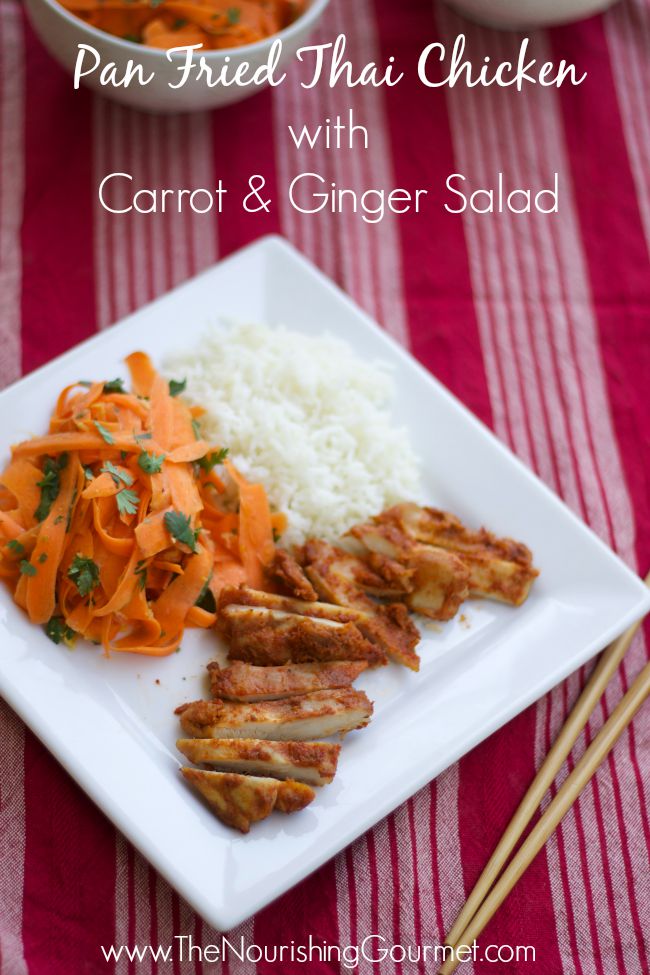
This simple pan-fried chicken is brought to a whole new level when covered in Thai inspired flavors, accompanied by a fresh carrot and ginger salad.

Long time readers will know that I love to share my twist on Thai dishes with you! Ingredients like curry paste give an ordinary dish a fun twist that I really enjoy.

In the summer time who wants to heat up the house by turning on the oven in the late afternoon? Not me. I prefer to cook on the stove top and keep the flavors light saving the heartier meals for the fall and winter. If I use the oven I wait till it cools down at night or first thing in the morning.

This pan-fried Thai chicken with carrot and ginger salad is light, refreshing and full of flavor! I chose to use red curry paste which has a slight kick to it, for a milder flavor you can decrease the amount used or use a more mild paste such as green curry.

The salad is wonderful when served right after you make it but it is even better the next day! You can make it ahead of time to allow for even easier prep when you start making dinner.

Other Thai Inspired Dishes:

  • Thai Pizza
  • Cold Thai Noodle and Vegetable Salad
  • Thai Curry Noodle Soup
  • Nourishing Yellow Curry
  • Easy and Delicious Thai Curry

Pan-Fried Thai Chicken

4 Servings

Ingredients:

  • 4 chicken thighs, pounded flat
  • 4 tablespoons Thai red curry paste
  • 2 tablespoons palm sugar/sucanat
  • 2vtablespoons coconut oil
  • 1 tablespoons grated ginger
  • 1 tablespoon soy sauce/tamari
  • 1 clove garlic, crushed

Directions:

1. Using a meat pounder or a rubber hammer thinly pound the chicken thighs until flat. (Kimi Notes: I like to put the chicken thighs between two pieces of parchment paper when flattening chicken.)

2. Mix the water, red curry paste, ginger, soy sauce, sugar, and garlic together to make a thick paste.

3. Coat both sides of the thighs, place in a glass container and allow to marinade for at least one hour.

4. Add the oil to a skillet and bring to medium/high heat. Add the thighs and cook for about 3 minutes on each side.

5. Cut one thigh to be sure there is no pink and that the meat is completely cooked.

6. Serve with steamed white rice and carrot and ginger salad.

Carrot and Ginger Salad

4 to 6 Servings

Ingredients:

  • 1 pound carrots, shaved into ribbons
  • 1/4 cup lime juice
  • 1/4 cup olive oil
  • 1/4 cup cilantro, chopped
  • 1 TBS grated ginger
  • 1 tablespoon soy sauce
  • 1/2 teaspoon unrefined salt

Directions:

1. Chop both ends off the carrots, peel and discard (or compost) the peels.

2. Use the peeler to make thin ribbons from the carrots, just like when you peel a carrot.

3. Chop the cilantro and mix with the carrots ribbons.

4. Mix the lime juice, olive oil, lime zest, ginger and unrefined salt together in a bowl.

5. Pour the dressing over the salad and toss to cover.

Pan Fried Thai Chicken
 
Recipe type: Dinner
Cuisine: Thai
Serves: 4 Servings
Print
 
Ingredients
  • 4 chicken thighs, pounded flat
  • ¼ cup water
  • ¼ cup Thai red curry paste
  • 2 TBS palm sugar/sucanat
  • 2 TBS coconut oil
  • 1 TBS grated ginger
  • 1 TBS soy sauce/tamari
  • 1 clove garlic, crushed
Instructions
  1. Using the meat pounder or a rubber hammer thinly pound the chicken thighs until flat.
  2. Mix the water, red curry paste, ginger, soy sauce, sugar, and garlic together to make a thick paste.
  3. Coat both sides of the thighs, place in a glass container and allow to marinade for at least one hour.
  4. Add the oil to a skillet and bring to medium/high heat. Add the thighs cook for about 3 minutes on each side.
  5. Cut one thigh to be sure there is no pink and that the meat is completely cooked.
  6. Serve with steamed white rice and carrot and ginger salad.
3.3.3077

 
Carrot and Ginger Salad
 
Recipe type: Side
Cuisine: Thai
Print
 
Ingredients
  • 1lb carrots, shaved into ribbons
  • ¼ cup lime juice
  • ¼ cup olive oil
  • ¼ cup cilantro, chopped
  • 1 TBS grated ginger
  • ½ tsp unrefined salt
Instructions
  1. Chop both ends off the carrots, peel and discard (or compost) the peels.
  2. Use the peeler to make thin ribbons from the carrots, just like when you peel a carrot.
  3. Chop the cilantro and mix with the carrots ribbons.
  4. Mix the lime juice, olive oil, lime zest, and unrefined salt together in a bowl.
  5. Pour the dressing over the salad and toss to cover.
3.3.3077


Filed Under: Dairy Free, Egg Free, Gluten Free, Main Dishes, Salads, Uncategorized

Balsamic Maple Brussels Sprouts with Toasted Almonds

April 17, 2015 by April Swiger 2 Comments

Balsamic Maple Brussels Sprouts with Toasted Almonds

By April Swiger, Contributing Writer

Sweet and salty with a bit of crunch, these brussels sprouts are enjoyable to even the hardest critics. This cold-weather vegetable from the cabbage family is often seen as undesirable for having a bitter taste. I believe it all depends on how you cook it though. For those who typically overlook these tiny buds, you may be pleasantly surprised by this combination.

Maple syrup is in abundance where I live in New England, and I love finding ways to incorporate it into my recipes. For a vegetable like brussels sprouts, where a bitter taste may need to be tamed, I knew this natural sweetener would be the perfect addition, along with the tang of balsamic vinegar. Throw in some chopped almonds, or your nut of choice, and it’s reminiscent of my favorite homemade candy, almond roca.

Balsamic Maple Brussels Sprouts with Toasted Almonds

There’s something about roasting vegetables that makes my mouth water. I love the golden brown pieces that are left in the pan, drenched in butter and salt. If I have a vegetable that I’m not sure what to do with, I will typically roast it, knowing it will likely turn out delicious. This is the only way I’ll prepare brussels sprouts from now on!

If you’re tired of soggy boiled brussels sprouts, you may just fall in love with this sweet and salty caramelized version. It only takes minutes to prepare. Also, you may love Kim’s version of Sautéed Brussels Sprouts with Bacon. Yum!

Other recipes you may enjoy:

  • Garlic and Rosemary Roasted Root Vegetables
  • Roasted Asparagus and Mushrooms with a Lemon Butter Sauce
  • Easy Pan-Fried Cabbage and Apples

Balsamic Maple Brussels Sprouts with Toasted Almonds
 
Author:
April Swiger
Recipe type: Side
Print
 
These sweet and salty Brussels sprouts will satisfy even the hardest critic!
Ingredients
  • 1 lb Brussels sprouts, rinsed, stemmed, and halved
  • 3 Tbls Coconut oil
  • Salt and pepper
  • 2 Tbls Maple syrup
  • 1 Tbls Balsamic vinegar
  • ¼ Cup chopped almonds
Instructions
  1. Preheats your oven to 400 F. Rinse the brussels sprouts, trim the stems, and slice them in half.
  2. On a baking sheet lined with parchment paper, roast the Brussels sprouts with coconut oil, and salt and pepper, for 20 minutes. Toss them after 10 minutes.
  3. Whisk together the maple syrup and balsamic vinegar, and coarsely chop the almonds. Drizzle the maple and balsamic mixture over the brussels sprouts, sprinkle the almonds over them, and roast for 5-7 more minutes.
3.2.2925


Filed Under: Dairy Free, Egg Free, Gluten Free, Grain Free, Sides, Vegan, Vegetarian

Steamed Artichokes with Three Dipping Sauces

March 18, 2015 by April Swiger Leave a Comment

Steamed Artichokes with Three Dipping Sauces

By April Swiger, Contributing Writer

Ring in spring with this seasonal delicacy! These savory dips, rich in healthy fats and bursting with flavor, are the perfect addition to the lovely spring artichoke. They are a cinch to whip up, and an easy way to jazz up the standard side of melted lemon butter, or mayonnaise, typically served with them.

I learned how to eat an artichoke at a very young age and immediately fell in love. I don’t know if it had to do with the actual artichoke itself, or the fact that my mother always served it with a big bowl of melted butter and fresh squeezed lemon juice. Yum! Regardless, I adore the taste and look forward to steaming some up this time every year.

Springtime is peak season for artichokes. These beautiful greenish, purple-hued thistles may appear intimidating at first, but I assure you they are very easy to prepare. A few minutes of prep time allows you to cut the stem off, thorns from the petals, and quickly rinse it for steaming. Place them in a pot with some crushed garlic, lemon slices, and bay leaves, and your kitchen will smell amazing within minutes.

Steamed Artichokes with Three Dipping Sauces

I love the unique way artichokes are eaten. Dip individual petals into your choice of dip and scrape off the “meat” at the tip through clenched teeth. Discard the petal in a scrap bowl and repeat. When you reach the heart of the artichoke (the best part, in my opinion), gently scoop out the fine fuzzy hairs with a spoon or knife, slice it into bite sized pieces, and dip. If you love butter, like I do, you will truly savor every bite.

These three dips are made with basic ingredients that most everyone has available to them, and are simple to assemble with minimal dishes. They can be easily doubled for larger groups.

Steamed Artichokes with Three Dipping Sauces
 
Author:
April Swiger
Recipe type: Side
Print
 
These savory sauces are the perfect compliment to the lovely spring artichoke.
Ingredients
  • 4 Artichokes
  • 1 Bay leaf
  • 3 Garlic cloves, crushed
  • 3 Lemon slices
  • A sprinkle of salt and pepper
  • For the Parmesan Butter Sauce:
  • 2 Tbls butter, melted
  • 2 Tbls olive oil
  • ¼ cup grated parmesan cheese
  • 1 Pinch of lemon zest
  • 1 Small garlic clove, minced
  • A pinch of sea salt
  • For the Balsamic Mustard Sauce:
  • 2 Tbls balsamic vinegar
  • 2 Tbls olive oil
  • 1 Tbls dijon mustard
  • A pinch of sea salt
  • For the Lemon and Herb Butter Sauce:
  • 4 Tbls butter, melted
  • 1 Small garlic clove, minced
  • ⅛ tsp each of dried thyme, oregano and basil
  • 1 Tbls fresh lemon juice
  • A pinch of sea salt and pepper
Instructions
  1. Cut the stems off each artichoke, along with ½-1 inch off the top, and trim the prickly thorn off each petal. Rinse them under cool water, gently spreading the leaves open.
  2. Place them upside-down in a pot with about 2 inches of water, the bay leaf, garlic cloves, lemon slices, and salt and pepper. Bring the water to a boil, then turn down the heat to low. Cover the pot and simmer for 25-35 minutes, or until a knife can be easily poked through the artichokes from top to bottom.
  3. While the artichokes are simmering, prepare your dips.
  4. For the Parmesan Butter Sauce: Melt the butter in a small saucepan. Remove from heat and whisk in the remaining ingredients. Transfer to a small bowl for dipping. Serve warm.
  5. For the Balsamic Mustard Sauce: Place all the ingredients in a small bowl and whisk until incorporated.
  6. For the Lemon and Herb Butter Sauce: Melt the butter in a small saucepan. Remove from heat and whisk in the remaining ingredients. Transfer to a small bowl for dipping. Serve warm.
  7. How to eat: Dip individual petals into your choice of dip and scrape off the “meat” at the tip through clenched teeth. Discard the petal in a bowl and repeat. When you reach the heart of the artichoke (the best part!), gently scoop out the fine fuzzy hairs with a spoon or knife, slice it into bite sized pieces, and dip.
3.2.2925


Filed Under: Condiments, Dairy Free, Egg Free, Gluten Free, Grain Free, Sides

Toasted Almond Rice Pilaf

March 27, 2014 by Katie Mae 2 Comments

ToastedRicePilafIMG_7763 By Katie Mae Stanley, Contributing Writer This pilaf’s flavor comes from sautéing the onions and garlic in delicious grass fed butter and roasting the almonds and rice with the vegetables until they have a soft golden color. Roasting pulls out the flavors and ensures that the rice won’t clump together as easily because the individual grains are coated in butter. If you are worried about the use of white rice in this recipe consider reading Kimi’s article on why they eat white rice.

Simple and wholesome, rice pilaf makes a wonderful addition to almost any meal. I remember being giddy each time my mom said we could have rice pilaf for dinner. It was my favorite despite the fact that it came from a box. There is no wrong way to make pilaf. All around the world there are different variations of this simple and tasty side. The origin of our word pilaf is derived from the Modern Greek pilafi, which comes from the Turkish pilav, Persian pilāw, Hindi pulāv, Sanskrit pulāka and possibly Dravidian origin. Aren’t languages intriguing? I also love how cuisines borrow from each other and slowly form thier own unique takes on food! That’s why you will see dishes of simlar styles like my Green Pea Pulao from Malaysia or my Arabic Rice from Israel.

I make my rice in a rice cooker to save on space and time but this can easily be made on the stove. My favorite rice cooker is the Vitaclay rice/slow cooker. #affiliatelink It doubles as a rice and slow cooker. It is preprogrammed to keep your food hot for up to 12 hours! Sometimes when I know I am going to be out or busy most of the day I will put my rice in the Vitaclay and a meat in my crock pot so that I have a meal ready to go that evening! (Read Kimi’s review of it here)

Simple and Tasty Crock Pot Meals and Recipes:

  • Crockpot Chicken and Quinoa from The Nourishing Gourmet
  • Chicken Teryiaki from Nourishing Simplicity
  • Nourishing Crockpot Carnival from Passionate Homemaking
  • Roasted Garlic Chicken from Just Making Noise
  • Spicy Mango-Ginger Beef Roast from Just Making Noise
  • Butter Chicken from Stacy Makes Cents
  • Slow Cooker Pumpkin Puree  from The Nourishing Gourmet

Toasted Almond Rice Pilaf
 
Author:
Katie Mae @ The Nourishing Gourmet
Recipe type: Side
Serves: 6-8
Print
 
This pilaf's flavor comes from sautéing the onions and garlic in delicious grass fed butter and roasting the the almonds and rice with the vegetables till the have a soft golden color. Roasting pulls out the flavors and insures that the rice won't clump together as easily because the individual grains are coated in butter.
Ingredients
  • 4 cups chicken stock
  • 2 cups white rice
  • ½ yellow onion, diced
  • 2 stalks celery, thinly sliced
  • ½ cup sliced almonds
  • ¼ cup butter
  • 1 tsp real sea salt
Instructions
  1. In a medium sized pot heat the butter over medium heat until melted. Add the onions and celery, sprinkle with salt and saute until almost translucent.
  2. Add the rice and almonds, stir until slightly browned. At this point you can transfer the rice mixture to a rice cooker or leave the rice in the pot.
  3. Stir in the broth. If you are are cooking the rice on the stove top bring the rice to a boil and then reduce to a simmer. Cover and cook for 20 minutes. If you are using a rice cooker follow the directions that came with your model. I have this rice cooker.
  4. Uncover and fluff with a fork or rice paddle before serving.
3.2.2265


Filed Under: Gluten Free, Sides Tagged With: Almond Rice Pilaf, Pilaf, Rice, Rice Pilaf, Rice Slow Cooker

Primary Sidebar

ConvertKit Form

Get Every Recipe

And the insider's view from our kitchen

Success! Now check your email to confirm your subscription.

There was an error submitting your subscription. Please try again.

We won't send you spam. Unsubscribe at any time. Powered by ConvertKit

Follow Me

  • Facebook
  • Google+
  • Instagram
  • Pinterest
  • RSS

Search

Please Read:

The information you find here at The Nourishing Gourmet is meant to help you become a better cook! This site is primarily for sharing family friendly recipes. It's not meant to give medical advice or to make any health claims on the prevention or curing of diseases.This site is only for informational and educational purposes. Please discuss with your own, qualified health care provider before adding in supplements or making any changes in your diet. Also, any links to sponsors or affiliates (including Amazon) may give me a percentage of the sale or a pay per click. Thank you for supporting this site.

Categories

  • $10 Main (42)
  • $5 Dishes (43)
  • 52 ways to save money on a healthy diet (53)
  • AIP (23)
  • Baked Goods (83)
  • Beverages (72)
  • Breakfast and Brunch (61)
  • Condiments (8)
  • Dairy Free (492)
  • Desserts (184)
  • Dietary Needs (6)
  • Egg Free (11)
  • Egg Free (86)
  • For the Kids (66)
  • For the Love of Food and Books (18)
  • Gluten Free (484)
  • Grain Free (95)
  • Health (75)
  • Kitchen Tools (4)
  • Main Dishes (126)
  • Nourishing Frugal Recipes (167)
  • Nourishing Frugal Tips (70)
  • Nourishing Practices (56)
  • Nutrient Dense Foods (70)
  • Q and A (15)
  • Salads (39)
  • Sides (101)
  • Snacks (124)
  • Soups (50)
  • The Healthy $1 Menu (21)
  • The Low Energy Guide to Healthy Cooking (18)
  • THM (2)
  • Trim Healthy Mama (2)
  • Uncategorized (846)
  • Vegan (241)
  • Vegetarian (361)

Recent Posts

  • 2 Ingredient Peppermint Bark
  • Herbal Hibiscus Lemonade (Keto, THM)
  • Creamy Curry Red Lentil Soup
  • One-Pot Gluten-Free Mac and Cheese
  • Healthy Pumpkin Spice Granola
  • Crispy Pumpkin Spice Granola (oil-free)
  • Why I Use THM Principles Now
  • Vietnamese Beef Noodle Salad
  • Coconut Flour Pancakes
  • Instant Pot Mexican Shredded Chicken

Recent Comments

  • Dorene St G on Cracker Toffee (Easy Peasy Christmas Candy)
  • Nadia Kriston on Finding a Toaster Oven Without Nonstick
  • KimiHarris on How to make heavenly coconut milk whipped cream (with an isi dispenser)
  • KimiHarris on Autumn Beef Stew (Tomato Free)
  • KimiHarris on How to make heavenly coconut milk whipped cream (with an isi dispenser)

Fresh: Nourishing Salads for All Seasons

Get Every Recipe

And the insider's view from our kitchen

Success! Now check your email to confirm your subscription.

There was an error submitting your subscription. Please try again.

We won't send you spam. Unsubscribe at any time. Powered by ConvertKit

Footer

Privacy

Copyright © 2023 · Foodie Pro & The Genesis Framework