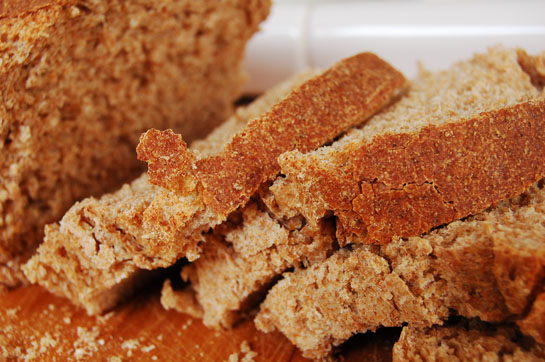
This sourdough bread is a basic, hearty, all-purpose loaf, that I call our “everyday sourdough bread” because it is so simple to make and versatile as well. It’s so nice having bread on hand because you can easily make it into a snack or add it to a meal.
Sourdough bread is moist, lasts well, is extremely effective in reducing anti-nutrients like phytic acid, is very flavorful, and frugal as well.
Ever since I blogged about the benefits of sourdough versus a yeasted bread, I have gotten requests to share my recipe. Somehow months went by, and I never delivered the promised recipe. I wasn’t making bread for a little while, my neglected sourdough starter died on me, and I also wanted to make sure that I was able to take pictures of the process. All of these things, prevented me from sharing sooner. But finally here it is.
Once it’s made it can go with a variety of meals, so I find that even though it takes a little time to make, it saves time in the end. I hope, now that I am getting back into the swing of baking, to share other sourdough recipes in the future, so keep on eye on my blog for more to come!
Everyday Sourdough Bread
This recipe is very easy to double (or triple). I usually double it. The rising times will vary according to how cold and moist the air is in your house. In the hot summer, my bread can rise within just hours, so I start in the morning. But most of the year, I need to start the night before. If it’s really cold in the house, I try to seek warm places to put my dough to rise, and then expect it to take longer. For the second rise, I include instructions on how to help your bread rise quickly by using your oven and hot water.
1 cup of sourdough starter
1/2 cup of water
1 1/2 teaspoons sea salt
2 tablespoons to 1/4 cup of honey (depending on how sweet you want it)
2 tablespoons melted coconut oil or olive oil
About 3 to 4 1/2 cups of spelt, hard whole wheat flour (freshly ground is preferable).Step One:
Bosch Mixer Instructions: (The Bosch works better if you at least double the recipe)For timing sake, start in the evening.
Place the mixing bowl on the bosch machine, and put the dough hook on.
Place your sourdough starter, water, salt, honey, and oil in the mixer bowl. Mix it just a tiny bit to combine.Add three cups of flour and start the machine on low. As it mixes, continue to add flour until the dough starts to clean the sides of the bowl and forms a ball. Stop the machine and feel it. Does it still feel really sticky? Add some more flour until it feels moist, but not sticky.
On low speed, knead for 6-8 more minutes.
Take out of the bowl and place on a clean, floured counter. If the dough is a bit sticky still, you can hand knead a little more flour in.
Hand Kneading Method
Combine your sourdough starter, water, salt, honey, and oil in large bowl. Whisk to combine.
With a wooden spoon, start stirring in your flour. Continue to add flour until the dough is so stiff, it’s too hard to stir.
On a clean, well floured surface, place your wet sticky dough, and start kneading in flour. To knead, flip the top half of the dough on top of the bottom half, push this folded lump of dough with heels of one or both of your hands. Turn the dough a quarter, and repeat. Remember to keep flouring the board and the dough, as needed. You may want to gently oil your hands to prevent sticking. Continue this process until the dough no longer feels sticky, but don’t add too much flour in, so as to make it feel dry. Total kneading time should be about ten minutes.
Step Two: The First Rising
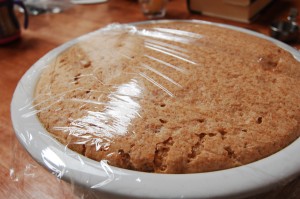
Place your dough in a lightly oiled bowl, cover tightly and allow to rise overnight. This step generally takes about 12 hours. If the weather is really warm and humid, it could take as little as three (I only experience this in the hot summer). The dough should double in size.
Step Three: The Shaping and Second Rising
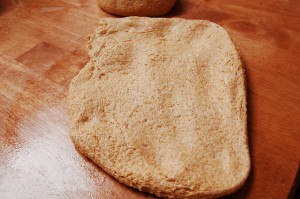
To shape your dough into a loaf. Press your ball of dough into a rough rectangle.
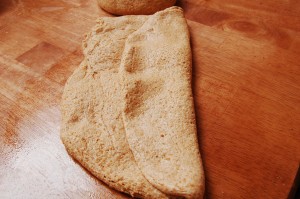
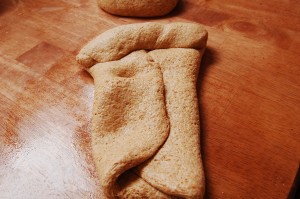
Fold one half of the dough to meet about the middle of your rectangle. Make sure to press down the dough, so that there isn’t any air bubbles.
Do the same with the other side of the dough, slightly overlapping the other fold.
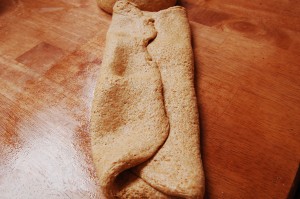
Starting at the top of your folded dough, start gently rolling it toward you, pressing to seal the dough with the heel of your hand as you go along.
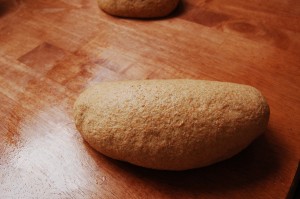
Continue until you reach the bottom of your dough. Using the tips of your fingers, you can pinch together any loose seems. It should look something like this when done.
Place in very well greased bread pans (I use palm or coconut oil to grease mine).
The Second Rise:
While you can do your second rise at room temperature. I prefer the following method because it takes a much shorter amount of time, is a more effective way to get your bread to rise, and also prevents the bread from become too sour. If you do decide to rise at room temperature, it should take between 6-12 hours, in a 65 to 70 degree house.
Oven method. Place your bread pans in the oven, with a towel covering them. Place a jelly roll pan, or a casserole dish on the rack below. Heat up some water to the boiling point, and carefully pour into the pan, and close the oven door. This will create a warm, moist environment for your bread to rise. Check the oven an hour or two later, and add more hot water. It should take 2-3 hours for your bread to rise.
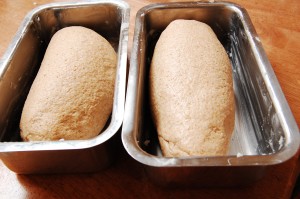
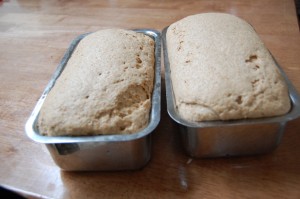
When I was making these particular loaves of bread, in two hours, I found my bread like this.
Slightly over risen! (The breaks on top of the loaves show where it has risen too much). So keep on eye on it. It may rise faster than you think.
To Bake:
Bake at 375 for about 45 to 55 minutes. Place in the lower third of your oven so that the top doesn’t brown to much. When you remove the loaf from the pan (you may need to run a knife around the edge before removing), it should sound hollow when tapped on the bottom. Cool in cooling racks and enjoy.
This post is part of Frugal Friday.
Latest posts by KimiHarris (see all)
- 2 Ingredient Peppermint Bark - December 21, 2022
- Herbal Hibiscus Lemonade (Keto, THM) - March 16, 2022
- Creamy Curry Red Lentil Soup - December 8, 2021
Hi Kimi!
I’ve been using a sourdough starter for about 1.5 months now, and I love it! I’ve made some yummy sourdough pancakes, which turn out perfectly. However, I started this bread recipe last night, and my dough is still the same size and density. It’s been about 12 hours now. I might know what the problem is but wanted to see what you think since it’s my first time actually making bread with my starter. A few days ago, I needed to feed my starter, but I wasn’t ready to bake with what I took out. So, I took out one cup (specificially for this recipe) and placed it in the fridge w/some plastic wrap. I’m not sure if this small amount “died” and that’s why it’s not rising? I didn’t even think that this could be a problem before I started. Anyways, do you think maybe I should just try to use this dough to make pancakes since it’s not rising. I don’t want it to go to waste. BTW… I used organic ground spelt, and my starter is a whole wheat starter. Thanks so much, and I love your blog!!
Hey,
I was just checking out the temp for this recipe since I”m making bread right now and I noticed your question. I don’t know if you’ll be looking at this again, but I would think part of your problem is putting the starter you wanted to use for the recipe in the fridge. You want your starter to be the most active so ideally you want it to be room temperature. Normally if you regularly have your stater in the fridge then you’d take out the day before and feed it a couple of times a day to reactivate it at room temperature. You could also create a sponge which also helps with activating your starter. So you could do what you did, but instead of immediately mixing it with all the flour to make bread, you’d mix it with one cup of flour and one cup of water or something to that effect. (this is essentially doubling the recipe and you’d have two cups of starter)
You should definitely see a difference in the dough and it will let you know the yeast and bacteria are working. Even if you didn’t knead to well the dough looks smoother, etc.
I hope that helps!
I am so excited, someone just gave me their culture and did my first feeding tonight. Weird to be nervous about making bread! I love your step by step instructions, it is a great help for a non-cooking newbie, ( but I am trying to learn!).
Dear Kimi,
I am thinking you have been having gluten and dairy issues since you have so many gluten free foods.I just learned I have a gluten issue.I am wondering how the sour dough bread has worked for your health issues? Also….have you used the pre- soak method with your grains and has it helped the gluten issues?
Thanks you and may the Lord Jesus bless you and your new little one this day.
I tried this afternoon to make sourdough bread from a different recipe. Made 2 bricks. I’m going to try your recipe. The instructions are really clear and the pictures will help. Thanks!
Thank you for this recipe! It was the first I loaf I ever made that both my husband and I really enjoyed. I made another doubled batch and, just to see what difference your shaping method would make, I rolled one up like you suggest and the other I just tucked the end under. Yours rose about twice as much!
I think I’m going to have to start baking sourdough bread! Thanks!
Does this method of preparation take care of the soaking the flour to remove the phytates?
Hey Kimi! My husband and I L-O-V-E bread but I am constantly plagued with yeast infections and am trying to avoid yeast as much as I can. Do have any idea if the naturally-occuring yeast in sourdough bread is still safe to eat or not? I tried making my own starter and bread and it flopped, but if I knew that it was better for me than regular yeast breads/rolls/etc I would definitely try it over again!
Dear Miss Christie – you might want to check out Bee Wilder’s “Healing Naturally” site concerning your yeast infections. I think that sourdough breads, made w/o yeast, should be ‘better’ but if you’re plagued with yeast infections, you probably want to avoid all grains to allow your body to heal. :-// Karen
Just baked some up this morning…I think this will now be our go-to bread recipe. Both loaves turned out very soft and rose a lot during the second rise. I’ve only had my starter for about 3 weeks but I’m loving all the things we can do with it. Yum!
Where do you find bread pans? Preferrably ones without a nonstick coating.. And any other suggestions if one doesn’t have any?? I can’t wait to try the recipe!
Thanks
Tammy
Tammy – I use glass pans and prefer the smaller 8×4 size…
I just found some Le Creuset stoneware loafs on amazon. They look great and got great reviews. Just wanted to pass this on. I am going to order one and give it a try! Le Creuset has not disappointed me yet!
I just tried this recipe in my Bosch with only the 3 cups of flour and it immediately turned into a brick. I am wondering if you have the amount of water (1/2c) right? I have been making whole wheat bread for years and have never seen so little water used in a recipe. I made a grape sourdough starter with whole wheat flour and it is nice and lively. What should I do? The recipe you give is quite close to the recipe I have used for years only with more water and instant yeast. I want to switch to sourdough because of health reasons. Could you help me please? I really would appreciate a reply. Thanks so much, Arlyne
I just had the same experience as Arlyne. I doubled the recipe, and as soon as I added the first bit of flour, the dough became dry and crumbled right away. My starter is 100% hydration, so I don’t think that would be the issue. I just added more water (another 1.5 cups in the end) as I thought that was the issue, and the dough seemed to behave normally. I was also using freshly milled flour. Any advice?
Hi. I use the methods from The Tassajara Bread book, pretty similar, make up a sponge the night before, fold in salt (and opt. oil) and more flour in the morning, knead 5 minutes, rise 1 – 2 hours, bake.
Anyway, we are allergic to wheat around here, and I have had excellent results using roughly equal parts rye and oat (very low gluten too) occasionally using buckwheat, or a fair amount of arrow root starch to make it lighter. There are wheat free options out there that still make nice bread!
I am wondering how you make your starter… Can you please share the recipe/method? Thank you so much! I use sprouted flour. Will that work?
For everyone interested, To Your Health Flour Company has excellent organic sprouted flours. They carry a really wide range of grains (spelt, kamut, quinoa, oat, rye, buckwheat, corn, etc.) and the quality is exquisite! I used to make my own sprouted flour and it was such a production… but I have little ones and the benefits of sprouted flour outweigh the chore of making it. I have been really happy with this company ever since I found it a year ago. They have free shipping on orders over 15 lbs this month! Just google them, – they are easy to find. I hope this is helpful to you all.
Still would love some suggestions on how to make “sponge” or culture for this bread. Any yeast recommendations? Is one sugar better than another? Does it have to be all purpose flour? Anyone has a very simple, quality solution for this? Thank you!
I have two issues with this recipe: I also think the water is too little. I hardly made it past one and a half cup flower and it couldn’t take any more.
Also, when am I supposed to save a piece of the dough to have as a starter for my next bread?
I could not get this recipe to work. I tried several times. It rises double for the first rise, but then does nothing for the second rise. Does bread behave differently at different altitudes? At any rate, I accidentally stumbled upon something that did work for me, and I wanted to share for those who were still having this turn out as bricks. I hope this helps someone out there!
I have made no-knead “bucket” sourdough bread in the past for my main bread, but it is always so dense. it rises double and it’s tasty, but its also crumbly and ugly, flat on top, just not like that beautiful bread I see that you have made! I have tried so many of the recipes on blogs like yours and my bread just never turns out beautiful, it’s either a brick (inedible) or that flat ugly dense loaf (but still edible.)
so after trying your bread several times, I dejectedly gave up on “real” bread and decided to go back to making bucket bread. I barely mixed the ingredients, came back the next morning and found that it hasn’t risen at all, probably because I hadn’t mixed it well enough, but I got the idea to try kneading it, putting it in the bread pans and seeing if it rose– and it did! beautiful rounded top loaves were rising in my over warmed by the oven light. it took 3 hours, then I baked it per your instructions, and I did it! REAL sourdough bread! it looks like yours!
sorry for this long comment. I just want to share it in case anyone else out there has the same experience as me and can’t seem to make “real” sourdough bread, despite following these recipes to the letter, and I wanted to share enough details so someone else could be able to duplicate what I did. here it is in recipe form below:
13 cups flour, whole grain
6 cups water
3 cups starter
3 tablespoons salt
mix until just barely combined, tightly cover and let sit over night in a warm spot. (it doesn’t rise)
in the morning, divide into 3rds and knead each piece for about 5 minutes (or maybe knead it all at once to save time?) place in buttered bread pans, cover with plastic wrap and let rise in a warm spot until double (mine rose in an oven warmed by the oven light, it took 3 hours.)
take at 375 for 55 minutes.
Thank you for your beautiful blog. I have loved other recipes I have gotten from you– especially the Irish Soda Bread (yay, a soaked version that turns out beautifully!) which was a huge hit with my family!
Oh, just one quick little thing, you know you have kneaded it enough when it isn’t cracking when you fold it over, it springs back when you poke it and it passes the “window pane test” which you can see here: http://youtu.be/iyb86ECObTM
Just set this out for its first rise (we like a very sour bread, so I’m doing the long second rise). Easy to follow recipe, which is great since I already found grinding my own wheat for the first time a bit intimidating. I love how you were specific about how the dough should feel (I’m in a very dry area, and always end up with too dry of dough or overcompensate and end up with more of a batter). Can’t wait to see how it turns out!
This blog is great!!! Totally got me in the mood to bake up a delicious loaf of bread! Has anybody heard anything good about the starters from Sourdough’s International? A friend suggested one of their starters, I haven’t got the chance to try them out.
First rise – excellent. Second – flat as a pancake. Guess I’ll start over. I am going to bake it anyways just to see what happens. I really can’t resist. Maybe I’ll have loaf crackers? Eat with a good raw French Brie? lemons into lemonade! 🙂
I was really excited about this because the picture looked great. While making it, I wasn’t even able to incorporate the full 3 cups of flour, so the dough turned out fairly small. And it rose, but not as much as yours did. Do you think the sourdough wasn’t ripe enough yet? Because the final result tasted good, but it was a sad sad height. maybe 1/3 or 1/2 of the height of yours ha. What do you think was the problem?
I just made your recipe and I am so excited to say that I finally made a successful whole wheat loaf of sourdough bread! Finally! I gave up trying to make sourdough bread and almost lost my starter because of neglect. But I brought my starter back to life and gave another go at it with your recipe and it came out perfect! Light and fluffy and even a little flakey like a fresh croissant. Just lovely! I thank you very much!! 😀
I made this today and I wish I could post a picture. Like others, I had to add much more water or would have ended up with a brick! In fact, I used water on the counter top instead of flour and kneaded some additional water into the dough after removing from the Bosch for the first rise. It could be the differences in flours as my starter was also @ 100% hydration. I used a heirloom variety – Turkey Red Wheat. The loaf is lovely. I also froze a loaf in the bread pan after shaping before the second rise. We are travelling next week and hoping that works so we can have fresh bread on our return. I will update this post to let others know if the freezing works.
I’ve frozen this loaf before and it tastes fine! Though I only had it in the freezer for 2 weeks at most before eating.
Hi! This is the second time I am making this bread. The first time was magic and my whole family loved it! This time however, something else is happening 🙁 I followed all the steps for the starter and kneading the dough and then left it to rise. It was rising beautifully before I went to bed. This morning however it looks moist and sticky and not risen. What happened? Did it go bad?