
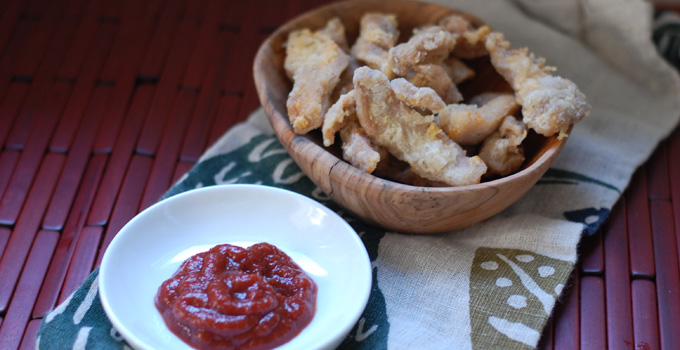
Sometimes you make something that is so delicious; the kids are begging for you to repeat it soon. This was one of those times! Gently fried in a pan, these crispy crusted, tender chicken strips are delicious dipped into homemade ketchup. Plus, they are gluten-free, grain-free, egg-free and dairy-free as well!. These are so delicious and have officially made it into the “must regularly make ” pile of recipes. We repeated the recipe the week after we first made it (you know, just to make sure they were good enough to share here. 🙂 )
I used coconut oil for frying these, but there are a variety of traditional fats that could work too. I was going to try my homemade rendered fat from beef broth, but I realized I didn’t have enough of it left for this project. I’ll try it next time!
I made these using the “eye-balling” method, partly because it’s kind of the lazy way to do it, and partly because thermometers and I have an on and off relationship. I buy supposedly great thermometers, and then they aren’t very accurate. (Tell me if you have a favorite one in the comments!). All to say, I have been perfecting the act of watchful cooking without one. That said, if you are using a thermometer, aim for 375F (190C).
Is fried food healthy?
Yes, this is a recipe that fries food. Can that really be healthy? First of all, regardless of whether you think fried food is the best option, making fried food yourself using a healthy oil is certainly better for you than getting it at a restaurant using typical nontraditional oils. Furthermore, there is some discrepancy in the research, and some research even suggests that frying in a good oil could be neutral or even have benefits.
I’m not convinced it should be on the menu weekly (hello, budgeting!), but certainly, it makes a wonderful treat!
Grain Free Fried Chicken Strips
Ingredients:
- 1 ½- 2 pounds chicken thighs (or breasts)
- 1 ½ cups tapioca starch
- 2 ½ teaspoon salt
- 1 teaspoon dried thyme
- freshly ground pepper
- coconut oil for frying
1. Cut off any fat from the chicken, and then cut into thin strips, about ¼-1/2 inch thick.
2. Put the tapioca starch, salt, thyme and plenty of ground pepper into a shallow pan and mix.
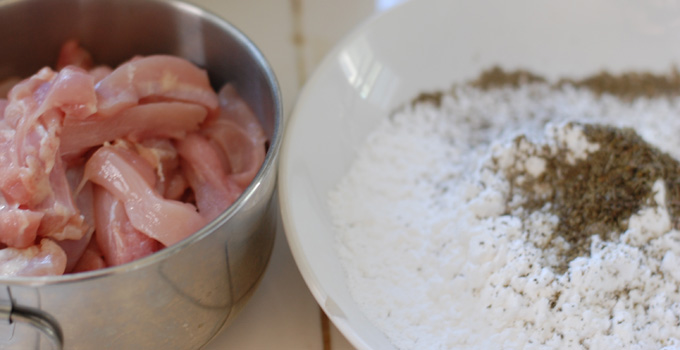
3. Toss the chicken strips and the starch mixture together until the chicken is well coated.
4. In a large saucepan (I prefer using cast iron for this), heat fat of choice. I used approximately 1 to 1 ½ cups of coconut oil. I wanted the chicken to be half submerged once it was put in. Heat the oil in a cast iron over medium heat (with a stainless steel pan, use medium-high heat), until hot (but not smoking). Add a single chicken strip to the pan, if it starts bubbling a lot around the chicken strip immediately, you have a good frying temperature (if not, don’t add any more until it starts bubbling around that single chicken strip, and then add more).
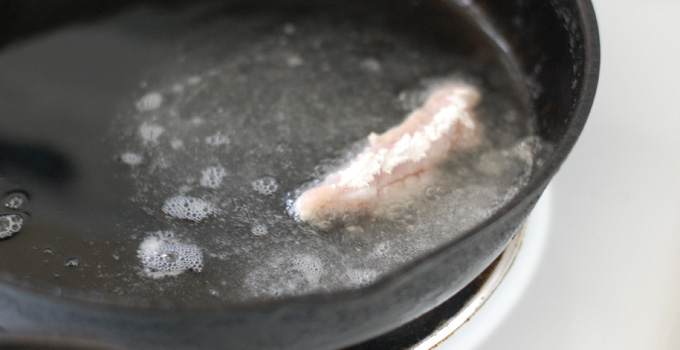
5. Add the strips carefully one by one, not crowding the pan. Wait until the chicken looks at least cooked half way through and is starting to get a little browned, and then turn over and cook on the other side. It took about 6-9 minutes for each batch to cook through. I simply cut through a chicken strip to check to make sure they were done, although once they were browned at all, I never found a single one that hadn’t gotten cooked thoroughly. Remove from the pan once cooked.
6. Repeat the frying process until all of the chicken is cooked. Serve with homemade ketchup and enjoy right away!
Interested in saving your oil for future frying projects? Check out this helpful link.
- 1 ½- 2 pounds chicken thighs (or breasts)
- 1 ½ cups tapioca starch
- 2 ½ teaspoon salt
- 1 teaspoon dried thyme
- freshly ground pepper
- coconut oil for frying
- Cut off any fat from the chicken, and then cut into thin strips, about ¼-1/2 inch thick.
- Put the tapioca starch, salt, thyme and plenty of ground pepper into a shallow pan and mix.
- Toss the chicken strips and the starch mixture together until the chicken is well coated.
- In a large saucepan (I prefer using cast iron for this), heat fat of choice. I used approximately 1 to 1 ½ cups of coconut oil. I wanted the chicken to be half submerged once it was put in. Heat the oil in a cast iron over medium heat (with a stainless steel pan, use medium-high heat), until hot (but not smoking). Add a single chicken strip to the pan, if it starts bubbling a lot around the chicken strip immediately, you have a good frying temperature (if not, don’t add any more until it starts bubbling around that single chicken strip, and then add more).
- Add the strips carefully one by one, not crowding the pan. Wait until the chicken looks at least cooked half way through and is starting to get a little browned, and then turn over and cook on the other side. It took about 6-9 minutes for each batch to cook through. I simply cut through a chicken strip to check to make sure they were done, although once they were browned at all, I never found a single one that hadn’t gotten cooked thoroughly.
- Repeat the frying process until all of the chicken is cooked. Serve with homemade ketchup and enjoy right away!
Latest posts by KimiHarris (see all)
- 2 Ingredient Peppermint Bark - December 21, 2022
- Herbal Hibiscus Lemonade (Keto, THM) - March 16, 2022
- Creamy Curry Red Lentil Soup - December 8, 2021
Looks delicious! I actually do this exact thing to make… fried sardines!! 🙂