• Skip to primary navigation
  • Skip to main content
  • Skip to primary sidebar
  • Skip to footer

The Nourishing Gourmet

Nourishing. Satisfying. Gourmet.

  • THM Coaching
  • About
    • Privacy
    • Contact
  • Recipes
  • Cookbooks
    • Everyday Nourishing Food
    • Salad Cookbook
    • Soup Cookbook

Nutrient Dense Foods

Enjoying a Gluten-free or Grain-free Holiday Season

November 18, 2015 by KimiHarris Leave a Comment


Enjoying the holiday season on a gluten or grain-free diet (resources and recipes!)

The first holiday season we were gluten-free was a big adjustment. So many family recipes and treats were off limits. But you know what? We’ve found that the holiday season can be a joy and a blessing with glorious food!

This week Megan from EatBeautiful.net and I shared about how we love the holidays, and holiday food – even though we eat differently. More then that, we found our holiday meals to be beautiful with real food!

Megan and her family have been on the GAPS diet, which is a healing, grain-free, starch-free diet. Half of my family is gluten-free, dairy-free, egg-free.

Maybe you can relate. We hope that this conversation is encouraging to you! We discuss not only recipes, but also some of the surrounding issues, like how to handle children on restricted diets during holiday get togethers, making desserts sweet enough to share with the general public, and more!

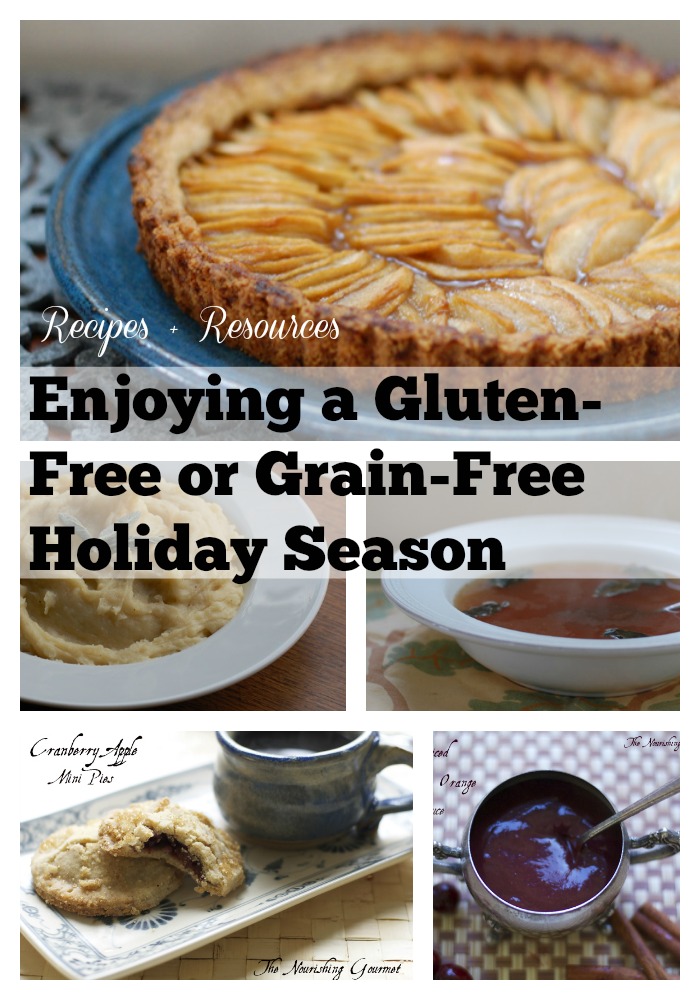
To get all of the links to recipes and resources: visit my holiday recipe page here.

Filed Under: Dairy Free, Egg Free, For the Kids, Gluten Free, Grain Free, Nourishing Practices, Nutrient Dense Foods

How to Make Carrot Juice With a Blender

November 3, 2015 by Chloe Breczinski 17 Comments


How to make carrot juice without a blender - easier than you think, and so helpful for those of us without juicers! -- The Nourishing Gourmet

By Chloe, from How We Flourish

Here’s the thing: I have a very small kitchen. I’m also on a tight budget. I don’t have the option of having a kitchen filled with small appliances. However, I had heard a lot about the benefits of juicing. A morning carrot juice is also an important about of the GAPS Intro Diet, so I learned how to make carrot juice with a blender.

If you ask most people, they will tell you that you need a real juicer for juicing. To truly receive the benefits of juicing, commercial juice is not an option as it is pasteurized. Juices must be freshly pressed to preserve the enzymes and nutrients that makes vegetable juices so good for us. But not everyone can afford a big fancy masticating juicer! I’d love to have one, of course, as it is certainly less work than making juice with a blender. But when that is not an option, you do not need to worry. You can still get the benefits of juicing for a lot less money.

Why Juicing

I was never a fan of juice before GAPS. But I learned that juicing can help support detoxification, and the vitamins and minerals from the juiced vegetables can be quickly absorbed. It can be a great remedy for constipation! This might be TMI, but that is why I have taken such a liking to juicing. It helped for me very much, so it’s a tool I like to keep in my back pocket.

Interested? If you would like to test the benefits of juicing without the investment, read on to learn how to juice without a juicer.

How to Juice without a Juicer

The following tutorial is for 100% fresh carrot juice, which is the starting point for juicing on GAPS Intro. How many carrots you need will depend on how much juice you want – 2-3 carrots usually makes a decent sized glass for me. This method of making juice in a blender will also work for all types of juices!

  1. Wash and chop the carrots.
  2. Add them to the blender. Any type of blender should work fine.
  3. Add a small amount of filtered water. With more watery vegetables, you may not need any. If you like your juices more dilute, add more. For carrot juice, add enough water to come slightly less that halfway up the carrots. It just needs to be enough to help get things moving.
  4. Blend on medium until the ingredients are well pulverized.
  5. Place a nut milk bag in your desired cup/container and pour in the blended ingredients.
  6. Squeeze as much liquid out of the nut milk bag as possible. Save the leftover pulp in the freezer to be used in other recipes.
  7. Enjoy your juice! It is best to drink on an empty stomach, such as first thing in the morning before breakfast.

Tip: If you enjoy the benefits of juicing, but find that it spikes your blood sugar, try adding fat and protein to your juice. One of my favorite ways to do this with with the so-called “GAPS Milkshake.”

Want to make a large batch? It is recommended to always drink juice fresh. However, I believe that if you are experiencing benefits with juicing, less-than-optimal juice may be better than no juice at all. Try freezing the juice immediately and thawing it in a water bath when you want it.

Are you interested in learning more about healing your gut with GAPS Intro? Learn more about how I did just that (without going crazy!) in my book Healing Patiently.

How to Make Carrot Juice With a Blender
 
Author:
Chloe
Recipe type: Beverage
Print
 
Carrot juice is a delicious and nourishing drink. Learn how to make it fresh, even if you do not have a juicer!
Ingredients
  • 2-3 carrots
Instructions
  1. Wash and chop the carrots.
  2. Add them to the blender. Any type of blender should work fine.
  3. Add a small amount of filtered water. With more watery vegetables, you may not need any. If you like your juices more dilute, add more. For carrot juice, add enough water to come slightly less that halfway up the carrots. It just needs to be enough to help get things moving.
  4. Blend on medium until the ingredients are well pulverized.
  5. Place a nut milk bag in your desired cup/container and pour in the blended ingredients.
  6. Squeeze as much liquid out of the nut milk bag as possible. Save the leftover pulp in the freezer to be used in other recipes.
  7. Enjoy your juice! It is best to drink on an empty stomach, such as first thing in the morning before breakfast.
3.3.3077

 Do you juice? What is your favorite type of juice to make?

Filed Under: Beverages, Dairy Free, Egg Free, Egg Free, Gluten Free, Grain Free, Nourishing Practices, Nutrient Dense Foods, Vegan, Vegetarian

Paleo Meat and Veggie Muffins

October 5, 2015 by Megan Stevens 33 Comments

Good for both breakfast and snaking. These delicious grain free savory  muffins are protein-rich, nut-free, and amazing in flavor!  -- The Nourishing Gourmet

By Megan, from Eat Beautiful

These protein-rich, savory muffins are studded with delicious vegetables and make an excellent breakfast or snack. They don’t contain almonds or almond products, and can be made nut-free with the use of sunflower seeds. So many Paleo or GAPS-friendly baked goods contain almonds or almond flour, so I’d like to share a recipe with you that doesn’t.

There is a glut of almond flour recipes in the Paleo baking community and while they are delicious they are also high in omega-6s, which already inundate the standard American diet. Additionally, most commercial almond products (meal, blanched meal, flour and butter) are not sprouted. In my opinion, all nuts and seeds should be sprouted before consumption for digestibility, and mineral absorption.

What about a muffin that has no flour at all? Truly Paleolithic in spirit, and even healing in its gentleness and nutrient profile, a muffin of meat, soaked seeds, eggs, veggies and fat is in order!

Soaked pine nuts are the secret ingredient in these lunch-inspired savory treats! The pine nuts do not, however, need to be dehydrated. They soak overnight in salt water (this takes less than 5 minutes, including their morning rinsing) and then get pureed right into the muffin batter. Easy.

For a more economical version, raw sunflower seeds are used.

The Sausage and Egg Muffin is also full of grated veggies. So you’re getting a walloping dose of goodness, a meal, in the form of a delicious handheld snack. I make a batch of these and freeze them. Then I alternate putting them, or leftovers from dinner, in my daughter’s daily lunches. She loves them and they look “normal” to her friends who do not eat Paleo diets. (That’s helpful when you’re 14.)

These are also great for road trips, or whenever you’re overly hungry but have no time to make a quality meal. They defrost beautifully in a toaster oven, straight from the freezer.

We love them plain. We also love to break them in half and top the halves with slices of butter or cheese.

You may notice; the recipe indicates the muffins are baking soda-free. For those on healing diets, such as GAPS, this plays in. Baking soda makes the stomach less acidic. Having an acidic belly is important in terms of triggering the digestive mechanisms to secrete digestive juices. (I even take a supplement called Betaine HCl with Pepsin that adds more acid to my stomach.) The muffins rise beautifully and stay their risen selves without the leavening agent.

Try these nourishing, protein-packed muffins that offer nothing but good stuff to give you energy toward wellness!

By the way, this recipe comes from my cookbook; and it’s one we make in our Paleo café. If you enjoy this recipe and approach to grain-free baking, check out my cookbook where you’ll find lots more treats that are customer-approved and genuinely healthy! My cookbook is Eat Beautiful: Grain-free, Sugar-free and Loving It and can be purchased as an eCookbook or in softcover from Amazon.

Cheers, friends! Enjoy.

Good for both breakfast and snaking. These delicious grain free savory  muffins are protein-rich, nut-free, and amazing in flavor!  -- The Nourishing Gourmet

Savory Meat and Veggie Muffins, aka Sausage and Egg Muffins

(nut-free, dairy-free, baking soda-free)

Intentionally GAPS-friendly, these muffins are an easy meal in your hand. Accompanied by a mug or Thermos of bone broth, they make the diet easier when you need to be away from home. Make a bundle of them and keep them in the freezer, easy to grab on the go. They also are free of baking soda, an added GAPS bonus, for a healing and satisfying food.

Ingredients:

  • 1 cup soaked raw pine nuts, wet* (see how-to below), or sunflower seeds (for a more economical option)
  • 1 cup zucchini or carrots, grated, or a combination of both
  • 1 cup cooked ground beef or other ground meat (ideally cooked up with a little sea salt, 1/2 teaspoon per 1 pound meat)
  • 6 eggs, preferably pastured
  • 1/2 cup olive oil, coconut oil, ghee or rendered animal fat, melted and cooled
  • 1/3 cup coconut flour or chia seeds
  • 1 dried teaspoon oregano
  • 1/2 teaspoon sea salt
  • 1/8 teaspoon powdered stevia (or 10 to 15 drops liquid stevia — NuNaturals brand preferred) or 2 tsp. honey

Yields 6 large or 12 small-size muffins.

Preheat oven to 325 degrees Fahrenheit.

Directions:

  1. Prepare 6 extra-large muffin cups or 12 medium-size muffin cups by lining them with cut squares of parchment paper. (Or use good-quality muffin cup liners that won’t stick.)
  2. Place the pine nuts, eggs, oil, coconut flour, oregano, sea salt and stevia into the blender.
  3. Puree the ingredients until they are smooth, about 30 to 45 seconds.
  4. Fold in zucchini or carrots and meat.
  5. Pour the muffin batter into the prepared tin and bake until they are puffed, golden and a knife inserted into the center of one comes out clean — about 25 minutes.

Variations:

  • Substitute grated apple and bulk pork for the zucchini and beef. Substitute 1/4 teaspoon allspice and 1/2 teaspoon sage for the oregano.
  • For added protein, use the full 1 pound of cooked ground meat, folding it into the batter as described. This version turns out great.

*How to soak raw seeds- For every 4 cups raw seeds, cover by two inches with room-temperature filtered water and 2 teaspoons sea salt. Stir well to dissolve the salt. Leave uncovered at room temperature overnight, then drain and rinse well in the morning. They are now ready to be used in their wet form.

Paleo Meat and Veggie Muffins
 
Print
 
Ingredients
  • 1 cup soaked raw pine nuts, wet* (see how-to below), or sunflower seeds (for a more economical option)
  • 1 cup zucchini or carrots, grated, or a combination of both
  • 1 cup cooked ground beef or other ground meat (ideally cooked up with a little sea salt, ½ teaspoon per 1 pound meat)
  • 6 eggs, preferably pastured
  • ½ cup olive oil, coconut oil, ghee or rendered animal fat, melted and cooled
  • ⅓ cup coconut flour or chia seeds
  • 1 dried teaspoon oregano
  • ½ teaspoon sea salt
  • ⅛ teaspoon powdered stevia (or 10 to 15 drops liquid stevia — NuNaturals brand preferred) or 2 tsp. honey
Instructions
  1. Preheat oven to 325 degrees Fahrenheit. Prepare 6 extra-large muffin cups or 12 medium-size muffin cups by lining them with cut squares of parchment paper. (Or use good-quality muffin cup liners that won’t stick.)
  2. Place the pine nuts, eggs, oil, coconut flour, oregano, sea salt and stevia into the blender.
  3. Puree the ingredients until they are smooth, about 30 to 45 seconds.
  4. Fold in zucchini or carrots and meat.
  5. Pour the muffin batter into the prepared tin and bake until they are puffed, golden and a knife inserted into the center of one comes out clean — about 25 minutes.
Notes
Substitute grated apple and bulk pork for the zucchini and beef. Substitute ¼ teaspoon allspice and ½ teaspoon sage for the oregano.
For added protein, use the full 1 pound of cooked ground meat, folding it into the batter as described. This version turns out great.

*How to soak raw seeds- For every 4 cups raw seeds, cover by two inches with room-temperature filtered water and 2 teaspoons sea salt. Stir well to dissolve the salt. Leave uncovered at room temperature overnight, then drain and rinse well in the morning. They are now ready to be used in their wet form.
3.3.3077


Filed Under: Baked Goods, Breakfast and Brunch, Dairy Free, For the Kids, Gluten Free, Grain Free, Nutrient Dense Foods

Grain Free Fried Chicken Strips

July 28, 2015 by KimiHarris 1 Comment

Pan fried in coconut oil, these chicken strips are also gluten, dairy, grain, and egg free!  (Kids love them!) --- The Nourishing Gourmet
Sometimes you make something that is so delicious; the kids are begging for you to repeat it soon. This was one of those times! Gently fried in a pan, these crispy crusted, tender chicken strips are delicious dipped into homemade ketchup. Plus, they are gluten-free, grain-free, egg-free and dairy-free as well!. These are so delicious and have officially made it into the “must regularly make ” pile of recipes. We repeated the recipe the week after we first made it (you know, just to make sure they were good enough to share here. 🙂 )

I used coconut oil for frying these, but there are a variety of traditional fats that could work too. I was going to try my homemade rendered fat from beef broth, but I realized I didn’t have enough of it left for this project. I’ll try it next time!

I made these using the “eye-balling” method, partly because it’s kind of the lazy way to do it, and partly because thermometers and I have an on and off relationship. I buy supposedly great thermometers, and then they aren’t very accurate. (Tell me if you have a favorite one in the comments!). All to say, I have been perfecting the act of watchful cooking without one. That said, if you are using a thermometer, aim for 375F (190C).

Is fried food healthy?

Yes, this is a recipe that fries food. Can that really be healthy? First of all, regardless of whether you think fried food is the best option, making fried food yourself using a healthy oil is certainly better for you than getting it at a restaurant using typical nontraditional oils. Furthermore, there is some discrepancy in the research, and some research even suggests that frying in a good oil could be neutral or even have benefits.

I’m not convinced it should be on the menu weekly (hello, budgeting!), but certainly, it makes a wonderful treat!

Pan fried in coconut oil, these chicken strips are also gluten, dairy, grain, and egg free!  (Kids love them!) --- The Nourishing Gourmet

Grain Free Fried Chicken Strips

Ingredients: 

  • 1 ½- 2 pounds chicken thighs (or breasts)
  • 1 ½ cups tapioca starch
  • 2 ½ teaspoon salt
  • 1 teaspoon dried thyme
  • freshly ground pepper
  • coconut oil for frying

1. Cut off any fat from the chicken, and then cut into thin strips, about ¼-1/2 inch thick.

2. Put the tapioca starch, salt, thyme and plenty of ground pepper into a shallow pan and mix.

Pan fried in coconut oil, these chicken strips are also gluten, dairy, grain, and egg free! (Kids love them!) --- The Nourishing Gourmet

3. Toss the chicken strips and the starch mixture together until the chicken is well coated.

4. In a large saucepan (I prefer using cast iron for this), heat fat of choice. I used approximately 1 to 1 ½ cups of coconut oil. I wanted the chicken to be half submerged once it was put in. Heat the oil in a cast iron over medium heat (with a stainless steel pan, use medium-high heat), until hot (but not smoking). Add a single chicken strip to the pan, if it starts bubbling a lot around the chicken strip immediately, you have a good frying temperature (if not, don’t add any more until it starts bubbling around that single chicken strip, and then add more).

Pan fried in coconut oil, these chicken strips are also gluten, dairy, grain, and egg free!  (Kids love them!) --- The Nourishing Gourmet

5. Add the strips carefully one by one, not crowding the pan. Wait until the chicken looks at least cooked half way through and is starting to get a little browned, and then turn over and cook on the other side. It took about 6-9 minutes for each batch to cook through. I simply cut through a chicken strip to check to make sure they were done, although once they were browned at all, I never found a single one that hadn’t gotten cooked thoroughly. Remove from the pan once cooked.

6. Repeat the frying process until all of the chicken is cooked. Serve with homemade ketchup and enjoy right away!

Interested in saving your oil for future frying projects? Check out this helpful link.

Grain Free Fried Chicken Strips
 
Serves: 4-6
Print
 
Ingredients
  • 1 ½- 2 pounds chicken thighs (or breasts)
  • 1 ½ cups tapioca starch
  • 2 ½ teaspoon salt
  • 1 teaspoon dried thyme
  • freshly ground pepper
  • coconut oil for frying
Instructions
  1. Cut off any fat from the chicken, and then cut into thin strips, about ¼-1/2 inch thick.
  2. Put the tapioca starch, salt, thyme and plenty of ground pepper into a shallow pan and mix.
  3. Toss the chicken strips and the starch mixture together until the chicken is well coated.
  4. In a large saucepan (I prefer using cast iron for this), heat fat of choice. I used approximately 1 to 1 ½ cups of coconut oil. I wanted the chicken to be half submerged once it was put in. Heat the oil in a cast iron over medium heat (with a stainless steel pan, use medium-high heat), until hot (but not smoking). Add a single chicken strip to the pan, if it starts bubbling a lot around the chicken strip immediately, you have a good frying temperature (if not, don’t add any more until it starts bubbling around that single chicken strip, and then add more).
  5. Add the strips carefully one by one, not crowding the pan. Wait until the chicken looks at least cooked half way through and is starting to get a little browned, and then turn over and cook on the other side. It took about 6-9 minutes for each batch to cook through. I simply cut through a chicken strip to check to make sure they were done, although once they were browned at all, I never found a single one that hadn’t gotten cooked thoroughly.
  6. Repeat the frying process until all of the chicken is cooked. Serve with homemade ketchup and enjoy right away!
3.3.3077


Filed Under: Dairy Free, Egg Free, For the Kids, Gluten Free, Grain Free, Main Dishes, Nutrient Dense Foods

« Previous Page
Next Page »

Primary Sidebar

ConvertKit Form

Get Every Recipe

And the insider's view from our kitchen

Success! Now check your email to confirm your subscription.

There was an error submitting your subscription. Please try again.

We won't send you spam. Unsubscribe at any time. Powered by ConvertKit

Follow Me

  • Facebook
  • Google+
  • Instagram
  • Pinterest
  • RSS

Search

Please Read:

The information you find here at The Nourishing Gourmet is meant to help you become a better cook! This site is primarily for sharing family friendly recipes. It's not meant to give medical advice or to make any health claims on the prevention or curing of diseases.This site is only for informational and educational purposes. Please discuss with your own, qualified health care provider before adding in supplements or making any changes in your diet. Also, any links to sponsors or affiliates (including Amazon) may give me a percentage of the sale or a pay per click. Thank you for supporting this site.

Categories

  • $10 Main (42)
  • $5 Dishes (43)
  • 52 ways to save money on a healthy diet (53)
  • AIP (23)
  • Baked Goods (83)
  • Beverages (72)
  • Breakfast and Brunch (61)
  • Condiments (8)
  • Dairy Free (492)
  • Desserts (184)
  • Dietary Needs (6)
  • Egg Free (11)
  • Egg Free (86)
  • For the Kids (66)
  • For the Love of Food and Books (18)
  • Gluten Free (484)
  • Grain Free (95)
  • Health (75)
  • Kitchen Tools (4)
  • Main Dishes (126)
  • Nourishing Frugal Recipes (167)
  • Nourishing Frugal Tips (70)
  • Nourishing Practices (56)
  • Nutrient Dense Foods (70)
  • Q and A (15)
  • Salads (39)
  • Sides (101)
  • Snacks (124)
  • Soups (50)
  • The Healthy $1 Menu (21)
  • The Low Energy Guide to Healthy Cooking (18)
  • THM (2)
  • Trim Healthy Mama (2)
  • Uncategorized (846)
  • Vegan (241)
  • Vegetarian (361)

Recent Posts

  • 2 Ingredient Peppermint Bark
  • Herbal Hibiscus Lemonade (Keto, THM)
  • Creamy Curry Red Lentil Soup
  • One-Pot Gluten-Free Mac and Cheese
  • Healthy Pumpkin Spice Granola
  • Crispy Pumpkin Spice Granola (oil-free)
  • Why I Use THM Principles Now
  • Vietnamese Beef Noodle Salad
  • Coconut Flour Pancakes
  • Instant Pot Mexican Shredded Chicken

Recent Comments

  • Dorene St G on Cracker Toffee (Easy Peasy Christmas Candy)
  • Nadia Kriston on Finding a Toaster Oven Without Nonstick
  • KimiHarris on How to make heavenly coconut milk whipped cream (with an isi dispenser)
  • KimiHarris on Autumn Beef Stew (Tomato Free)
  • KimiHarris on How to make heavenly coconut milk whipped cream (with an isi dispenser)

Fresh: Nourishing Salads for All Seasons

Get Every Recipe

And the insider's view from our kitchen

Success! Now check your email to confirm your subscription.

There was an error submitting your subscription. Please try again.

We won't send you spam. Unsubscribe at any time. Powered by ConvertKit

Footer

Privacy

Copyright © 2023 · Foodie Pro & The Genesis Framework