• Skip to primary navigation
  • Skip to main content
  • Skip to primary sidebar
  • Skip to footer

The Nourishing Gourmet

Nourishing. Satisfying. Gourmet.

  • THM Coaching
  • About
    • Privacy
    • Contact
  • Recipes
  • Cookbooks
    • Everyday Nourishing Food
    • Salad Cookbook
    • Soup Cookbook

Main Dishes

Cassava Egg Noodles

January 14, 2021 by KimiHarris 5 Comments

I love these noodles in a rich homemade chicken noodle soup. But my family also enjoyed them in a variety of noodle dishes. They are tender, grain-free, gluten-free, and delicious. Homemade noodles are the perfect comfort food, and who doesn’t need a little comfort food right now? We happily ate our way through various adaptations of this recipe. 

Cassava flour is made from the whole cassava root and as such is grain free. It should not be confused with tapioca flour, which is its refined counterpart. Cassava flour is loved for its more neutral flavor, and its ability to be used more readily in replacement of wheat flour. 

What brand to buy? While I haven’t tried all of the brands out there, I do know that different brands may result in slightly different results. I had success using Otto’s Cassava flour, Thrive Market Cassava flour, and Pamela’s Cassava Flour. (By the way, I love ordering from Thrive Market! You can sign up with my partner link if you haven’t already.)

Are these noodles like wheat noodles? 

In short, no. They are going to be more fragile. I still miss the days of making regular noodles, as gluten makes a strong noodle. You are going to have to use a light touch when handling these, and don’t get frustrated if they break into smaller pieces. That said, they are delicious when cooked, and with practice, I’ve been able to whip these together quickly. 

Ways to Enjoy Cassava Noodles: 

  • Delicious in soup, such as the classic chicken and noodle soup
  • Scrumptious served with melted butter and parmesan
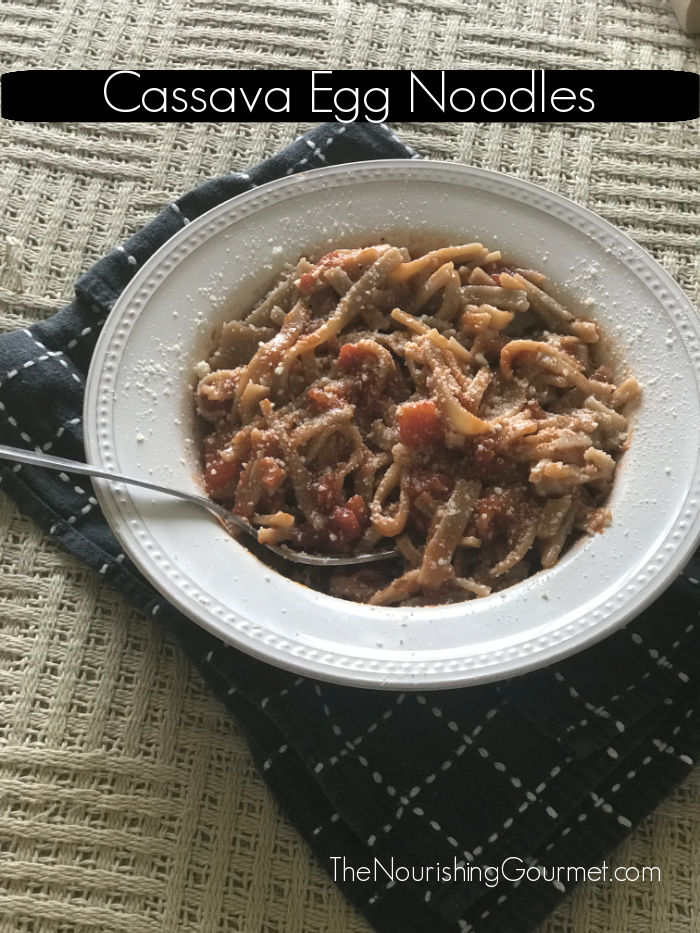
  • Serve with a traditional tomato meat sauce

Cassava Egg Noodles 

2-3 servings 

  • 1 cup of cassava flour
  • 1/4 teaspoon salt
  • 1 large egg
  • 1 tablespoon olive oil (or oil of choice)
  • 1 tablespoon water
  • Salt for boiling water

(This recipe can be doubled, just boil in a large pot.) 

1. Bring a medium-sized pot of water to a boil on the stove while preparing noodles. 

2.  In a medium-sized bowl, stir together flour and salt. Add the egg, oil and water, and whisk together until the mixture forms into a dough. Gently knead with your hands. The dough should be fairly firm, but not dry (or wet). You can add more flour or water, as needed.

3. Roll out on your largest cutting board (can do in batches if needed): Dust surface with extra flour, place dough on top, and dust flour on top of the dough. Using a gentle touch, roll out the dough into a rectangle, until it gets between ⅛-¼ inch thick. 

4. Cut the rolled-out dough into desired size strips using either a sharp knife or a pizza cutter. I’ve cut them into tiny strips, and also into wide fettuccini sizes trips (around ½ inch). 

5. Salt the boiling water well, and add noodles to the pot. You want to keep the water at a gentle simmer. Cook for 3-4 minutes, until the noodles are just soft and cooked through, but still a little firm. Pour through a heat-safe sieve in the sink and give a quick rinse with cold water. 

6. Serve right away as desired.

Filed Under: For the Kids, Gluten Free, Grain Free, Main Dishes

Why I’m Spatchcocking My Turkey This Year

November 26, 2019 by KimiHarris 6 Comments

This method has many advantages, including a super fast cooking time, and moist, delicious meat.

Turkey is the centerpiece of most Thanksgiving tables, yet it’s also the hardest to cook correctly. If you undercook it, food poisoning is a possibility, but if you overcook it, the breasts can be dry and unappetizing. 

My solution for the past five years or so has been trying out different forms of brining. My go to is this dry brine – I love not having to deal with a lot of liquid (as well as not having to find a large enough container for said turkey and brine). A dry brine still gives you the flavorful benefits of a brine as well as a juicy turkey. 

However, I think spatchcocking makes my recipe even better. Spatchcocking is when you remove the spine of the turkey, and roast the turkey flat. This has significant benefits, the biggest that it cooks very fast. I cooked a 16 pound turkey in a little less than an hour and a half. Wow! But it also gets the turkey’s skin delicious, crisp and brown, and even better –roasts the turkey evenly – so the legs and breasts get done at the same time. 

While you won’t be able to stuff your turkey this way (an option that many experts say not to do anyway), the benefits far outweigh that fact. 

But before I send you all scurrying to try this out yourself, I do want to honestly share our experience testing this method out. 

  1. It’s not at all hard to spatchcock a chicken with a sharp knife or kitchen shears. I had a harder time with a turkey. My husband, with his stronger hands, ended up helping me out with this part. I prefer kitchen shears, but do expect to have to use some oomph on this part. 
  2. When I pressed down on the turkey to flatten it after the backbone was removed, a large squirt of turkey juice sprayed across the kitchen floor. Oops. 
  3. Most recipes I found used a very hot oven for this method. This ended up causing a lot of smoking. For Thanksgiving, I plan on turning the oven down a bit after the first 20 minutes, and also adding water to the bottom of the pan to hopefully prevent that from reoccurring. 
  4. Our turkey was hefty at 16 pounds, so it just barely fit on our sheet pan once flattened. I would say it needs to be 16 pounds or less, so this method won’t likely work for larger birds unless you split the turkey in half and roast on two pans. 

Despite those disadvantages, our “test” turkey turned out so well cooked and delicious we all decided this was a method we simply had to do again. Paired with the salt brine? Amazing. 

I don’t want to give my own directions yet, as I still want to experiment with this method, but here are a couple of recipes showing how to spatchcock: Example one, two, and three.

And here is my dry brine recipe! 

Filed Under: AIP, Dairy Free, Egg Free, Gluten Free, Grain Free, Main Dishes, Nutrient Dense Foods

Easy Dinner: Brats with Peppers and Onions (Toaster Oven Friendly)

August 23, 2017 by KimiHarris 6 Comments

Easy meal:Brats with Peppers and Onions (that can be made in a toaster oven!). Flavored with basil and garlic. Yum!

This easy dinner recipe gives you juicy brats with lightly browned onions and peppers that are lovely served in a bun or over rice. The brats (or sausage and hot dogs of your choice) get lightly browned and stay juicy, while the peppers and onions add a lot of flavor, color, and nutrition to the dish. I especially like it served with sauerkraut on the side.

When the weather is hot I throw this into our toaster oven, so it doesn’t heat up our house, and uses little electricity too. It does give out some heat (although not half as much as a regular oven), so we also cook this in our laundry room to prevent our kitchen and living space from getting any warmer. (Just make sure you keep it away from kids as the toaster oven gets very hot).

A Word on Equipment:

We choose to buy an inexpensive toaster oven that doesn’t have nonstick in it. You can read about it here. We are still very happy with it! (Here is a direct Amazon link: Waring Pro Digital Convection Oven).

If you are making a rice bowl, you can also use an Instant Pot or clay rice cooker – this is also a great way to prevent your kitchen from getting too hot on a warm day.

Are Sausage/Hot Dogs Good for You?

Finally, there have been some studies linking eating hot dogs to higher rates of certain childhood cancers, as well as possible cancer causing effects on adults. (This article has a good overview of some of them.) While there could be other explanations for some of the results (that is, people who ate more processed meats also could be more likely to be eating an unbalanced diet), the statistics are still compelling. For that reason, we try to avoid or limit sausage and processed meats that contain nitrates and are heavily processed. The brats pictured above are from a local grocery store that grinds their own meat and stuffs their sausage themselves. It’s no different from eating ground meat, so I feel they are a good choice.

Feeding your family vitamin C containing fruits and vegetables (including lacto-fermented sauerkraut) could also help prevent toxic components of processed or grilled meats from affecting your health. I find it fascinating how previously unknown benefits to well-balanced diets are still being discovered! As always, we choose not to worry too much about every single discovery but buy the best quality we can afford and serve well-balanced meals. I was also amused to learn that marinades with herbs and garlic (like this recipe) help prevent carcinogens from forming when cooking meat at high heat. Sometimes what tastes best also is better for you!

Easy meal:Brats with Peppers and Onions (that can be made in a toaster oven!). Flavored with basil and garlic. Yum!

Brats with Peppers and Onions

PDF for Printing

Serves 5

  • 5 brats (or sausage/hot dog of choice)
  • 2 bell peppers (red and yellow are nice), seeded, stemmed, and thinly sliced
  • 1 onion (sweet or yellow), peeled and thinly sliced
  • 1 teaspoon dried basil
  • Unrefined Salt and Freshly Ground Pepper
  • 3 garlic cloves, peeled and finely minced or put through a garlic press
  • 2 tablespoons of fat (melted) or oil of your choice, heat safe.

1:Preheat oven or toaster oven to 400F.

2. Place all of the ingredients on a sheet pan, drizzle oil or melted fat over everything, and then toss to coat vegetables and meat evenly.

3: Place in oven or toaster oven and roast until the vegetables are soft and the sausage is completely cooked through (about 20 minutes – but it depends on the thickness of the sausage. A toaster oven will cook them faster). Ground meat products such as sausage should reach the temperature of 160F internally. I also like to see a little bit of browning on the sausage and vegetables.

4:Serve as desired, and enjoy!


_________

Some links may be affiliate links. I may earn a small commission on items purchased through my links. 

Filed Under: $10 Main, Dairy Free, Egg Free, Gluten Free, Grain Free, Main Dishes, The Low Energy Guide to Healthy Cooking

Salt Roasted Turkey with Herbs and Garlic (AIP-friendly)

November 16, 2016 by KimiHarris 16 Comments

salt-roasted-turkey-dry-brine

Salt roasted turkey is also sometimes called “dry-brining, ” and it gives you moist turkey meat and crisp skin and beautiful flavor. Plus, I love that this method is so simple!

You will mix kosher salt with dried herbs, lemon and orange zest, and garlic and gently massage into the turkey. Left to saturate overnight, the turkey ends up being well flavored as well as moist, and the turkey skin is browned nicely and crisp. What more can you ask for?

Wet Brine Vs. Dry Brine

The first turkey I made that I felt was a big success was a wet brine. It was plump, flavorful, and was finally a turkey that didn’t dry out. The biggest disadvantages we saw were the following.
1: It’s a bit of a pain to do, and you either need a giant stock pot or a brining bag.
2: The skin doesn’t get as browned and crisp as other methods because it never drys out as much.
3: It does dilute the turkey flavor. Harsher critics of the method say it waters it down. I still like wet brining turkeys, but I have to say that dry brining may be my new favorite.

Benefits of dry brining

1. Dry brining will give you beautiful turkey skin that is very delicious.
2. It’s incredibly easy to do, and you don’t need a brining bag.
3. While wet brining can dilute, dry brining concentrates flavors.
4. Dry brining creates its own brine as it draws moisture out of the bird, which the salt then melts into, and then the salty brine reabsorbs into the turkey.

A Couple More Thoughts on Dry brining

Be aware that this is a well-salted bird. We dislike meats that are under-salted, so this was a wonderful method for us. However, if you like dishes barely or lightly salted, this isn’t the method for you. A few people will rinse the turkey before cooking to cut down on saltiness, but this will make your turkey skin wet, cut down on the flavor a bit, and isn’t considered a safe practice unless you sterilize well afterward.

Dry Brining Method

  • Start with a fresh turkey, not a frozen and defrosted one (most frozen turkey’s have already been injected with a salty mixture)
  • Mix kosher salt with whatever extra flavors you’d like – dried or fresh herbs, citrus zest, garlic.
  • Rub all over turkey (back and front) and sprinkle in the turkey cavity.
  • Cover, and refrigerate for 12-18 hours. Uncover for the last couple of hours to allow the skin to start drying out for extra crispy skin.
  • Stuff turkey, and baste with melted butter or avocado oil.
  • Roast according to directions, and serve!

Things you’ll need:

  • You can use regular kosher salt, but I used and recommend this unrefined kosher salt that hasn’t been bleached or processed but still has the natural minerals in it.
  • I got a great stainless steel turkey pan from Ikea a couple of years ago. If you aren’t ready to fork over a couple hundred, there are more frugal ones to be had.
  • A meat thermometer
  • A zester or fine grater

I picked out the smallest turkey I could find (about 10 ½ pounds) for the above picture (I was just making it for our small family). The dry brine works for 10-13 pound turkey. (For a ten pounder, you don’t have to use quite all of the salt mixture) For a 14- 15 pound turkey, use a 1/3 a cup of kosher salt and heaping measurements of flavor proponents. For a twenty pound turkey, double the mixture.

Salt Roasted Turkey with Herbs and Garlic

PDF File for Recipe Printing

Recipe for dry salt brine for turkey

Dry Brine Recipe

Take note that you can widely change this recipe up as long as you keep the salt the same. The salt will permeate furthest, the herbs and garlic will flavor just the skin and first layer of the meat.

Ingredients: 

  • ¼ cup kosher salt
  • 2 teaspoons each of dried thyme and oregano (or 2 tablespoons each of fresh)
  • 3-5 garlic cloves, peeled and pressed through a garlic press of finely minced
  • Zest from 1 large lemon
  • Zest from 1 large orange

Other possible additions or substitutions: ground pepper (not AIP), rubbed sage, basil, rosemary

Directions:

  1. Mix in a small bowl. Save lemon and orange for stuffing the turkey.

Dry Brined turkey creates moist turkey meat and crisp , beautiful turkey skin. Plus, it's so beautiful!

Preparing the Turkey.

Ingredient:

1 10-14 pound fresh turkey (I used organic, a free range organic would be even better), Notice notes above and below for bigger turkeys

Directions:

  1. Remove any gizzards and the neck bone (check both sides of the turkey). Set aside for broth making (or put in the freezer for later use). Remove metal or plastic insert that holds turkey legs. Pat dry with paper towels.
  2. Sprinkle about two tablespoons of the salt mixture inside the turkey cavity, and then rub the rest of the mixture on the turkey, front and back (you can also gently push some under the skin of the turkey).
  3. Place turkey on rimmed baking sheet or roasting pan and cover with plastic wrap. Or place in a brining bag and place on sheet.
  4. Refrigerate for 12-18 hours. Remove plastic wrap or brining bag for the last couple of hours to dry out skin, if desired.

Preparing Turkey To Roast

(Simply double all of the below ingredients if using a large turkey)

Ingredients:

  • ¼ -1/2 cup of melted butter or avocado oil
  • 1 large onion, peeled and thinly sliced
  • The lemon and orange leftover from the dry brine
  • 3 cups of water

Directions:

  1. Place oven rack at lowest position and pre-heat the oven to 425F.
  2. If not already, place turkey, breast side up, in middle of roasting pan on roasting rack. Slice the leftover orange and lemon, and stuff them, along with the sliced onion, into the turkey.
  3. Gently tie legs together (confession – I couldn’t find my kitchen twine when I was testing this recipe, and it still turned out okay) by crossing the legs and then tying. Drizzle liberally with melted butter or avocado oil. Pour water underneath the roasting rack in the turkey pan.
  4. Place in oven and cook for 20 minutes. Turn down heat to 325F and cook until a meat thermometer gets to 165F when stuck in the thickest part of the turkey thigh and the juices run clear. You may want to turn the turkey pan around half way through the cooking time. (Basting unnecessary) . Cover with foil if the skin is getting too dark.
  5. Approximate total cooking time: 8-12 pounds, 2 ¾ -3 hours; 12-14 pounds – 3 to 3 ¾ hours; 14 -18 pounds, 3 ¾ to 4 ¼; 18-20 pounds, 4 ¼ – 4 ½ hours; 20-24 pounds, 4 ½ -5 hours.
  6. Remove from oven and cover loosely with foil to keep warm, and let rest for about 15-30 minutes. (This gives you time to make the gravy). Carve and serve.

P.S. I’m planning on walking you through making a gravy with the drippings, but in case I don’t get to it, you need to dilute the drippings significantly as they will be very salty before turning it into gravy.

Some links may be affiliate links. I may earn a small commission on items purchased through my links. 

Filed Under: AIP, Dairy Free, Egg Free, Gluten Free, Grain Free, Main Dishes

« Previous Page
Next Page »

Primary Sidebar

ConvertKit Form

Get Every Recipe

And the insider's view from our kitchen

Success! Now check your email to confirm your subscription.

There was an error submitting your subscription. Please try again.

We won't send you spam. Unsubscribe at any time. Powered by ConvertKit

Follow Me

  • Facebook
  • Google+
  • Instagram
  • Pinterest
  • RSS

Search

Please Read:

The information you find here at The Nourishing Gourmet is meant to help you become a better cook! This site is primarily for sharing family friendly recipes. It's not meant to give medical advice or to make any health claims on the prevention or curing of diseases.This site is only for informational and educational purposes. Please discuss with your own, qualified health care provider before adding in supplements or making any changes in your diet. Also, any links to sponsors or affiliates (including Amazon) may give me a percentage of the sale or a pay per click. Thank you for supporting this site.

Categories

  • $10 Main (42)
  • $5 Dishes (43)
  • 52 ways to save money on a healthy diet (53)
  • AIP (23)
  • Baked Goods (83)
  • Beverages (72)
  • Breakfast and Brunch (61)
  • Condiments (8)
  • Dairy Free (492)
  • Desserts (184)
  • Dietary Needs (6)
  • Egg Free (11)
  • Egg Free (86)
  • For the Kids (66)
  • For the Love of Food and Books (18)
  • Gluten Free (484)
  • Grain Free (95)
  • Health (75)
  • Kitchen Tools (4)
  • Main Dishes (126)
  • Nourishing Frugal Recipes (167)
  • Nourishing Frugal Tips (70)
  • Nourishing Practices (56)
  • Nutrient Dense Foods (70)
  • Q and A (15)
  • Salads (39)
  • Sides (101)
  • Snacks (124)
  • Soups (50)
  • The Healthy $1 Menu (21)
  • The Low Energy Guide to Healthy Cooking (18)
  • THM (2)
  • Trim Healthy Mama (2)
  • Uncategorized (846)
  • Vegan (241)
  • Vegetarian (361)

Recent Posts

  • 2 Ingredient Peppermint Bark
  • Herbal Hibiscus Lemonade (Keto, THM)
  • Creamy Curry Red Lentil Soup
  • One-Pot Gluten-Free Mac and Cheese
  • Healthy Pumpkin Spice Granola
  • Crispy Pumpkin Spice Granola (oil-free)
  • Why I Use THM Principles Now
  • Vietnamese Beef Noodle Salad
  • Coconut Flour Pancakes
  • Instant Pot Mexican Shredded Chicken

Recent Comments

  • Dorene St G on Cracker Toffee (Easy Peasy Christmas Candy)
  • Nadia Kriston on Finding a Toaster Oven Without Nonstick
  • KimiHarris on How to make heavenly coconut milk whipped cream (with an isi dispenser)
  • KimiHarris on Autumn Beef Stew (Tomato Free)
  • KimiHarris on How to make heavenly coconut milk whipped cream (with an isi dispenser)

Fresh: Nourishing Salads for All Seasons

Get Every Recipe

And the insider's view from our kitchen

Success! Now check your email to confirm your subscription.

There was an error submitting your subscription. Please try again.

We won't send you spam. Unsubscribe at any time. Powered by ConvertKit

Footer

Privacy

Copyright © 2023 · Foodie Pro & The Genesis Framework