• Skip to primary navigation
  • Skip to main content
  • Skip to primary sidebar
  • Skip to footer

The Nourishing Gourmet

Nourishing. Satisfying. Gourmet.

  • THM Coaching
  • About
    • Privacy
    • Contact
  • Recipes
  • Cookbooks
    • Everyday Nourishing Food
    • Salad Cookbook
    • Soup Cookbook

Dietary Needs

Vietnamese Beef Noodle Salad

July 15, 2021 by KimiHarris 2 Comments


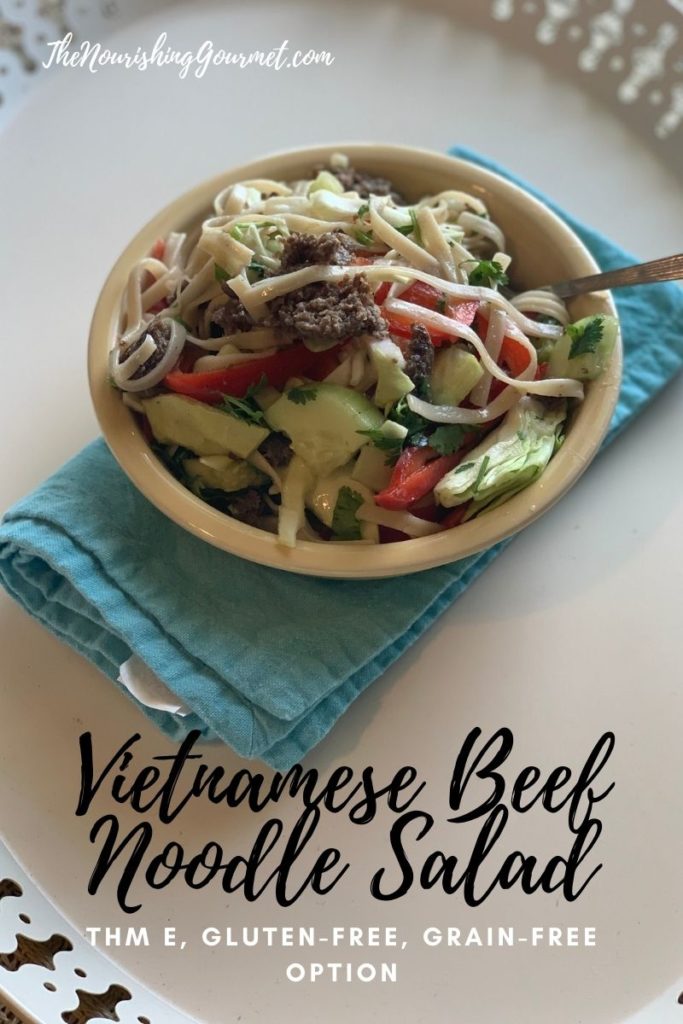
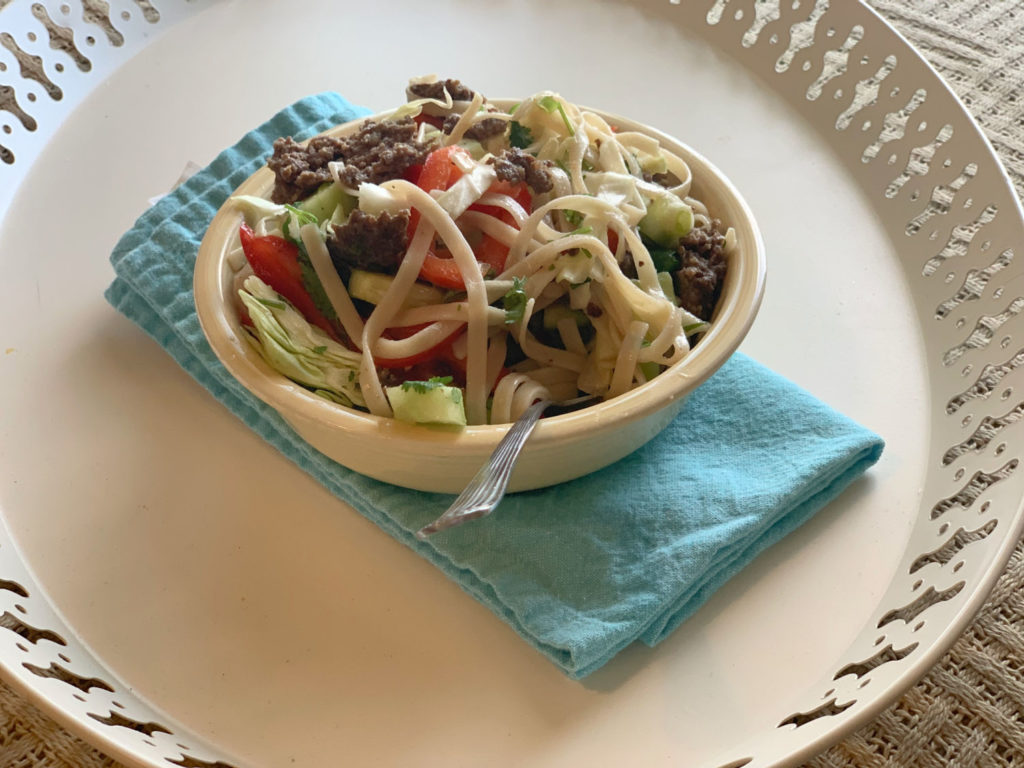
This refreshing, gluten-free salad is full of flavor with the punch of rice vinegar, the saltiness of fish sauce, the sweetness of honey or sweetener of choice, and the herby savoriness of cilantro and/or basil. It also happens to be one of my favorite meals right now. Not only is it delicious, but it is packed with nutrients!

While, yes, I eat this just because it’s so good, I also aimed to get a rainbow of produce in this recipe, which adds not only more flavor but also important nutrients, antioxidants, and a wide variety of fiber sources. Win-win! 

The other aspect I love about all of the added vegetables is that it helps you stay with an appropriate amount of noodles. We often want a huge plateful of pasta — with this recipe, you can have a large plate of pasta, but half of it is vegetables! 

This recipe also works for those of you who are on THM (Trim Healthy Mama) as an “E” meal. 

We’ve eaten this meal many times through the summer, and it’s perfect for hot weather, but we eat it year-round. 

I named this a Vietnamese recipe, although I do want to clarify that this isn’t a claim to being an authentic Vietnamese recipe, but rather, I’ve used some of the flavor profiles and sauce inspiration from Vietnamese cuisine. 

Notes on the recipe:

  • Traditionally, a recipe like this would have used white rice noodles, such as rice sticks. I am using whole grain brown rice noodles. You can get something like these stir-fry Thai Kitchen brown rice noodles, though I have been using brown rice fettuccine noodles, as they are cheaper and similar in taste and texture. 
  • This will need to be served right away. If you aren’t serving it right away, you can keep the elements of the recipe separate, and toss right before serving (toss the noodles with a bit of the sauce and/or oil to keep them from sticking before storing them, however, or simply make the other elements – the sauce, the meat, and the chopped vegetables, and cook the noodles right before serving. 

Notes on THM:

  • While technically you are supposed to use 96% lean meat for an E meal on THM, because I don’t add any fat to this recipe, I use the 93% grasssfed ground beef that I find locally and I think that works well for fat limits for an E meal. If you don’t use a lean meat here, it counts as a cross-over (XO). 
  • Honey isn’t encouraged on THM when in weight loss mode, but the ¼ a cup of honey here is pretty small per serving. I’ve tested this with both honey and xylitol, and both worked very well. Allulose should work perfectly too (and is dog-safe, unlike xylitol). 
  • Brown rice noodles are on plan on THM, but you are encouraged to watch your blood sugar when eating them, if you are sensitive, and to keep your portions small. This recipe works well, because it mixes vegetables with the noodles for a filling meal, without leaning completely on the noodles. 
  • Cassava noodles are not considered on-plan for THM, but for those grain-free, some find that they do well with occasional cassava noodles (cassava is also a wonderful prebiotic fiber!). Some other grain-free noodle options to play with are here.

Vietnamese Beef Noodle Salad

Serves: 6-8

Ingredients:

Meat:

  • 1 lb ground beef (96% or up, for an E meal)
  • 1 tsp dried ginger
  • 3 cloves garlic
  • 2 tbsp rice vinegar
  • 1 tbsp tamari or coconut aminos or fish sauce
  • Optional: 1 tsp onion powder and 1 tsp garlic powder
  • Optional: pinch or two of red pepper flakes
  • Add more coconut aminos/tamari/fish sauce, and vinegar to taste

Sauce/Dressing

  • Scant ¼ cup honey or ¼ cup xylitol. Other options: Allulose, or of-plan organic white sugar
  • ½ cup hot or warm water
  • ½ cup rice vinegar
  • ¼ cup fish sauce
  • 3 garlic cloves, finely minced
  • Scant 1 tsp dried ginger
  • Pinch of cayenne pepper

Salad

  • 8-12 oz dried pasta *
  • 2 cucumbers
  • 3-6 green onions
  • 2 large bell peppers (red, yellow, or orange)
  • 1 bunch of cilantro
  • Optional: a few handfuls of (Thai) basil
  • 4 cups shredded or thinly sliced cabbage

*We usually use brown rice noodles, but I also tried this with 8 ounces of cassava noodles for a grain-free option. Both worked! But the cassava needs to especially be eaten right away as it will get mushy if left to sit. Cassava noodles aren’t on THM, although some use it as a personal choice option if needed.

Directions:

  1. Make the sauce by first stirring together the hot or warm water with the sweetener of choice. Add the rest of the ingredients. Set aside.
  2. Prep the vegetables: Peel the cucumbers and cut into small wedges. Seed and thinly slice the sweet bell peppers. Thinly slice cabbage, chop the green onions (removing the top two inches and discarding), and wash the cilantro, remove the stems, and chop.
  3. Cook pasta according to box directions, but make sure you salt well. While the pasta cooks make up the ground beef, adding the seasoning as it cooks, and stirring frequently.
  4. Drain the pasta once just tender, and rinse with cold water. Drain well. Add to a large bowl with the vegetables, and then toss with the dressing.
  5. Serve right away. You can also add more rice vinegar and fish sauce to add more flavor if needed. Over time, the noodles will start absorbing the sauce, so, if needed, you can add a bit more vinegar and either tamari, coconut amino acids, or fish sauce, to taste.

Filed Under: Dairy Free, Egg Free, Egg Free, Gluten Free, Grain Free, Main Dishes

Coconut Flour Pancakes

June 10, 2021 by KimiHarris 3 Comments

These grain-free coconut flour pancakes are moist, have a great crumb, and are delicious and family-friendly. I love them topped with berries. Delicious! They work well for those on grain or gluten-free diets, or for those eating keto or THM (they are an “S” meal). 

Coconut flour recipes can end up dry, with a poor crumb. How do you fix that? You should pair coconut flour with high-fat ingredients. In this case, butter and coconut milk (or you could use cream, sour cream,or whole milk Greek yogurt). This keeps your pancakes moist and tender instead of dry. 

Tips:

  • You can cook this in whatever pan you have, but I especially like to use my large cast iron pans when making pancakes.
  • This would be lovely served on a Pancake Charcuterie Board.  
  • Serving suggestions: Any typical pancake toppings work here. If you are keto or THM (S), Lakanto Powdered Sugar or is one option, a fresh berry sauce made with xylitol/stevia, and served with stevia-sweetened coconut whipped cream is another. I also enjoy it topped with unsweetened Greek yogurt and fresh berries. 
  • For extra protein: serve with unsweetened nut or seed butters. 
  • OR, make them into savory pancakes and top with a fried egg and bacon. 

Coconut Flour Pancakes

  • 3 eggs
  • ¼ cup coconut milk (or cream, yogurt, sour cream)
  • ¼ cup melted butter or coconut oil
  • ¼ cup coconut flour
  • 1 teaspoon baking powder
  • Butter and coconut oil for pan

Directions: 

1. In a medium-sized bowl, add the eggs and coconut milk, and whisk. If using butter, go ahead and whisk in as well. If using the coconut oil, wait until after you’ve added the dry ingredients, and then whisk in the melted coconut oil.

2. Add in the coconut flour and baking powder, whisk. Let sit for a few minutes. If the mixture is too thick, you can thin it with a little more liquid, but you want the mixture to be pretty thick, just not dry. Heat a pan over medium heat until warm. Add butter or coconut oil to the pan.

3.This recipe works best for small pancakes. I usually use about ¼ cup or less of batter per pancake. Add batter to the pan, and let cook until one side is browned and edges are starting to firm up. If the bottom is cooking too quickly, turn down the heat. Flip, and cook the second side (the second side will cook more quickly). Remove and repeat the process, adding more fat to the pan as needed.

Serve with desired toppings and enjoy!

Filed Under: Baked Goods, Breakfast and Brunch, Dairy Free, For the Kids, Gluten Free, Grain Free

Instant Pot Mexican Shredded Chicken

May 13, 2021 by KimiHarris 1 Comment

This easy recipe takes just a couple of ingredients and can be thrown together in mere minutes, but produces flavorful shredded chicken that’s perfect for tacos, burritos and burrito bowls, and taco salads.

If you’ve followed this blog for a while, you may have noticed that we tend to love dark meats, such as chicken thighs. But chicken breast can be delicious too! This recipe is suitable for most gluten-free, grain-free, paleo/primal diets. I most often eat this on the THM (Trim Healthy Mama) plan as part of my E meal.

For those of us coming to THM from the traditional foods world, eating some meals that are higher in the slow carbs, but lower in fat is a real transition. However, look at how satisfying this meal is below!

What’s in this bowl: Brown rice, pinto beans, Mexican shredded chicken, cabbage slaw tossed with a teaspoon of oil and lime juice, fresh garlic and salt, salsa, and nonfat Greek yogurt.

If you are interested in why I decided to start combining what I had learned from other experts in the holistic world with THM, you can read my story here and learn about my coaching as well.

For an S meal, or other Mexican-inspired recipes, check out this juicy Carnitas recipe as well as my Simple Mexican Coleslaw. Delicious!

But regardless of your dietary lifestyle, this recipe is delicious!

Instant Pot Shredded Chicken

  • 2-3 Chicken Breasts
  • 1 and 1/4 cup salsa or Picante sauce
  • 1 teaspoon each chili, cumin, garlic powder
  1. In a 6 quart Instant Pot add the salsa or sauce. An IP needs at least 1 cup of liquid, so if your salsa is dry, add chicken broth. Add the chicken and spices.
  2. Secure lid, set steam release valve to closed, and program for ten minutes on high on manual.
  3. Let rest for five minutes, and then release. Check to make sure chicken is cooked all the way through.
  4. Shred chicken, then pour the sauce over it. Enjoy!

Filed Under: Dairy Free, Egg Free, Gluten Free, Grain Free, Main Dishes, Nourishing Frugal Recipes, The Low Energy Guide to Healthy Cooking, Uncategorized

Tender Instant Pot Carnitas (shredded pork for tacos)

April 15, 2021 by KimiHarris Leave a Comment

One of my kids told me after my last tweaks to this recipe, “Mom, this is so good! I feel like I’m at Chipotle!” and that was highest praise from this particular child. My kids usually grow tired of recipes I’m testing for this blog. But this was one they happily ate as I continued to perfect it.

This recipe for carnitas has been on our table repeatedly in recent weeks. Cooked to perfection in a pressure cooker, carnitas can be used for tacos, burritos, burrito bowls, or taco salads. 

Our kids enjoy their carnitas in tacos with all of the toppings, while I make mine into a grain-free carnitas bowl using my Simple Mexican Coleslaw recipe, along with guacamole and salsa. When I’m eating dairy, I’ll also add sour cream and cheese. So good! This makes a Trim Healthy Mama “S” meal.

I tested this recipe in a pressure cooker, the large Instant Pot. This is where pressure cookers really shine, as they cook meat quickly, and it comes out so tender. However, I also have provided notes on how to make this in a slow cooker, or stove/oven. 

It’s worth noting that traditionally carnitas were slow-cooked in lard until tender and crispy, with not quite as many spices as this recipe has. That is a lovely way to enjoy a traditional recipe. But this recipe is easier for me to put together, and I find it plenty fatty enough just from the fat produced from the roast. 

Related Recipes:

  • Simple Mexican Quinoa Bowls
  • Mexican Quinoa Salad
  • Mexican Chocolate Dairy-free Ice Cream
  • Lacto-Fermented Escabeche
  • 7 Layer Mexican Dip

Tender Instant Pot Carnitas

  • 3-6 pound pork butt roast or shoulder roast
  • Salt and pepper
  • Avocado oil, or oil/fat of choice
  • 2 teaspoons onion powder (optional)
  • 1 heaping tablespoon chili powder
  • 1 heaping tablespoon ground cumin
  • 8 garlic cloves, peeled, and minced
  • 2 heaping teaspoons dried oregano
  • 1 cup chicken broth 
  • ½ cup lime juice (orange juice is more traditional, and delicious as well, but we preferred lime).
  • 2 teaspoons salt and generous amount of freshly ground black pepper
  1. Cut roast into, roughly, largish two-inch squares (mine were very irregular, and that’s fine). If they are very wet, pat dry, salt and pepper generously.
  2. Using the sauté function, heat enough oil in the Instant Pot until hot (but not smoking), and using tongs, place some of the squares into the bottom of the pan. Don’t overlap, and do multiple batches. Turn once, browning both sides. Remove to plate, and then repeat until you have finished all of the meat.
  3. Turn the sauté function off, add meat back into the IP, and add the rest of the ingredients.
  4. Put lid on, and hit “manual” and set for 40 minutes on high. Once done, let it release for 10-15 minutes.
  5. Remove lid, and remove meat into a large bowl. Shred with two forks (my kids like doing this!). We also remove any fatty pieces.
  6. Put into a serving dish and pour some of the sauce over it, and serve.
  7. OR, if you would like it browned, you can place on a large sheet pan, and brown it in the oven on broil for around five minutes. The other options would be browning it in a large frying pan on the stove. My kids prefer it straight from the IP.

Directions for slow cooker: Brown meat in a pan in as many batches as needed. Place in slow cooker, and add the rest of the ingredients. Cook on low for 6-8 hours, or on high for 3-5 hours, until the meat is fork tender.

Directions for stovetop/oven: In an oven-safe dish with a lid, brown meat in as many batches as needed. Add the rest of the ingredients, put the lid on, and place in a preheated oven at 300F, and bake for 3 to 4 hours until the meat is fork tender.

Filed Under: Dairy Free, For the Kids, Gluten Free, Grain Free, Main Dishes, The Low Energy Guide to Healthy Cooking

« Previous Page
Next Page »

Primary Sidebar

ConvertKit Form

Get Every Recipe

And the insider's view from our kitchen

Success! Now check your email to confirm your subscription.

There was an error submitting your subscription. Please try again.

We won't send you spam. Unsubscribe at any time. Powered by ConvertKit

Follow Me

  • Facebook
  • Google+
  • Instagram
  • Pinterest
  • RSS

Search

Please Read:

The information you find here at The Nourishing Gourmet is meant to help you become a better cook! This site is primarily for sharing family friendly recipes. It's not meant to give medical advice or to make any health claims on the prevention or curing of diseases.This site is only for informational and educational purposes. Please discuss with your own, qualified health care provider before adding in supplements or making any changes in your diet. Also, any links to sponsors or affiliates (including Amazon) may give me a percentage of the sale or a pay per click. Thank you for supporting this site.

Categories

  • $10 Main (42)
  • $5 Dishes (43)
  • 52 ways to save money on a healthy diet (53)
  • AIP (23)
  • Baked Goods (83)
  • Beverages (72)
  • Breakfast and Brunch (61)
  • Condiments (8)
  • Dairy Free (492)
  • Desserts (184)
  • Dietary Needs (6)
  • Egg Free (11)
  • Egg Free (86)
  • For the Kids (66)
  • For the Love of Food and Books (18)
  • Gluten Free (484)
  • Grain Free (95)
  • Health (75)
  • Kitchen Tools (4)
  • Main Dishes (126)
  • Nourishing Frugal Recipes (167)
  • Nourishing Frugal Tips (70)
  • Nourishing Practices (56)
  • Nutrient Dense Foods (70)
  • Q and A (15)
  • Salads (39)
  • Sides (101)
  • Snacks (124)
  • Soups (50)
  • The Healthy $1 Menu (21)
  • The Low Energy Guide to Healthy Cooking (18)
  • THM (2)
  • Trim Healthy Mama (2)
  • Uncategorized (846)
  • Vegan (241)
  • Vegetarian (361)

Recent Posts

  • 2 Ingredient Peppermint Bark
  • Herbal Hibiscus Lemonade (Keto, THM)
  • Creamy Curry Red Lentil Soup
  • One-Pot Gluten-Free Mac and Cheese
  • Healthy Pumpkin Spice Granola
  • Crispy Pumpkin Spice Granola (oil-free)
  • Why I Use THM Principles Now
  • Vietnamese Beef Noodle Salad
  • Coconut Flour Pancakes
  • Instant Pot Mexican Shredded Chicken

Recent Comments

  • Dorene St G on Cracker Toffee (Easy Peasy Christmas Candy)
  • Nadia Kriston on Finding a Toaster Oven Without Nonstick
  • KimiHarris on How to make heavenly coconut milk whipped cream (with an isi dispenser)
  • KimiHarris on Autumn Beef Stew (Tomato Free)
  • KimiHarris on How to make heavenly coconut milk whipped cream (with an isi dispenser)

Fresh: Nourishing Salads for All Seasons

Get Every Recipe

And the insider's view from our kitchen

Success! Now check your email to confirm your subscription.

There was an error submitting your subscription. Please try again.

We won't send you spam. Unsubscribe at any time. Powered by ConvertKit

Footer

Privacy

Copyright © 2023 · Foodie Pro & The Genesis Framework