• Skip to primary navigation
  • Skip to main content
  • Skip to primary sidebar
  • Skip to footer

The Nourishing Gourmet

Nourishing. Satisfying. Gourmet.

  • THM Coaching
  • About
    • Privacy
    • Contact
  • Recipes
  • Cookbooks
    • Everyday Nourishing Food
    • Salad Cookbook
    • Soup Cookbook

The Low Energy Guide to Healthy Cooking

Paleo Tigernut Waffles

April 4, 2019 by KimiHarris 2 Comments

Paleo Tigernut Waffles - A wonderful baked good for a grain-free diet, and also a source of prebiotic fiber!

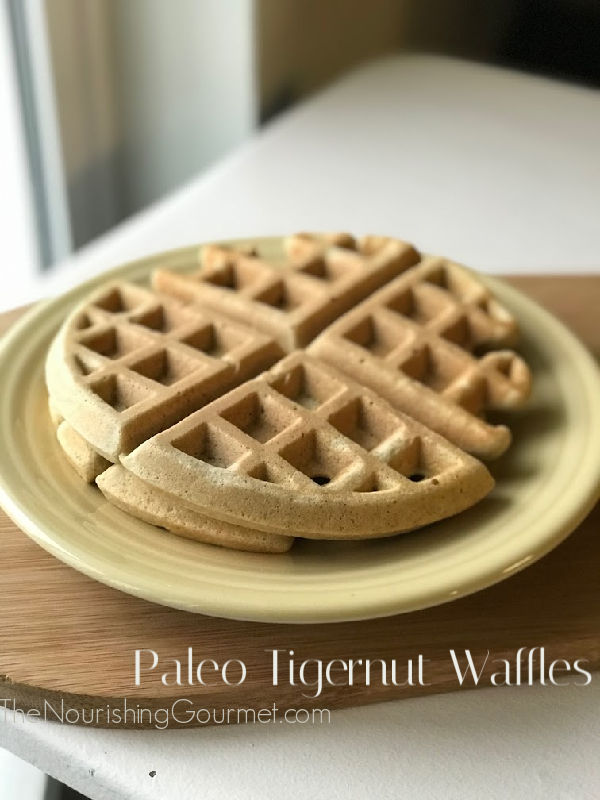
These gently sweet waffles are not only grain and dairy free, but they are delicious! Tigernuts have been eaten for thousands of years and are not a nut, but actually a small tuber. They are a good source of prebiotic fiber and are also a grain-free carbohydrate. I created this recipe for a couple of reasons.

  1. I temporarily am doing a grain-free diet again. I find that it helps reset my digestive system and gives me more energy (usually I eat gluten-free). Grain-free waffles are some of the fastest grain-free baked goods I can make myself and hence valuable to my time-strapped schedule.
  2. I am also experimenting with adding prebiotic fiber into my diet as a way of increasing my microbiome health. Tiger nut flour happens to be a great source of it. You can read about the possible benefits of prebiotic fiber in the following three studies: Health Effects and Sources of Prebiotic Dietary Fiber, Fiber and Prebiotics: Mechanisms and Health Benefits, Dietary fiber and prebiotics and the gastrointestinal microbiota. Note: I’m not making any health claims about the following recipe, and I have just begun my own self-experimentation in adding prebiotic fiber.
  3. When I’m eating a grain-free diet, I do have to be careful to add at least some carbs into my diet. If I go too low carb, I don’t feel well. However, I quickly get tired of sweet potatoes, so tigernut flour and cassava flour allows me to expand what I can eat.

Non-Toxic Waffle Iron?

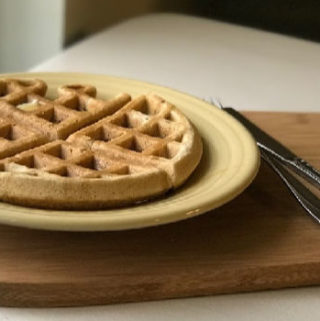
Before I share the recipe, I also wanted to mention that I recently bought a new waffle iron, as we no longer owned one, and it has worked well for us! It has a nonstick ceramic surface and doesn’t contain PTFE or PFOA and so is considered a more non-toxic choice. I found that my gluten and grain-free waffles won’t brown well in it unless I turn the knob all the way to high, or nearly so. Waffles stick the least in this waffle iron of any I have tried. This picture was taken after making a batch of them! This is the (affiliate links following) waffle maker I bought. You could also check out the cast iron versions, like this one.

Notes on Ingredients and Recipe:

  • You can see the brands of tigernut and cassava flour I used by following the links.
  • If you used all tigernut flour in this recipe it would be very dense and fibrous, which is why I added another grain-free flour. Even with that, keep in mind that the high-fiber tigernut flour will make these waffles have a slightly more fibrous texture.

Paleo Tigernut Waffles

  • 2 large eggs
  • ½ cup water or milk of choice
  • 1 teaspoon vanilla extract
  • ¾ tigernut flour
  • ½ cup cassava flour
  • 1/8 teaspoon salt
  • 1 ½ teaspoon baking powder
  • 2 tablespoons coconut oil (plus more, as needed, for waffle pan)
  1. Plug waffle iron in and start preheating.
  2. Put the eggs, water or milk, and vanilla extract into a medium-sized bowl. Whisk.
  3. Add the flours, salt, and baking powder.
  4. If your coconut oil isn’t liquified, gently melt on the stovetop or in a cup in the microwave and add to bowl and whisk right away until smooth.
  5. Brush pan with oil/melted fat of choice, as needed, and put about ½ cup (or amount appropriate for your waffle pan). Cook until done, and lightly browned.
  6. Remove with fork, and repeat the process until done with batter.
  7. Makes between 2-4 waffles, depending on how full you fill your pan, and how large your waffle pan is. I recommend a half waffle as a serving size since this is a very fiber-rich recipe (that said, I’ve definitely eaten a whole one for dinner!) You can also reheat in the toaster oven or toaster.

Print Friendly Recipe:

Paleo Tigernut Waffles
 
Print
 
Ingredients
  • 2 large eggs
  • ½ cup water or milk of choice
  • 1 teaspoon vanilla extract
  • ¾ tigernut flour
  • ½ cup cassava flour
  • ⅛ teaspoon salt
  • 1 ½ teaspoon baking powder
  • 2 tablespoons coconut oil (plus more, as needed, for waffle pan)
Instructions
  1. Plug waffle iron in and start preheating.
  2. Put the eggs, water or milk, and vanilla extract into a medium-sized bowl. Whisk.
  3. Add the flours, salt, and baking powder.
  4. If your coconut oil isn’t liquified, gently melt on the stovetop or in a cup in the microwave and add to bowl and whisk right away until smooth.
  5. Brush pan with oil/melted fat of choice, as needed, and put about ½ cup (or amount appropriate for your waffle pan). Cook until done, and lightly browned.
  6. Remove with fork, and repeat the process until done with batter.
  7. Makes between 2-4 waffles, depending on how full you fill your pan, and how large your waffle pan is. I recommend a half waffle as a serving size since this is a very fiber-rich recipe (that said, I’ve definitely eaten a whole one for dinner!) You can also reheat in the toaster oven or toaster.
3.3.3077


Filed Under: Baked Goods, Breakfast and Brunch, Dairy Free, Gluten Free, Grain Free, Snacks, The Low Energy Guide to Healthy Cooking

15 Unrecipes for Healthy Busy Day Meals

February 27, 2019 by KimiHarris 2 Comments

These easy methods can produce yummy healthy meals with what you have on hand - and without a formal recipe!

There is a certain lovely rhythm you can fall into in the kitchen that lends itself to creating simple meals and snacks with what you have on hand. A pinch of this, a handful of that, some leftovers, and a pot of beans, and dinner is served.

While I continue to experiment with some new recipes to bring to you at The Nourishing Gourmet, I wanted to share some of my “un-recipes,” or methods that are so simple, and pliable to what you have on hand, that an exact recipe is not needed.

I will link to some easy recipes as well, to get your thought process going. But I find that a well-stocked kitchen can often supply delicious meals without a recipe and just a dash of creativity.

You will notice that some of these snacks and easy meals are inspired by the books I read as well.

Bed of Greens + random bits and pieces
Cover a plate with fresh greens of choice (I use the baby salad greens), and top with leftovers such as shredded meats, cooked grains, chilled vegetables, leftover (or canned) beans, fresh vegetables, and top with dressing of your choice (here are 8 of my favorite dairy-free salad dressings). Other options: Canned fish, fried egg, boiled eggs, diced, homemade croutons (fry diced older bread cubes in a pan with melted butter and olive oil and salt and pepper).

I’m amazed at the delicious meals I am often able to make using just the little bits and pieces of leftovers used over salad greens.

Nutritious Smoothies
If you keep frozen fruit in the freezer, it’s easy to whip up a last minute meal or snack. Add salad greens for vegetables, or cucumber or zucchini. Use banana or some juice to sweeten it. Add protein by using white beans, collagen powder, or a spoonful of nut butter (like in this recipe )

Easiest soups ever
If you have broth, you can make a soup with leftovers or pantry items. For example, many soups can be created with a few vegetables, and some eggs (egg drop soup [PDF file]is one of my favorites!).

Or heat broth and add leftover vegetables, rice, and diced meat. Or saute vegetables, add broth, and then add some leftover pasta and meat. There are as many variations as you can imagine! If your broth is homemade and flavorful (just salt it well!), you can get away with adding less to it, and it still being delicious.

Apples and Cheese or Apples and Nut/Seed Butters
This makes a light meal or a snack. Slice apples and cheese, and enjoy. Or slice apples and serve with your choice of nut, peanut, or seed butter. (We love this DIY Maple Pumpkin Seed Butter too).

Celery Stick and Peanut butter or nut/seed butter
You know the drill, slather celery sticks with nut butter of choice, and top with raisins, if desired. If you want to get even fancier, there are other versions as well according to Google.

Swedish Rye Bread and Cheese
Weston A Price noted that Swedish villagers used dark rye bread and a large slab of grass-fed cheese (about the size of your hand) for meals. When both the bread and the cheese are using nutrient-dense ingredients, you get a surprising amount of nutrients in such a simple meal. It’s important to remember that people in the past didn’t have time to make elaborate meals, but their bread and cheese were often more nutrient dense because of the ingredients and methods they used to produce them. (Grilled cheese is also delicious, and to make it more “grown-up” you can always add grilled onions or vegetables, or serve with a soup or salad on the side). Our kids also love quesadillas!

Stuffed Avocados
Slice an avocado in half and fill with egg salad, top with sliced boiled eggs, or tuna or chicken salad. Yum!

Japanese Avocados
This is a favorite from my husband’s childhood. Follow the recipe once, and never need it again!

Open-faced sandwiches
I love this Norwegian tradition. Use hearty sliced bread (I use gluten-free) and serve with leftover sliced meats, hard-boiled eggs, butter, sliced cucumbers, and radishes, baby greens, leftover cooked fish + whatever you have on hand, or want to use! People can make their sandwiches as they like it. You can even put out lettuce cups for those not eating grains or use a paleo bread.

This easy dish makes a wonderful and flavorful frugal main dish that is paleo and AIP friendly too! Serve it over desired carbohydrate (AIP - think cauli-rice or sweet potato). -- The Nourishing Gourmet

Skillet Meals
Again, using leftovers, you can create excellent meals. Fry up leftover rice or quinoa into fried rice/quinoa. Use diced meats, frozen peas or corn, or saute up some vegetables and then add pre-cooked ingredients to the pan. Read, The Art of Skillet Dinners, for more ideas, including some grain free options.

Fried Bread (inspired by James Herriot)
James Herriot, in one of his beautiful books, talks about his wife making him fried bread to bring along when he was driving to visit a farm in his veterinarian duties. It makes a delicious snack! Basically, you pan-fry a slice of bread in butter, olive oil, or bacon grease, and serve nicely browned, while warm. Top with sandwich makings, if desired, or enjoy as is! This is like toast, but better.

Eggs in a Million Ways
Eggs are the perfect fast food. Scrambled, fried, boiled, soft-boiled, and on. Serve it for dinner along with sausage and toast, and everyone is happy. One easy recipe – Simple Deviled Eggs.

Grain “Puddings”
This makes an easy and delicious snack (or dessert!). Use leftover cooked and chilled grains such as rice, quinoa, buckwheat, or oats. Cover with milk of choice, lightly sweeten with sweetener of your choice (pure maple syrup is delicious), dust with cinnamon, and then serve cold or warm.

Sliced leftover meats with veggies, cucumbers, or baked goods
Put out a platter of leftover sliced meats (like pot roast, which is delicious cold), serve with cucumber slices and carrots and red bell pepper slices, and toast, muffins, or biscuits (biscuits are easy to make last minute!).

Leftover Baked Potatoes or Sweet Potatoes
I always try to make extra when we have these for dinner (see how to make sweet potatoes in a slow cooker here), and then I can quickly reheat them and serve with butter and salt and pepper, or stuffed with cheese or sour cream, or diced meats or leftover shredded beef. I also make roasted sweet potatoes rounds on a regular basis (another recipe where you really only need to use the “recipe” once or twice, before you have the method down).

Filed Under: 52 ways to save money on a healthy diet, For the Love of Food and Books, Nourishing Frugal Recipes, The Low Energy Guide to Healthy Cooking

Lemon Apple or Raspberry Banana Green Monster Smoothie (and 5 Reasons to Drink Green Smoothies)

March 6, 2018 by KimiHarris 7 Comments

Why Green Smoothies are so healing, and how to enjoy them on a regular basis.

These healing smoothies are stuffed full of greens, and antioxidant-rich berries and lemons. They are especially for those bringing healing foods into their diet. I love them! Full fat coconut milk makes it creamy and delicious, but it also helps aid in the absorption of nutrition (Read: Fat and the absorption of vitamins). I personally love the flavor of lemon in the Lemon Apple smoothie, and it helps balance any bitterness from the greens. Plus, read about all of the health benefits of lemons here. Healing smoothies like these have been an important part of my diet since I got sick months ago, and I definitely felt the lack when I tried cutting them out.

I find that green smoothie drinking is somewhat frowned upon in the real food, slow food, Nourishing Traditions crowd. It’s true that smoothies weren’t available to our ancestors, but I have no problem using a blender if it will help me heal and energize me!

Here are five reasons that you might want to consider including them into your routine. Just remember that we are all unique, and you should add in what works best for you.

Green smoothies up your vegetable intake

I have long known that I feel significantly better when eating a lot of vegetables. The Wahls protocol has also inspired me to get a lot of produce into my daily diet. But I’m not going to lie – It can be hard to consume the amount that makes me feel best. This is especially true when you are healing or deal with chronic health issues. But it’s also true for those of us with busy lifestyles, work schedules, or kids! Consuming lots of greens in your smoothies is an easy way to enjoy the benefits of a high vegetable diet. 

Help you consume antioxidant rich berries

Blueberries, wild blueberries, and raspberries are easily accessible and offer a lot of antioxidant support. This is so important for fighting inflammation and it’s best to get antioxidants from food not supplements (read more why here PDF). They also add fiber and nutrition and are wonderful foods to keep in your diet on a regular basis. The lemon apple smoothie offers support through the lemon and apple too.

Green smoothies are FAST

I love the slow food movement, and I have a chicken slowly roasting over a bed of vegetables in my oven right now, but I love foods that are fast too. I recognize that I need fast things at least sometimes, and you probably do too.

Green smoothies are easy to digest

As many have experienced with Lyme disease, or mold exposure, and many other gut disturbances, digestion can be easily upset. Some find that they have to only consume well cooked vegetables. In my case, I also find smoothies are especially easy on my stomach. It’s been a huge blessing for me during months when everything I ate felt heavy in my stomach – with the exception of smoothies.

Green smoothies can be enjoyed on the go

And by the go, I don’t just mean taking them in the car. I like that I can be sipping on my smoothie slowly while helping a child with homework, or doing housework. I think we overall do need to slow down and eat slowly. But for someone like me, I’m thankful I can sip my way through my smoothie in my own time.

Tips for these recipes:

  • When you need a lot of extra nutrition, you can make a double portion, put most of it in a eight cup mason jar in the fridge, and enjoy it slowly throughout the day. Most days I fill my Vitamix container to the top with greens.
  • This is a STRONG green drink at the full amount of greens. Play around with what you personally tolerate.
  • Make it sweeter by using some apple juice, cut down on the greens if they are too strong for you, or try more mild greens like baby lettuce.
  • I do use a high powered blender (I recently switched to the Vitamix and love it!). You can also use a regular heavy duty blender, but you will likely have to adjust the recipe a bit (more liquid, less to blend, etc).
  • You can precook certain greens, as desired, and then freeze them in an ice cube tray instead of using raw. (You can read more about this issue here). I personally have decided not to worry about it too much and just rotate my greens.
  • For best taste, or if you are using nonorganic lemons, you can peel the lemon before slicing. Also, do this if you aren’t using a high powered blender.

Ingredients:

    • I love using this coconut milk or coconut cream.
    • Organic vanilla extract
    • For added protein, you can add this gelatin.

Lemon-Apple Green Monster Smoothie

PDF for printing

  • 2-4 cups of greens of choice (I rotate through baby spring mix, “power mixes” of greens, and spinach)
  • 1 large apple, cored, and cut into pieces.
  • 1 slice of lemon (seeded, and peeled, see notes above).
  • 1 cup of liquid + more as needed (I usually mix coconut cream or full fat coconut milk with water for this, or have used coconut water and/or kombucha, which also adds sweetness. Apple juice or part apple juice would make this a lot sweeter, but use in moderation. You can also add a half or whole banana, which does change the taste.)
  • 1 teaspoon of vanilla extract, optional
  • 2 handfuls of ice

Add all of the ingredients to a high powered blender, and blend until frothy and smoothie. Scrape down the sides and add more liquid as needed. Make sure that the texture is smooth!

Enjoy

Raspberry-Banana Green Monster Smoothie

  • 2-4 cups of greens of choice (I rotate through baby spring mix, “power mixes” of greens, and spinach).
  • ½ cup of frozen raspberries
  • ½ – 1 frozen banana (or fresh)
  • 1 cup of liquid + more as needed (I usually mix coconut cream or full fat coconut milk with water for this, or have used coconut water, which also adds sweetness. Apple juice or part apple juice would make this a lot sweeter, but use in moderation.)
  • 1 teaspoon of vanilla extract, optional
  • Small handful of ice

Add all of the ingredients to a high powered blender, and blend until frothy and smoothie. Scrape down the sides and add more liquid as needed. Make sure that the texture is smooth!

Enjoy

Disclosure: Some links are affiliate. 

Filed Under: AIP, Beverages, Dairy Free, Egg Free, Gluten Free, Grain Free, Health, The Low Energy Guide to Healthy Cooking, Vegan, Vegetarian

Turmeric Bombs (for Golden Milk and Golden Sipping Broth)

February 16, 2018 by KimiHarris 10 Comments


This project takes about five minutes to make. These turmeric bombs are full of anti-inflammatory spices, and they make it easy to get a lovely cup of Golden Milk or Golden Sipping Broth on a daily basis. Yay for a simple way to enjoy the benefits of these beautiful spices!

To make it hassle-free, I use silicone molds (this one) to make them. I tried just pouring the whole mixture into a small container and cutting off pieces to use, and it was not effective.

Turmeric gets a lot of attention for its possible benefits. According to the University of Maryland, “Turmeric (Curcuma longa) has been used for 4,000 years to treat a variety of conditions. Studies show that turmeric may help fight infections and some cancers, reduce inflammation, and treat digestive problems.” (Read more here).

For similar reasons my doctor has me consuming turmeric on a regular basis as well as taking a supplement.

This recipe helps you absorb turmerics active properties. The included oil, ginger and black pepper all work together to help your body benefit from turmeric. Heat is also helpful for absorption, so this recipe lightly heats the spices (and then it’s heated a second time later when you use it in a recipe)!

I have simple instructions below for using turmeric bombs for making Golden Milk or Golden Sipping Broth, but I’ve also added turmeric bombs to a simple stir-fry or you can even add them to a bowl of soup! One note: This does have a fair amount of coconut oil in them. Some people experience digestive distress when they first add coconut oil into their diet. So take it slow if you are new to it!

Supplies:

    • silicone mold
    • turmeric powder
    • ginger powder
    • black pepper
    • coconut milk or coconut cream
    • coconut oil

Turmeric Bombs

Printable PDF download

Ingredients:

  • ¼ cup of coconut oil
  • ¼ cup of turmeric
  • 1 tablespoon dried ginger
  • 1 teaspoon black pepper

Instructions:

In a small pot or saucepan, melt the coconut oil over low heat until mostly melted. Add the spices, and stir to combine with a whisk. Let heat for about 15 seconds or so, and then remove from the heat.

Place the silicone mold on something flat such as a sheet pan. Using a spoon or heat-safe spatula as needed to scrap the spices off the bottom of the pan, spoon the mixture into the silicone mold (I use 1 teaspoon molds).

Put in the refrigerator or freezer until solid. Pop the turmeric bombs out, and place in a jar.

Keep in the refrigerator (should keep for a long time).

Golden Milk Using Turmeric Bombs

Heat 1 cup of milk of choice (I use a combination of coconut cream and water) with 2 teaspoons of honey and a splash of vanilla extract. Add 1 turmeric bomb once the milk is warm and whisk to combine once it’s melted.

Golden Sipping Broth Using Turmeric Bombs

Heat 1 cup of chicken broth. Add 1 turmeric bomb (or 2), 1 tablespoon of coconut cream (optional) and salt and pepper to taste. Whisk and serve.

Some links above may be affiliate links. 

Filed Under: Beverages, The Low Energy Guide to Healthy Cooking

« Previous Page
Next Page »

Primary Sidebar

ConvertKit Form

Get Every Recipe

And the insider's view from our kitchen

Success! Now check your email to confirm your subscription.

There was an error submitting your subscription. Please try again.

We won't send you spam. Unsubscribe at any time. Powered by ConvertKit

Follow Me

  • Facebook
  • Google+
  • Instagram
  • Pinterest
  • RSS

Search

Please Read:

The information you find here at The Nourishing Gourmet is meant to help you become a better cook! This site is primarily for sharing family friendly recipes. It's not meant to give medical advice or to make any health claims on the prevention or curing of diseases.This site is only for informational and educational purposes. Please discuss with your own, qualified health care provider before adding in supplements or making any changes in your diet. Also, any links to sponsors or affiliates (including Amazon) may give me a percentage of the sale or a pay per click. Thank you for supporting this site.

Categories

  • $10 Main (42)
  • $5 Dishes (43)
  • 52 ways to save money on a healthy diet (53)
  • AIP (23)
  • Baked Goods (83)
  • Beverages (72)
  • Breakfast and Brunch (61)
  • Condiments (8)
  • Dairy Free (492)
  • Desserts (184)
  • Dietary Needs (6)
  • Egg Free (11)
  • Egg Free (86)
  • For the Kids (66)
  • For the Love of Food and Books (18)
  • Gluten Free (484)
  • Grain Free (95)
  • Health (75)
  • Kitchen Tools (4)
  • Main Dishes (126)
  • Nourishing Frugal Recipes (167)
  • Nourishing Frugal Tips (70)
  • Nourishing Practices (56)
  • Nutrient Dense Foods (70)
  • Q and A (15)
  • Salads (39)
  • Sides (101)
  • Snacks (124)
  • Soups (50)
  • The Healthy $1 Menu (21)
  • The Low Energy Guide to Healthy Cooking (18)
  • THM (2)
  • Trim Healthy Mama (2)
  • Uncategorized (846)
  • Vegan (241)
  • Vegetarian (361)

Recent Posts

  • 2 Ingredient Peppermint Bark
  • Herbal Hibiscus Lemonade (Keto, THM)
  • Creamy Curry Red Lentil Soup
  • One-Pot Gluten-Free Mac and Cheese
  • Healthy Pumpkin Spice Granola
  • Crispy Pumpkin Spice Granola (oil-free)
  • Why I Use THM Principles Now
  • Vietnamese Beef Noodle Salad
  • Coconut Flour Pancakes
  • Instant Pot Mexican Shredded Chicken

Recent Comments

  • Dorene St G on Cracker Toffee (Easy Peasy Christmas Candy)
  • Nadia Kriston on Finding a Toaster Oven Without Nonstick
  • KimiHarris on How to make heavenly coconut milk whipped cream (with an isi dispenser)
  • KimiHarris on Autumn Beef Stew (Tomato Free)
  • KimiHarris on How to make heavenly coconut milk whipped cream (with an isi dispenser)

Fresh: Nourishing Salads for All Seasons

Get Every Recipe

And the insider's view from our kitchen

Success! Now check your email to confirm your subscription.

There was an error submitting your subscription. Please try again.

We won't send you spam. Unsubscribe at any time. Powered by ConvertKit

Footer

Privacy

Copyright © 2023 · Foodie Pro & The Genesis Framework