Years ago I started the practice of drinking lemon water in the morning before I ate. The habit didn’t stick for my morning routine, but I’ve been enjoying drinking lemon water in recent years throughout the day.
I’ve long found the habit helpful when I was starting to catch a virus, but more recently I’ve had several Lyme patients mention to me that they feel better when drinking plenty of lemon water – especially when they are experiencing the dreaded “die-off” effect.
One simple reason we may experience this is because lemon water adds a small amount of minerals and vitamins to water, and helps replace electrolytes. I’ve found that I feel hydrated faster with lemon water in comparison to plain water. Sometimes I add a pinch of sea salt too.
But there may be more benefits than just simple hydration. Lemon juice is a source of vitamin C and flavonoids which could both offer benefits. I’ve personally found supplementing with vitamin C helpful, but lemons are an excellent source of vitamin C in their whole food form.
Here is some information on citrus flavonoids and other citrus benefits, and another study on the nutritional properties of citrus. A Japanese study found a positive correlation to lowering blood pressure in walking and lemon ingestion, and a study on mice found that lemon juice was helpful in protecting the liver from alcohol injury.
One of the (many) reasons the Mediterranean diet is thought to be so healthful is because of their abundant citrus in the diet. This quote from the research, “Citrus as a Component of the Mediterranean Diet” gives a good idea of the nutritional power of citrus as a whole.
“Citrus fruits have well-documented nutritional and health benefits. Since ancient times that citrus has been used not only as food but also in folk medicine to treat some complaints: bronchitis, tuberculosis, cough, cold, menstrual disorder, hypertension, anxiety, depression and stress (Favela-Hernández et al., 2016). They can actually help preventing and curing some diseases and, above all, they are essential in a balanced and tasty diet. Citrus fruits do not possess sodium, fat and cholesterol, but are sources of several minerals (potassium, calcium, phosphorus, magnesium, copper), vitamins (C, B1, B2, B3, B5, B6, B9), dietary fiber and secondary phytochemicals (carotenoids, phenols, including flavonoids, coumarins, limonoids, alkaloids and essential oils) which alone or in combination have been referred as being able to prevent inflammation, degenerative diseases, heart disease and even cancer (Ejaz et al., 2006; Lv et al., 2015).Potassium not only helps to maintain the body’s water, acid balance and normal pressure, but also is important in transmitting nerve impulses to muscles as well as in the muscle contraction (Economos & Clay, 1999). Vitamin C plays a key role in the absorption of inorganic iron; which can aid in the treatment of anaemia provided that adequate medicines are also administered. This vitamin is also important in the formation of collagen. A deficiency of this vitamin is responsible for the weakness of those tissues in which collagen is an essential element (ligaments, tendons, dentin, skin, blood vessels and bones). ” Read more: Citrus as a Component of the Mediterranean Diet (PDF Download Available). Available from: [accessed Jan 25 2018].
Crystal over at MoneySavingMom.com has talked about how she drinks an entire gallon of lemon water every day and that it made a huge difference in her health and energy. She’s not alone in experiencing positive effects – though not everyone chooses to drink quite that much lemon water.
I do know that I feel better drinking it, so I have continued the habit. I don’t argue with success!
Tips for Lemon Juice Consumption:
Morning Cup of Lemon Juice Tea: In a cup of warm/hot water, squeeze half of a lemon and stir in honey to taste. (Some add cayenne pepper as well). Drink in the morning before breakfast.
Pre-make Lemon Water for the Day: Whether you are aiming for eight cups or a gallon of water, you can premake your lemon juice for the day. I use about 4-5 tablespoons of lemon juice per eight cups (it doesn’t need to be exact).
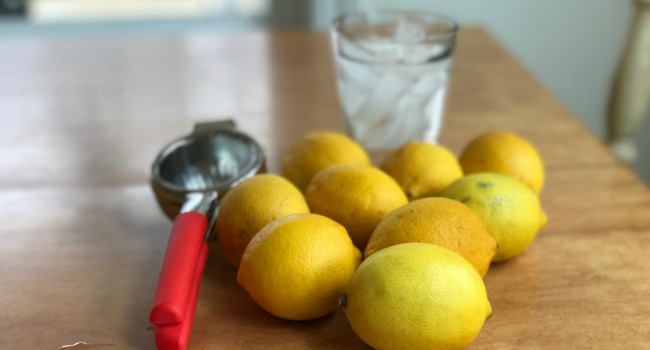
Drinking it Freshly Squeezed: I often like to squeeze a half of a lemon in a glass of water as I’m thirsty throughout the day. To make this practical see my notes below about my lemon squeezer.
Hot Lemon Mint Tea: I also make this Lemon Mint Tea, that uses a whole lemon, peel and all.
In Smoothies and Juices: I also enjoy adding a small wedge of lemon (seeded, but peel left on) to my smoothies and juicing it with veggies. (When using lemon peel make sure you are using organic lemons and wash them well.)
Hand Juicer I Love: I got tired quickly of hand squeezing lemons or using inadequate lemon juicers. My husband got me this lemon juicer (pictured above), and it is amazing! It gets all of the lemon juice out easily, and also doesn’t put stress on my hands. (Make sure you use it correctly. The lemon half goes in “backward” so that it is turned inside out as it is squeezed.)
Vanilla Lemonade: If you aren’t used to the sourness of lemon water, you can use vanilla stevia to sweeten it. Vanilla lemonade is good!
Bottled Lemon Juice: If you would like to use bottled lemon juice instead of fresh, choose glass if you can. This organic lemon juice is a great choice. Not only will you avoid plastic chemicals, but it will also have more stable vitamin C in it according to this research, “Regarding packing material, vitamin C in fruit juice is quite stable when stored in metal or glass containers, whereas juice stored in plastic bottles has a much shorter shelf-life. ”
Don’t brush your teeth directly after drinking any citrus juice (wait at least 15 minutes). I also like to swish ph neutral water in my mouth afterwards to protect my teeth.
What about you? Have you found lemon water helpful?
Some links above may be affiliate links.