• Skip to primary navigation
  • Skip to main content
  • Skip to primary sidebar
  • Skip to footer

The Nourishing Gourmet

Nourishing. Satisfying. Gourmet.

  • About
    • Privacy
    • Contact
  • Recipes
  • Cookbooks
    • Everyday Nourishing Food
    • Salad Cookbook
    • Soup Cookbook

Alison Diven

15 Freezer Burrito Hacks for Nourishing Cooks + Goat Cheese-Green Chile Breakfast Burrito Recipe

June 11, 2014 by Alison Diven 24 Comments

15 Freezer Burrito Hacks for Nourishing Cooks: Wrap & Roll Tutorial (No Plastic!) + Hacks for Allergies, Budget, Speed, and More
By Alison Diven, Contributing Writer

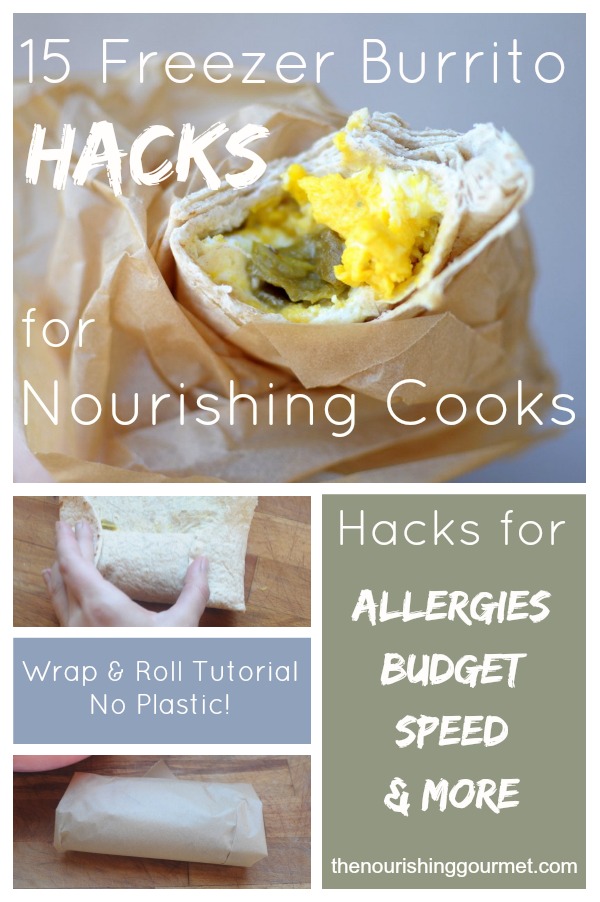
Burritos just the way you like them whenever you like them, in minutes. No additives,no plastic, , no iffy oils—just nourishing goodness for no-brainer breakfasts or dinners. Can you tell I love homemade freezer burritos?!

Since I started experimenting with them, my husband has devoured a hot and hearty breakfast every morning with zero fuss, leaving him extra space for his 5 a.m. coffee ritual before work.  He just pops one into the toaster oven to heat while he dresses.

And I, queasy pregnant mama, have an easy lunch or snack for those days when nothing sound good, and I’ve already spent all my energy scrounging for food my toddler deigns to eat.

You know what I mean. Whether you’re tending to babies, stocking the freezer for postpartum life, carting teens around, or just plain busy, we all need convenience food sometimes. These knock the nutritional socks off Evol and Amy’s burritos, can meet your special dietary needs, and are far cheaper to boot.

Wanna know how I’m making it work? Here are 15 freezer burrito hacks to get you started—including ideas for allergy and budget needs—plus my favorite breakfast burrito recipe to inspire you: eggs, goat cheese, and green chiles. You’ve gotta try this killer combo!

Essential Success Hacks

1. Cool all fillings to room temperature or colder before filling burritos. Steam=soggy tortillas. (Thanks to TheKtchn for this tip!)

2. Warm tortillas to room temperature or until they’re pliable for less cracking and breaking, then roll like this:
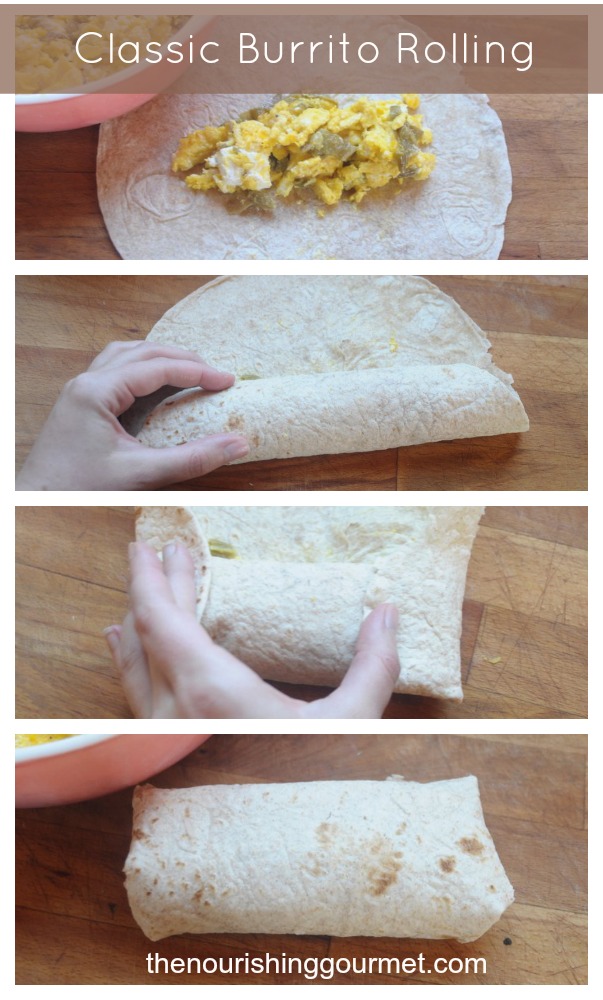
Classic Burrito Rolling

3. Go easy on wet ingredients like salsa and sauces. Drain extra fluids off sautéed vegetables.

4. Wrap your burritos first in parchment paper, then in foil, then in gallon size freezer bags. They’ll last for months this way and are oven-safe, but you’ll never have questionable materials touching your food. Like so:
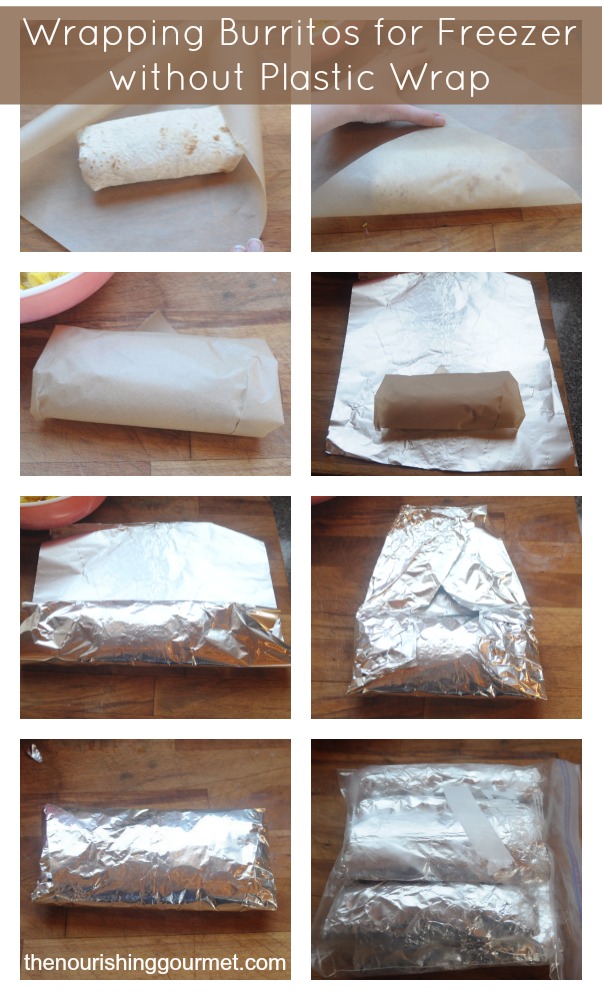
Wrapping Burritos for Freezer without Plastic Wrap.jpg

Time-Saving Hacks

5. Mix all filling ingredients together in a single bowl. Any sacrifice in presentation is worth the faster assembly. Plus, you won’t prematurely run out of an ingredient. (Hats off to Tammy’s Recipes for this awesome tip.)

6. Use store-bought tortillas, but check ingredient lists. In my current season of fatigue, this is my biggest shortcut. I’m fortunate to have locally-made organic wheat tortillas at my fingertips, and I’ve chosen Rudi’s Gluten Free Tortillas for my gluten, dairy, egg, and soy-free son.(Kimi notes: We are also a gluten-free family. Rudi’s probably has one of the nicest textures, but it does contain corn products in it for those sensitive. You could also use (affiliate links) these brown rice tortillas , or these these multi-grain gluten-free tortillas).

7. Bake your scrambled eggs in the oven if you’re making a giant batch of breakfast burritos. They can cook and then cool while you attend to other tasks. See this method.

8. Slow-cook chicken, beef roast, or pork roast the day before for hands-off shredded meat. I do it like this.

9. Make just one flavor variety per burrito prep day and keep it simple, only 2-4 components. You’ll dirty fewer dishes and streamline the whole process.

Allergy Hacks

10. Gluten-free or grain free? Don’t despair! GF people can choose non-GMO corn tortillas (blue corn or organic are sure bets), store-bought GF tortillas, or even better, homemade options like these nutrient-dense soaked buckwheat wraps or these egg-arrowroot paleo wraps. The last recipe is grain-free too, high protein, quick, and wraps beautifully with zero cracking.

11. Egg-free? Wheat tortillas, like Katie’s soaked ones, corn tortillas, or Rudi’s Gluten Free are good choices.

12. Dairy-free is a piece of cake. Almost any tortilla will meet this criterion, and then it’s up to you to leave dairy out of your fillings.

*NOTE: Many of these alternative tortillas are more prone to cracking (except the egg-arrowroot paleo wrap), so fold like this instead:
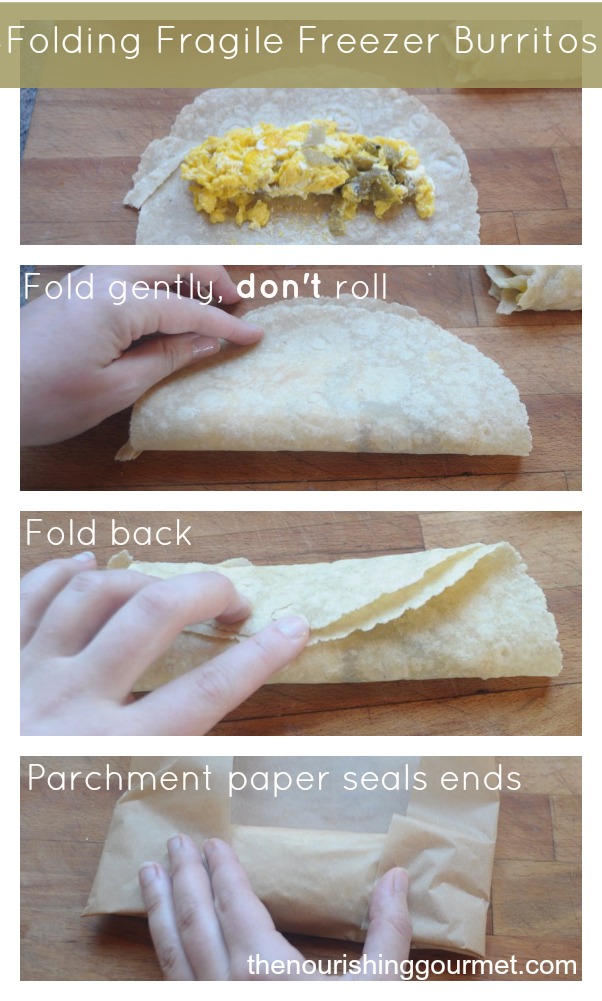
Folding Fragile Freezer Burritos.jpg

Frugal Hacks

13. Use thrifty ingredients like yard eggs, rice, home-cooked beans, or diced potatoes to stretch indulgent items like grass-fed beef, pastured pork sausage or bacon, and cheese.

14. Go pungent with your cheese—think sharp cheddar or goat cheese—so you can use less. Also, check out Costco.. We often get fabulous imported, grass-fed cheeses for much less there.

15. Make your own tortillas. Here’s a soaked whole wheat recipe, Natalia offers a gluten-free buckwheat wrap here, and I can heartily recommend this grain-free paleo wrap.

And now, on to my very favorite breakfast burrito, inspired by Albuquerque’s fabulous Grove Cafe & Market.

Goat Cheese-Green Chile Breakfast Burritos.jpg

Goat Cheese-Green Chile Breakfast Burritos
 
Author:
Alison Diven
Recipe type: Breakfast
Cuisine: New Mexican
Serves: 6
Print
 
These creamy dreamy Southwest burritos will spice up your mornings! Prepare them for a quick fresh treat or freeze a double batch for later (see blog post for details). Select tortillas according to your allergy or dietary needs (again, many ideas in the blog post). You can find New Mexico, or "Hatch," green chiles frozen in many grocery stores or fresh in late summer. Or, substitute sauteed poblano peppers. It'll still be spectacular! A little sausage wouldn't go amiss either.
Ingredients
  • 12 pasture-raised eggs
  • ¼ cup grass-fed butter (we love Kerrygold)
  • ¼ teaspoon salt
  • ¼ teaspoon freshly-ground black pepper
  • 8 ounces soft goat cheese (chevre), separated into chunks
  • ¾ cup chopped roasted New Mexico green chiles, without seeds
  • 6-10 tortillas, depending on size
Instructions
  1. Heat butter in a large skillet on medium-low heat. Gently scramble eggs until soft set, sprinkling with salt and pepper.
  2. Gently warm tortillas.
  3. For a pretty presentation, layer scrambled eggs, goat cheese, and green chiles in tortillas and wrap.
  4. For speed, gently mix goat cheese and chiles in scrambled eggs and divide among tortillas.
  5. Enjoy!
3.2.2700


Filed Under: $10 Main, Breakfast and Brunch, Dairy Free, Gluten Free, Main Dishes, Nourishing Frugal Tips, Vegetarian

Cook Once, Eat Thrice with a Slow Cooker Beef Roast (GF & DF-Adaptable)

May 13, 2014 by Alison Diven 11 Comments

Cook Once, Eat Thrice.jpg

By Alison Diven, Contributing Author

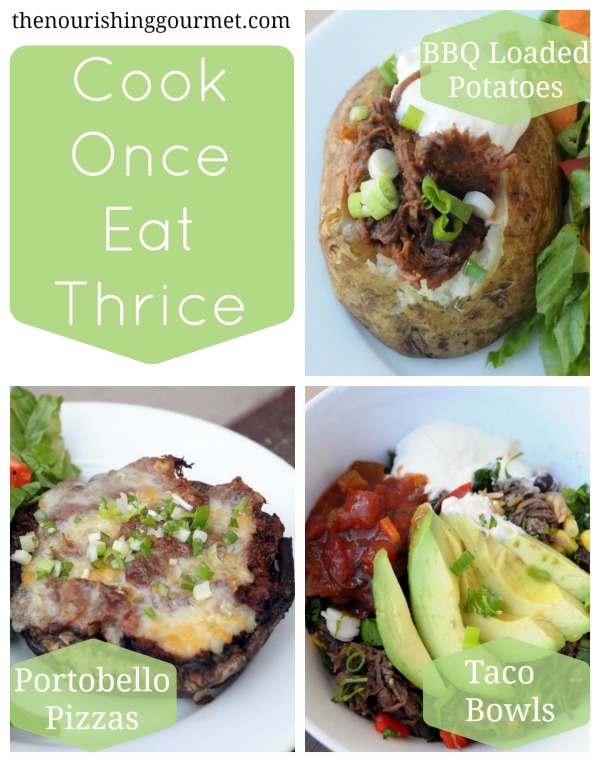
Are you having one of those weeks? Do you need an action plan for a few days of no-stress, family-pleasing, yet healthful meals? After multiple rounds of illness in our household, I sure do! Picture this: cook (very) simply tomorrow night, then have the next two nights virtually off, while enjoying 3 different dinners—BBQ loaded baked potatoes, deluxe taco bowls, and portobello mushroom pizzas.

We’re following this plan ourselves right now, and it’s such a relief. The flavors are familiar, the cooking simple, and I know we’re all still eating healthy meat, nourishing fats, and even vegetables. For a pregnant mama coddling a sick toddler and exhausted husband, this is very good news, indeed.

It all starts with slow cooking a beef roast, then shredding the meat and seasoning it three simple ways. First, it gets smothered in BBQ sauce atop baked potatoes with all the fixings and a side salad. Then, it joins fresh vegetables, beans, and rice with salsa and sour cream for a Tex-Mex treat. Finally, it meets Italian herbs, portobello mushrooms, and cheese (if you like) for a quick broil, with leftover side salad. Simple and satisfying.

It’s a fabulous way to stretch an already affordable cut of beef, and without a single complaint about leftovers. I’ve written the instructions for a family of 4, but it would also work for a family of 6 without using a bigger roast; just scale up the other ingredients. For those on a no-dairy diet, it’s easy to leave out the cheese, sour cream, and butter.

Because I’m so intimately acquainted with the brain fog that comes with challenging seasons—first trimester, anyone?—I’ve made this plan as user friendly as possible. You’ll find a printable shopping list and explicit step-by-step instructions for each night. So just print and go, girl! You can do this.

Recipe Notes

  • Because my goal is ease, I call for store-bought BBQ sauce and salsa, canned beans, and an optional box of baby greens. You’ll want to look for ingredient lists that are free of GMOs, corn syrup, yucky food additives, and your family’s allergens. Of course, you’re welcome to make your own and save money that way! Kimi notes: I keep (affiliate link) Eden’s beans on hand for recipes such as this. It’s cooked with kombu, a nutritious seaweed that makes them digestible. 
  • The one condiment I do call for making at home is salad dressing. It’s just SO easy and far superior (and cheaper) to what’s available even in health food stores, especially the fats, which are important to me.
  • A whole chicken or pork shoulder would be excellent substitutes for the beef pot roast. The flavors will still work beautifully.
  • I always recommend grass-fed beef and dairy products, when possible. Not only are they healthier for you, the cow, and the planet, they often just taste better. You won’t believe the magic grass-fed beef, slow cooking, and salt and pepper make together! Be sure to save the bones and extra cooking liquids for your next batch of bone broth.
  • If you end up with leftover odds and ends, you can mix and match them to make a couple of fabulous breakfast frittatas or omelets.

Shopping List & Recipes

Click to download the Cook Once, Eat Thrice Shopping List PDF. You’ll also want to print all three step-by-step recipes below.

Cook Once, Eat Thrice Night #1: BBQ Loaded Baked Potatoes
 
Author:
Alison Diven
Cuisine: American
Serves: 4
Print
 
Cook once today and enjoy ultra easy meals for two more nights. The simple tasks for today include 1) slow cooking the beef roast, 2) baking potatoes, 3) cooking rice, 4) seasoning the beef, 5) preparing a simple salad and dressing, and 6) assembling tonight's dinner. Tasks 1-5 can be fit in at any time of day, as you have time. Total active time is less than 30 minutes!
Ingredients
For the Meat
  • 3 lbs bone-in beef pot roast, preferably grass-fed
  • 1½ to 2 teaspoons sea salt
  • 1 teaspoon freshly ground black pepper
  • ½ cup BBQ sauce, plus more to taste
  • ½ teaspoon ground cumin
  • ¼ teaspoon dried oregano
  • ¼ teaspoon crushed red pepper flakes
  • 1 Tablespoon tomato paste
For the Rice
  • 1½ cups rice, white or brown
  • water or broth as directed by package or rice cooker
  • 1 teaspoon salt
  • 1 teaspoon chili powder
For the Salad (Nights 1 & 3)
  • 1-2 heads lettuce OR 1 large box baby greens
  • Your favorite salad vegetables, like carrots & celery or tomatoes & cucumbers
  • 1 cup extra virgin olive oil
  • ⅓ cup raw apple cider vinegar
  • 1 tablespoon Dijon mustard
  • salt and pepper to taste
For Baked Potatoes
  • 4 large baking potatoes, preferably organic
  • 2 tablespoons extra virgin olive oil
  • 1 bunch green onions, sliced
  • 4 ounces cheddar cheese, shredded (optional)
  • Butter for serving (optional)
  • Sour cream for serving (optional)
Instructions
  1. Cook meat. In the morning, place the roast in the slow cooker and sprinkle salt and pepper on top. Cover and cook on low for about 8 hours, until very tender and “shreddable.”
  2. Bake potatoes. 1-1/2 hours before dinner, turn the oven to 400. While pre-heating, scrub potatoes, pat dry, prick skin, and rub with olive oil. When oven is hot, place potatoes on a cookie sheet and bake for 50-60 minutes, turning over midway, or until the flesh is soft when tested with a fork.
  3. Cook Rice. Meanwhile, cook rice according to package or rice cooker directions, adding salt and chili powder before cooking. Place cooked rice in storage container and refrigerate.
  4. Flavor meat. When meat is done, remove meat to large bowl and shred with two forks. Spoon some of the cooking juices into the meat to moisten it. Put one third of the shredded meat into a small saucepan, one third into a storage container, and one third into another storage container. To the saucepan, add ½ cup BBQ sauce and set aside. To the first storage container, add ½ teaspoon cumin and combine. Cover and refrigerate. To the second storage container, add ¼ teaspoon oregano, ¼ teaspoon crushed red pepper flakes, and 1 tablespoon tomato paste. Combine, adding more cooking juices as needed to incorporate tomato paste. Cover and refrigerate.
  5. Prepare salad and dressing. Wash and cut up vegetable toppings. Set aside. Combine 1 cup olive oil, ⅓ cup apple cider vinegar, 2 tablespoons Dijon mustard, etc and emulsify with whisk, blender, or immersion blender. Add salt and pepper to taste. Set aside.
  6. Assemble Meal. Warm BBQ sauce and meat reserved in saucepan. Slice green onions. Serve potatoes topped with butter, BBQ beef, sour cream, shredded cheese, and green onions. Serve ½ the salad greens topped with ½ the vegetable toppings with the homemade salad dressing.
3.2.2499

Cook Once, Eat Thrice Night #2: Shredded Beef Taco Bowls
 
Author:
Alison Diven
Cuisine: Mexican
Serves: 4
Print
 
If you followed the plan for Night #1, you'll have dinner on the table in 15 minutes tonight! Be sure to save any leftover vegetables and toppings.
Ingredients
  • Prepared cumin-flavored beef from Night #1
  • Prepared rice from Night #1
  • 1 can black, pinto, or kidney beans
  • ½ cup frozen organic corn kernels
  • 1 large bell pepper
  • 2 medium tomatoes (if in season)
  • 1 large or 2 small avocados
  • 1 handful cilantro
  • ½ cup salsa
  • ½ cup sour cream (optional)
  • Leftover sliced green onions
Instructions
  1. Rinse and drain beans. Rinse frozen corn in warm water and set aside for a few minutes to thaw. Chop bell pepper, tomatoes (if using), and cilantro. Slice avocados.
  2. Meanwhile, gently warm shredded cumin beef and rice. You can use a single large skillet on low and place the beef on one half and the rice on the other half.
  3. Assemble taco bowls, layering rice, beans, beef, vegetables, avocado, sour cream, and salsa.
3.2.2499

Cook Once, Eat Thrice Night #3: Portobello Mushroom Pizzas
 
Author:
Alison Diven
Cuisine: Italian
Serves: 4
Print
 
Tonight's the last night of the 3-day plan. Enjoy another speedy, delicious dinner that requires only a quick broil to get on the table. Have leftover odds and ends after the 3 days? Most ingredients will go toward an absolutely killer breakfast frittata or omelet tomorrow morning. Have fun!
Ingredients
  • Prepared oregano-tomato shredded beef from Night #1
  • 4 large or 6-8 smaller portobello mushrooms
  • 2 Tablespoons extra virgin olive oil
  • 4 ounces Italian melting cheese (like mozzarella), sheep-milk feta, or goat chevre
  • Leftover chopped bell pepper and/or tomato (optional)
  • Leftover green onions (optional)
  • Leftover salad greens from Night #1
  • Leftover salad vegetable toppings from Night #1
  • Leftover salad dressing from Night #1
Instructions
  1. Set oven to broil.
  2. Gently brush dirt off mushrooms. Cut out mushroom stems. Brush tops (smooth side) of mushrooms with olive oil and place top side up on baking sheet.
  3. Broil mushrooms for 3 minutes, watching carefully to prevent burning.
  4. Turn over mushrooms and spread shredded beef over the shallow cavity. If you have any left over, add chopped bell pepper and/or tomato. Top with cheese.
  5. Broil for 2-4 more minutes, watching very carefully to prevent burning.
  6. Serve immediately alongside salad greens, salad vegetable toppings, and salad dressing. Sprinkle green onions on top, if you have any leftover.
3.2.2499

Looking for More Easy Family Dinners?

Check out these delicious slow-cooker, quick, and one-pot meals:
Shawarma Whole Chicken in the Slow Cooker
Easy Thai Curry Noodle Soup
14 Easy Dinner Recipes (That Are Healthy and Frugal Too!)
Cucumber Tuna Boats
3 Ingredient Teriyaki Pan Fried Chicken (Easiest Recipe Ever!)
Sriracha-Lime Salmon One-Pot Meal

Filed Under: $10 Main, 52 ways to save money on a healthy diet, Dairy Free, Gluten Free, Main Dishes, Nourishing Frugal Recipes, Nourishing Frugal Tips

Vietnamese Bun: Refreshing Noodle Salad with Vegetables, Chicken & Herbs (GF & DF)

April 25, 2014 by Alison Diven 2 Comments


Vietnamese Bun: Refreshing Noodle Salad with Vegetables, Chicken & Herbs (GF & DF)

By Alison Diven, Contributing Author

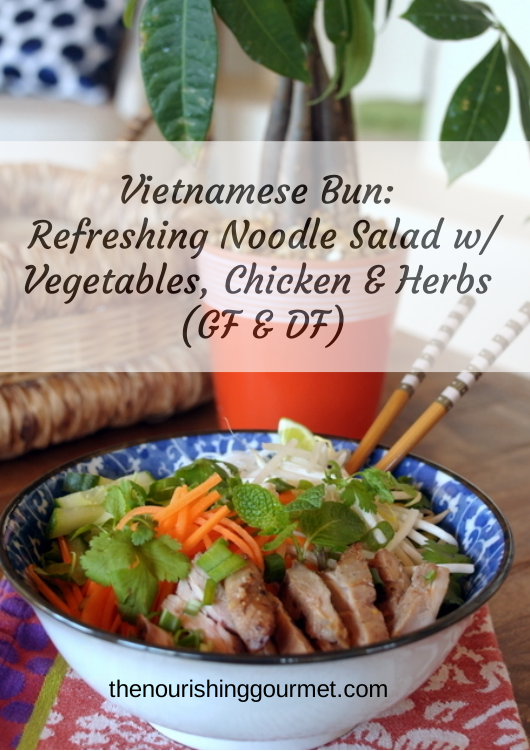
Have you heard it yet, the siren call of spring? Here in northwest New Mexico, the birds are dancing in the junipers, new-green shoots surprise me daily along our pathways, and the very light and air seem re-born. My palate has changed too: I’m ready for all things light, crisp, fresh. Vietnamese bun, a cold noodle dish, showcases the best of spring—tender lettuces, crisp sprouts, sweet carrots, and fresh herbs nestled into silky rice vermicelli and highlighted with a tangy-salty-sweet sauce. Broiled or grilled chicken makes it a complete meal.

This dish is a great incentive to explore farmers’ markets and home gardening. Endless variations can be dictated by what’s available. Fresh-picked sugar snap peas, perhaps? Daikon or little red radishes? It’s all fair game! Not traditional, no, but I’m not judging.

My version of bun isn’t the most traditional anyway. Since I’m seeking great nutrition, I’m happy to swap out some of the usual pile of noodles for nutrient-dense lettuce and extra vegetables. Coconut sugar in the dipping sauce turns it a surprising deep brown, but it tastes just as good as the white sugar-laced kind. I also was unable to find lemongrass locally, so I improvised with lemon peel in the marinade. It added just the hint of lemon flavor I craved.

Because our climate puts us still weeks away still from the first harvest, I used all grocery store produce to get my fresh fix a bit early, but come May, you better believe I’m going to hit the local growers’ markets! I’m hooked for life. Some especially busy or ill seasons have kept me from the farmer stands, but I always return sooner or later. I just can’t stay way. There’s no comparing the taste and nutrition of fresh, local produce, not to mention the joy of partnering directly with those who lovingly work the land.

If you have yet to experience the difference buying local can make, I encourage you to take a step toward finding a farmers’ market today. You may be just in time for the first fruits of the growing season. Visit LocalHarvest.org and search for your location. You can also ask around at health food stores, natural food co-ops, yoga studios, and anywhere else health- or eco-conscious people gather.

Other  noodle dishes you might enjoy: 

  • Easy Thai Curry Noodle Soup 
  • Cold Thai Noodle and Vegetable Salad (gluten-, -grain-, and dairy-free)
  • Asian Noodle Salad

A few recipe notes:

(Amazon affiliate links)

  • While the ingredient “fish sauce” may sound scary and even smell a little off-putting, it tastes wonderful and absolutely non-fishy in the final dish. It simply adds wonderful umami and depth to food. I splash in a little to any kind of soup when I need a flavor boost. Check ingredients for a sauce made only of fish, salt, and perhaps, sugar. Red Boat is the purest option I know, and is often available in health food stores, but we also buy and enjoy Tiparos, which can be cheaper and easier to find. Asian markets will have the best prices.
  • Did you know you can grow your own bean sprouts in 4 days without fancy equipment? This tutorial has a special trick for making them grow thick and strong like the ones from the grocery store.
  • For a vegetarian version, top with boiled eggs instead of chicken.

Vietnamese Bun: Refreshing Noodle Salad with Vegetables, Chicken & Herbs
 
Author:
Alison Diven
Recipe type: Gluten Free, Dairy Free
Cuisine: Asian
Serves: 4
Print
 
A light, refreshing salad perfect for spring and summer produce. Can be made entirely ahead for a stress-free dinner. Feel free to use whatever vegetables are fresh from the garden or farmers' market. The marinade as written produces an intensely meaty, savory flavor that works well when contrasted with the rest of the dish. If you or your children prefer a mild, sweeter taste, replace 1 Tbsp of fish sauce with coconut sugar. Finally, for the Dipping Sauce, use the larger amounts in parenthesis if you already know you like lots of sauce.
Ingredients
Chicken:
  • ~1 lb organic or pastured chicken thighs
  • 2 Tbsp fish sauce (check label for gluten; I prefer Red Boat)
  • 2 Tbsp coconut sugar or Rapadura or Sucanat (I like Nutiva coconut sugar)
  • 1 Tbsp rice vinegar
  • zest of 1 small lemon
  • ½ tsp freshly ground black pepper
  • 2 cloves garlic, crushed
Salad:
  • 8 ounces rice vermicelli
  • 1 small head nutritious lettuce like butterhead or romaine, thinly sliced
  • 2 handfuls bean sprouts (see tutorial here for making your own), washed
  • 3 small carrots, julienned (I like this julienne peeler)
  • 1 seedless cucumber, julienned
  • 4 green onions, sliced
  • 1 handful fresh cilantro
  • 1 bunch fresh mint
  • 1 bunch fresh basil, especially Thai basil, optional
  • ¼ cup crushed roasted peanuts, optional
  • 1 lime, cut into wedges
Dipping Sauce:
  • 4 Tbsp (or 6 Tbsp) lime juice
  • ½ cup (or ¾ cup) water
  • 2 Tbsp (or 3 Tbsp) fish sauce (Red Boat is my favorite)
  • 2 cloves (or 3 cloves) garlic
  • 4 Tbsp (or 6 Tbsp) coconut sugar (Nutiva brand is excellent)
Instructions
  1. Combine chicken thighs and all marinade ingredients in a dish and leave in refrigerator for at least several hours, and preferably overnight.
  2. Prepare vermicelli according to package instructions. (Can be done ahead, refreshing noodles in warm water before serving.)
  3. Prepare dipping sauce by mixing the lime juice, water, fish sauce, garlic, and coconut sugar together until well combined. (Can be made ahead; chill until serving time.)
  4. Heat broiler on high. Shake marinade off chicken, place on broiler-safe pan, and broil for 3-4 minutes per side, watching closely to avoid burning. Allow to cool slightly and cut into slices.
  5. Assemble the salads by dividing noodles, lettuce, carrots, cucumber, green onions, herbs, and chicken among 4 large bowls. Top with crushed peanuts and lime wedges if desired.
  6. Sauce can be served in 4 small bowls for dipping, or poured over the top of each salad.
  7. Enjoy!
3.2.2265

Looking for more springtime inspiration? The Nourishing Gourmet has got you covered!

Spring Is Here Asparagus Egg Drop Soup
Tangy Lemon Curd (Honey Sweetened and Dairy Free)
Spring Green Frittata
Healthy Strawberry Lemonade (Stevia-Sweetened)
Nourishing Nettle Soup

Filed Under: Dairy Free, Gluten Free, Main Dishes, Salads

Sriracha-Lime Salmon One-Pot Meal + Seafood FAQs

March 12, 2014 by Alison Diven 18 Comments

Sriracha-Lime Salmon One-Pot Meal + Seafood FAQs

By Alison Diven, Contributing Writer

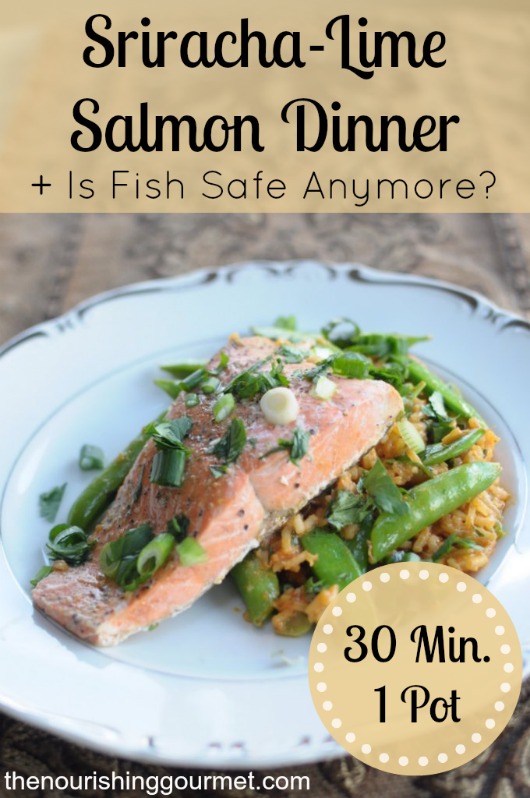
Think fish is bland? Tricky? Nah. If you like easy food with flair, get a load of this: Sriracha. Lime. Ginger. Tamari. This one-pot, 30-minute salmon dinner is like a kick in the mouth. The good kind, of course. Everyone from my toddler to my picky foodie father loves this recipe!

I developed this recipe as part of my own family’s quest to eat more seafood. I’m sure you’ve seen information about anti-inflammatory omega-3 fatty acids, found in high concentrations in seafood, and the need to balance omega-3 and omega-6 ratios. For a while, I took high-dose EPA-DHA fish oils, but these days, I’m mostly seeking the full nutritional package by eating the whole food. Seafood-eating people groups have long boasted exceptional health, and even Weston A. Price was impressed with traditional diets in costal regions. It’s not just about the omega-3s either. There’s also selenium, zinc, iodine, and who knows what else we haven’t yet identified. (For the record, I do still take fermented cod liver oil for the concentrated vitamin A and vitamin D.)

So, with a new family goal of two seafood dinners per week, plus leftovers for lunch the next day, I’ve been on the hunt for more recipes! One night I stumbled upon a one-pot salmon dinner from RealSimple.com. It was fabulous and easy, but after a couple of repetitions, I craved variety. That’s when this recipe was born. I recycled the cooking method but did a total flavor makeover, combining my favorite pho condiment, sriracha, which seems to be quite the trend these days, with other punchy ingredients like lime, ginger, and cilantro. A little coconut milk in the rice plus extra sugar snap peas beefed up the nutrition too.

But before we get to the recipe, maybe you have questions about seafood, especially its safety and affordability. Let’s take a quick look at the most common ones.

Isn’t seafood high in poisonous mercury these days?

You’ll see two main camps on this issue. One side says mercury in seafood is dangerous, period. The other side says not necessarily. They argue that selenium protects against mercury absorption, so as long as the fish you eat has more selenium than mercury (and most do), you’re golden. Chris Kresser is among the latter group and published a thorough, thought-provoking article on the topic here. I myself find the selenium argument persuasive, but just to be safe, I still mostly choose fish very low on the mercury scale. Here’s a useful chart for selecting low-mercury fish yourself.

What about PCBs and dioxins?

Again, I’ll reference Chris Kresser’s article. While PCBs and dioxins, both industrial waste toxins, are a health concern, seafood seems to be the least of our worries in exposure to them. Meat, dairy, and vegetables all far outpace fish. Unfortunately, we live in a polluted world, land and sea. Since not eating isn’t an option, I’m just make the best choices I can. For me, that includes fish.

But seriously now, what about radiation from Fukushima?

This one gives me real pause, largely because it’s hard to find solid information. On one hand is the contingent preaching certain death and disaster, and on the other the government party line on perfect safety. I suspect the truth is somewhere in between.  (If you’re wondering what on earth I’m talking about, “Fukushima” refers to the Japanese nuclear power plant meltdown following March 2011’s tsunami. Read more here. Basically, people are concerned about radioactive particles in seafood . . . plus a host of environmental consequences.) Many health conscious people have stopped eating Pacific seafood entirely, while others are selective. The Healthy Home Economist recently shared her sobering research on Pacific tuna (if you follow the Nourishing Gourmet on Facebook, you’ve already seen this one!), and here’s a recent article on the kind of testing on seafood and kelp that’s underway these days. All I can say is do your own research. We’re ditching Pacific tuna in my house, not that we ate much anyway, and sticking to Alaskan salmon, sardines, and Atlantic wild catches. I think the benefits of careful seafood consumption still outweigh the risks.

Seafood is expensive! How can I afford it?

You’re in luck here because Kimberly has already written a great article on this topic, 6 Tips for Eating Seafood on a Budget. Tip #6, use frozen and canned, is especially useful in my home because we live in landlocked New Mexico. Wild-caught frozen salmon from Costco, wild-caught canned salmon from our Azure Standard co-op, and wild-caught sardines are mainstays for us.

Is farmed seafood ever okay?

I always thought the answer was “no,” but in reading up for this article, I discovered I was wrong. Mark Sisson summarizes some healthy farmed options here, like shellfish (except from Asia), tank-farmed fresh water Coho salmon, and US trout. Who knew?

Am I supposed to eat the skin?

I was always confused about this growing up. The answer is YES, as long as you’re eating top-quality fish, please eat the skin. It’s full of healthy fats, different proteins from the flesh, and well, it’s a part of the animal that people have been eating forever. Talk about a traditional food! If it’s a little soggy from your preparation method, take it off the fish and set it aside. Later, crisp it up on the stove or in the oven, sprinkle with salt, and enjoy.

So, are you ready to dive in? Try it out this addictive recipe next time you need a nourishing meal fast. You’re gonna love it!

Sriracha-Lime Salmon One-Pot Meal with Rice & Snap Peas
 
Author:
Alison Diven
Cuisine: Asian Fusion
Serves: 4
Print
 
Punchy and spicy, here's one flavor combination you won't soon forget! And at only 30 minutes start to finish--prep time happens alongside cooking--with time to spare for setting the table, you'll love the convenience too. If you prefer to eat brown rice, you can try adding more cooking time at the beginning.
Ingredients
  • 1 cup medium grain fragrant white rice, like basmati or jasmine
  • 1 cup full-fat coconut milk (preferably BPA- and gum-free, like Natural Value)
  • 1⅓ cups water
  • 4 wild-caught salmon fillets, 4-6 oz each (frozen works well)
  • salt & black pepper
  • 10 oz sugar fresh sugar snap peas (or snow peas, green beans, or broccoli florets)
  • 2 Tbsp lime juice (1-2) limes
  • 2 Tbsp sriracha (I especially like Organicville because it's additive-free and extra delicious)
  • 4 Tbsp tamari sauce
  • 1 Tbsp grated fresh ginger (I use a microplane like this one)
  • 4 green onions
  • 1 small handful fresh cilantro
Instructions
  1. Put the rice, coconut milk, and water in a large skillet and bring to a boil over high heat. Reduce heat to low and cover, cooking for 10 minutes.
  2. Meanwhile, season the salmon fillets generously with salt and pepper, and prep sauce ingredients. Juice the limes, grate the ginger, slice the green onions, and wash and chop the cilantro.
  3. After the rice has cooked for 10 minutes, stir it quickly and then place the salmon fillets on top. Replace the lid and cook for another 7 minutes.
  4. Meanwhile, assemble your sauce by combining the lime juice, sriracha, tamari, ginger, green onions, and cilantro--reserving a small amount of green onions and cilantro for garnish.
  5. Add the sugar snap peas to the skillet and replace lid, cooking for another 3-5 minutes, until the snap peas are bright green and the salmon cooked through.
  6. Pour the sauce over all the ingredients and serve family style. Or, for a nicer presentation, remove the salmon and add the sauce just to the rice. Stir to combine and pile rice on individual plates, topped by a salmon fillet, and garnished with the reserved green onions and cilantro.
3.2.2265


Even More Nourishing Seafood Recipes

Want more inspiration? Don’t miss these other healthy recipes at The Nourishing Gourmet:
Fresh Herb & Clam Sauce over Pasta
Broiled Black Cod Salad with Blackberry Dressing
Sardine Salad with Toast
Salmon with Basil Romesco Sauce
Crispy Fish Cakes with Double Mustard

And here are a few of my personal favorites from around the web:
Salmon Fish Stew, Brazilian Style from Simply Recipes
Sherried Sardine Toast by Alton Brown
Dad’s [White] Fish Stew from Simply Recipes
Shrimp, Pea & Rice Stew from Oprah.com

What are your favorites? I’m always looking for ideas!

Filed Under: Dairy Free, Main Dishes, Nutrient Dense Foods Tagged With: Salmon, Seafood

« Previous Page
Next Page »

Primary Sidebar

Follow Me

  • Facebook
  • Instagram
  • Pinterest
  • RSS

Search

Please Read:

The information you find here at The Nourishing Gourmet is meant to help you become a better cook! This site is primarily for sharing family friendly recipes. It's not meant to give medical advice or to make any health claims on the prevention or curing of diseases.This site is only for informational and educational purposes. Please discuss with your own, qualified health care provider before adding in supplements or making any changes in your diet. Also, any links to sponsors or affiliates (including Amazon) may give me a percentage of the sale or a pay per click. Thank you for supporting this site.

Categories

  • $10 Main (43)
  • $5 Dishes (43)
  • 52 ways to save money on a healthy diet (53)
  • AIP (23)
  • Baked Goods (84)
  • Beverages (72)
  • Breakfast and Brunch (63)
  • Condiments (8)
  • Dairy Free (498)
  • Desserts (185)
  • Dietary Needs (6)
  • Egg Free (14)
  • Egg Free (92)
  • For the Kids (70)
  • For the Love of Food and Books (18)
  • Gluten Free (491)
  • Grain Free (98)
  • Health (75)
  • Kitchen Tools (5)
  • Main Dishes (128)
  • Nourishing Frugal Recipes (169)
  • Nourishing Frugal Tips (70)
  • Nourishing Practices (57)
  • Nutrient Dense Foods (70)
  • Q and A (16)
  • Salads (40)
  • Sides (104)
  • Snacks (126)
  • Soups (50)
  • The Healthy $1 Menu (21)
  • The Low Energy Guide to Healthy Cooking (20)
  • THM (5)
  • Trim Healthy Mama (5)
  • Uncategorized (848)
  • Vegan (243)
  • Vegetarian (363)

Recent Posts

  • Eating for Comfort and Sustenance
  • Perfect Instant Pot Black and Brown Rice
  • What Worked and What Didn’t in My Cooking Life Last Year
  • Mocha Dark Chocolate Bombs (low sugar)
  • Gingerbread Caramel Corn
  • Thyme and Garlic Potato Stacks
  • The Great Big Holiday Salad
  • 30 Favorite Kitchen Stocking Stuffers
  • Luxurious DIY Lip Balm
  • Spicy Korean Beef and Cabbage

Recent Comments

  • June on One-Pot Gluten-Free Mac and Cheese
  • Kim on Eating for Comfort and Sustenance
  • Michelle Sanders on Chile-Spiked Dark Chocolate Bark with Pepitas & Mango (Dairy Free)
  • KimiHarris on Eating for Comfort and Sustenance
  • KimiHarris on Eating for Comfort and Sustenance

Fresh: Nourishing Salads for All Seasons

Footer

Privacy

Copyright © 2026 · Foodie Pro & The Genesis Framework